- Impex
- Documentation
- A manual for understanding and using the Impex Control Center
Introduction
The Impex Control Center (from here on ICC) is the appliance for fleet management of Impex scanners. These scanners can be USB Protect stations - the physical stations that are kiosks where removable media is handled - and DataLocks - which scans and controls network flows.
This manual will go through the functionality of the ICC explaining how to use it.
The ICC will contain the master configuration for the USB Protect stations and the DataLocks, which is edited using the graphical user interface. The ICC is also receiving scan records and meta data when a check has been performed on an USB Protect station or in a DataLock. If a USB Protect station or a DataLock is configured to send files to the quarantine, the ICC also receives copies of the files that are to be quarantined.
Normally an ICC server is a virtual appliance, but it can also be installed on a physical server.
History
In the beginning Impex stations all had the same configuration and fetched their updates from the same server. When customers started deploying Impex stations inside of their infrastructure with different configurations it quickly became apparent that each customer needed their own server with their own settings. The ICC was developed to address this need. It is a web based server component which contains configurations for all Impex scanners within an organization.
Components
The ICC server contains a web application, a web server, a database, several scripts and system timers. It runs tightly integrated with the operating system, a version of Linux1. All components are packaged using the RPM packaging system with signed packages. This mean that all packages gets validated, that they come from the right trusted source repository and that all package content has been intact since its release, i.e. check that it has not been manipulated.
The operating system packages, Impex software packages and all anti virus signature updates are synchronized with an upstream repository server which in the common case is updates.sysctl.se. These updates are then provided to the Impex stations connected via the installed ICC server.
Network Setup
The main update server is hosted by SYSCTL. All customer ICC-servers need to fetch their updates from it. Usually this is done through the company proxy using proxy authentication. The ICC-server will verify the certificate of the remote server and then fetch any available updates. This is done over TLS (HTTPS) and done several times per day.
The Impex Stations in turn, connect to their configured ICC-server and fetch their updates from it. This is also done over TLS and they also verify the ICC-server’s certificate before establishing the connection.
To summarize, only port 443 using TCP needs to be open between the network components and only in one direction.
If the malware alert function is to be used the ICC server also needs to be able to connect to a SMTP server specified by the customer.
Time
All time is fetched via the ICC server as well which in turn fetches it from the main repository server. This is also done over the TLS connection.
Overview page
After logging in, the first thing displayed on the dashboard is a collection of graphs aggregating information from the last 1000 scans. You can also select data for specific time periods, including 1 week, 1 month, 3 months, or all time.
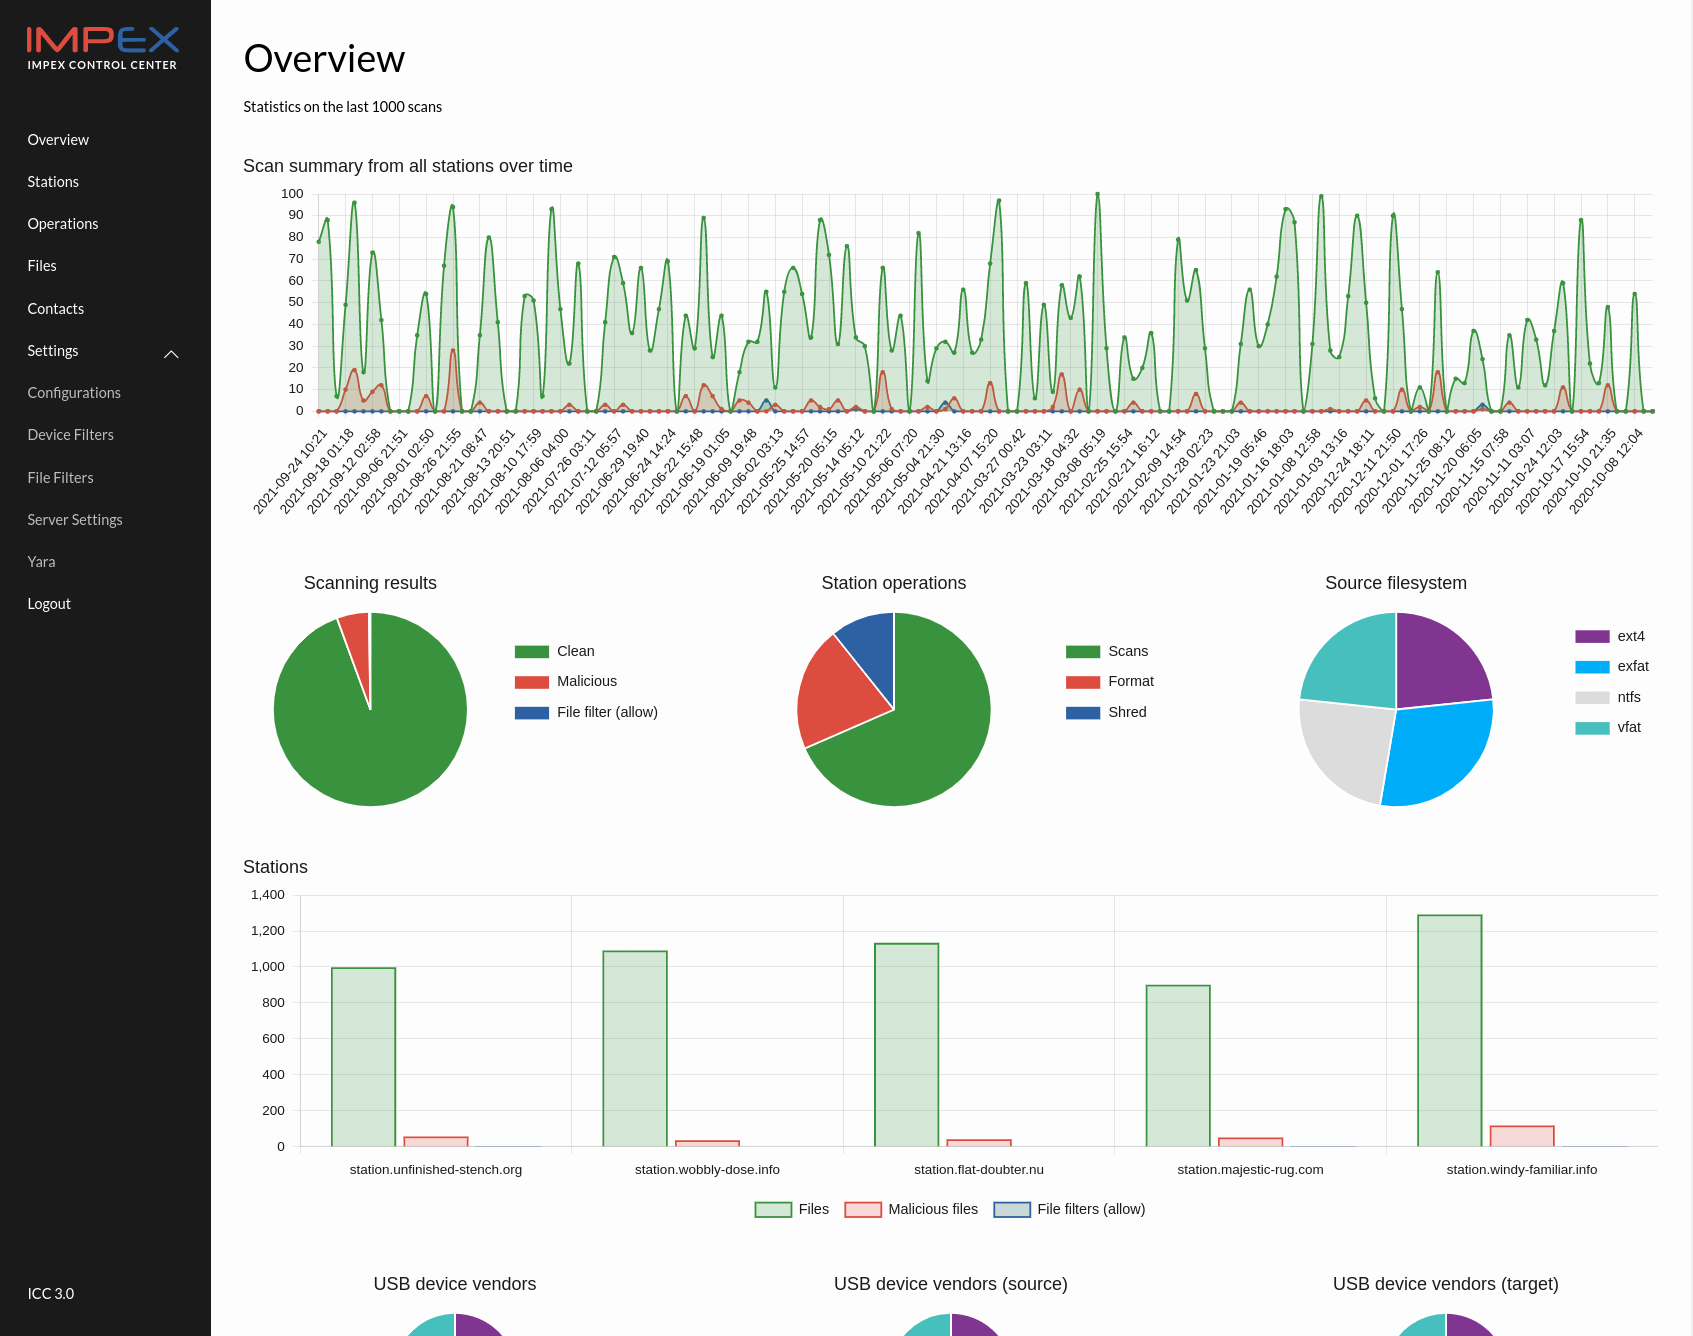
The overviews show the different USB vendors used, how many stations have been used, a timeline and a grand total of clean files, malware and allowed files2 scanned and found.
Navigation menu
The side navigation is always visible and roughly groups the available functionality of ICC.
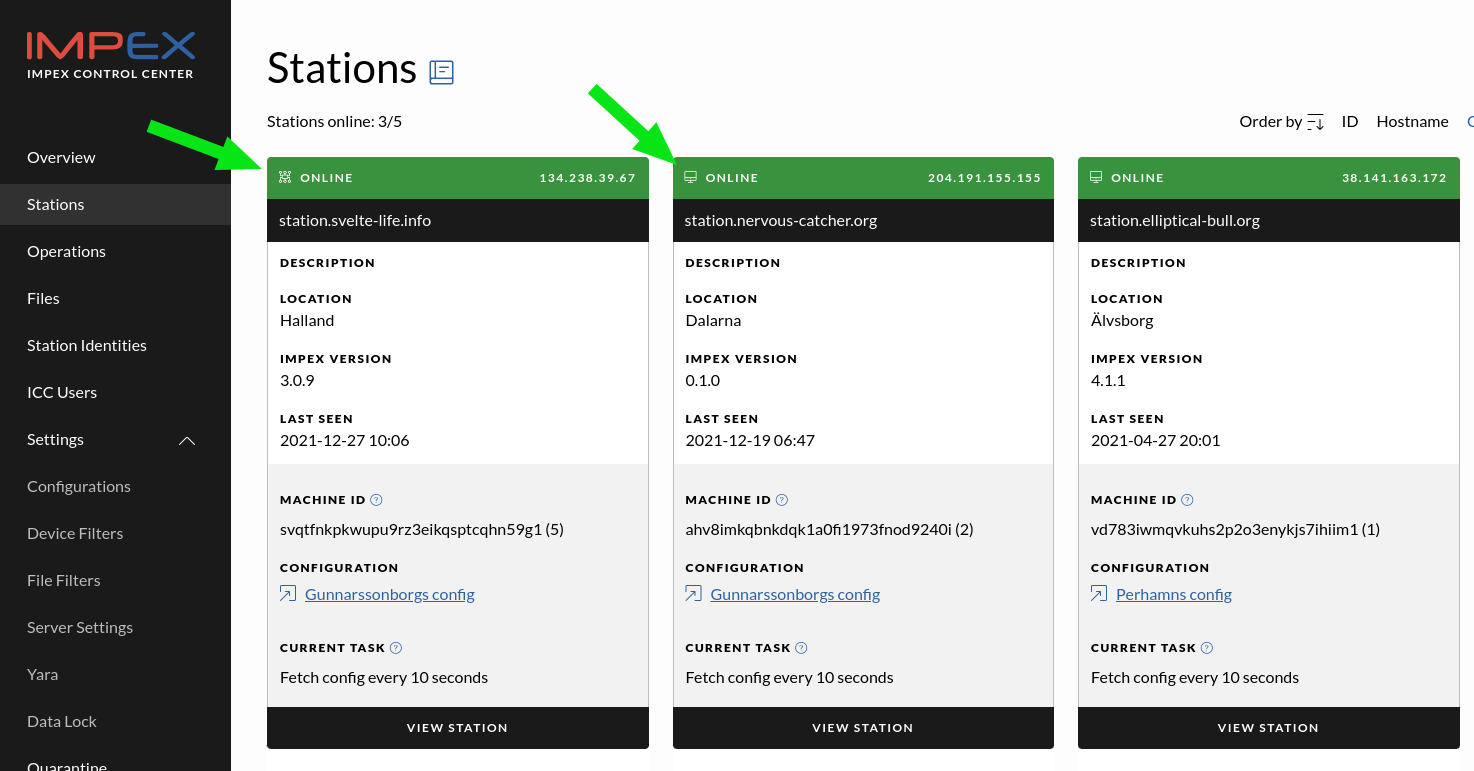
Stations
The stations page lists all registered and approved stations, each station is represented as a card. When a new Impex Station is installed and connected to the network it will first register with its configured ICC server. It will then wait for an administrator to log into the ICC server and click the “Approve” button. This process is explained in detail in the work flow chapter Registering a new Impex Station.
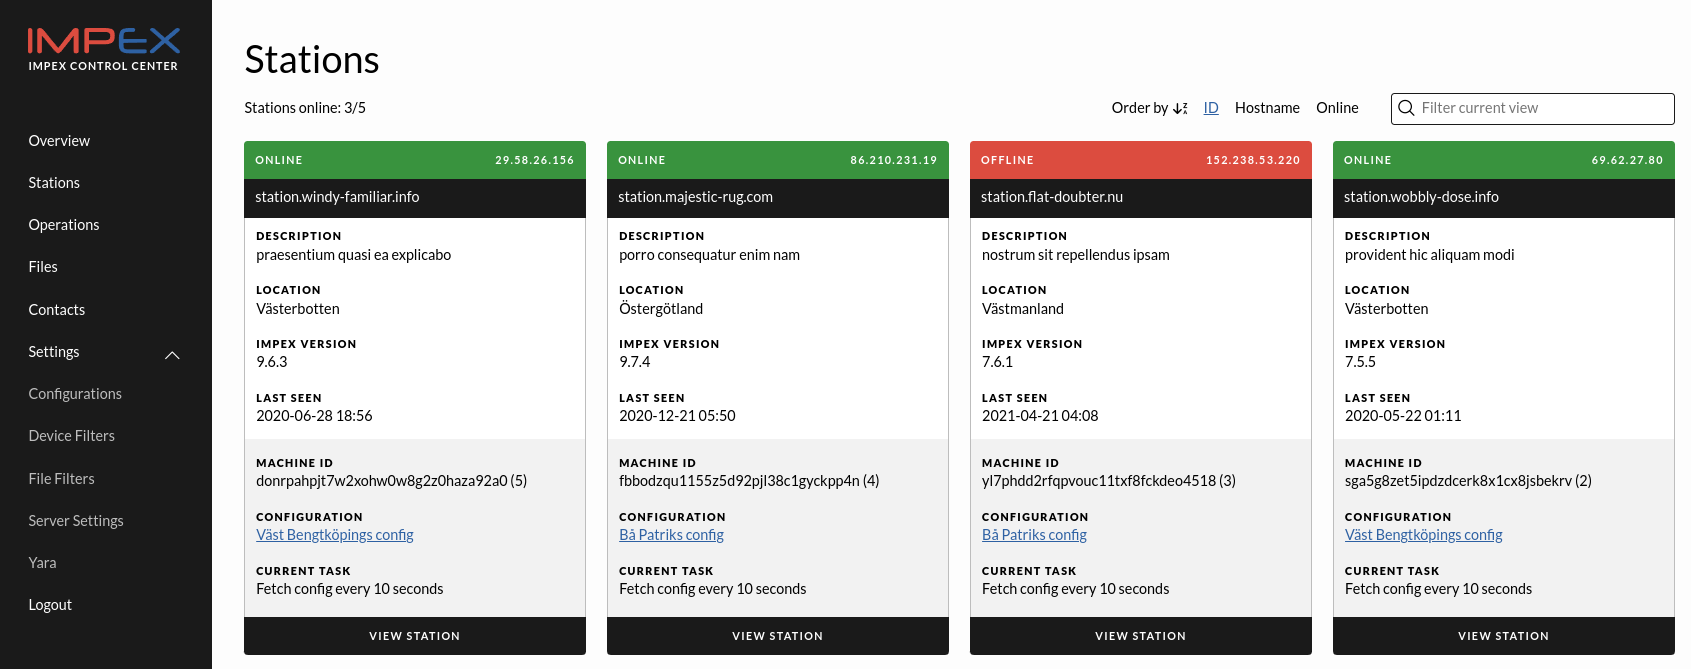
Station Card
The station card contains information that can be set by the administrator helping the administrator to identify and locate the station. The fields can be edited in the station detail view.
- Station name, defaults to the hostname the station had when it registered and the IP address that the ICC saw the station registration coming from. Note that this can be set to any string. It is not used by the system in any way.
- Description, station description
- Location, station location
- The Last seen, shows when last the station was seen by the ICC server. When last seen is more than three hours ago the status of the card changes from “Online” to “Offline”
- Machine ID, unique per Impex Station installation and can also be seen on the “System Information” page on the Impex Station. Within parenthesis the Station ID is shown. This is the ID allocated by the ICC for this station.
- Configuration, the Configuration this station is using. Click on it to go to the configuration
To edit or view more details about the station and its operations, click View station.
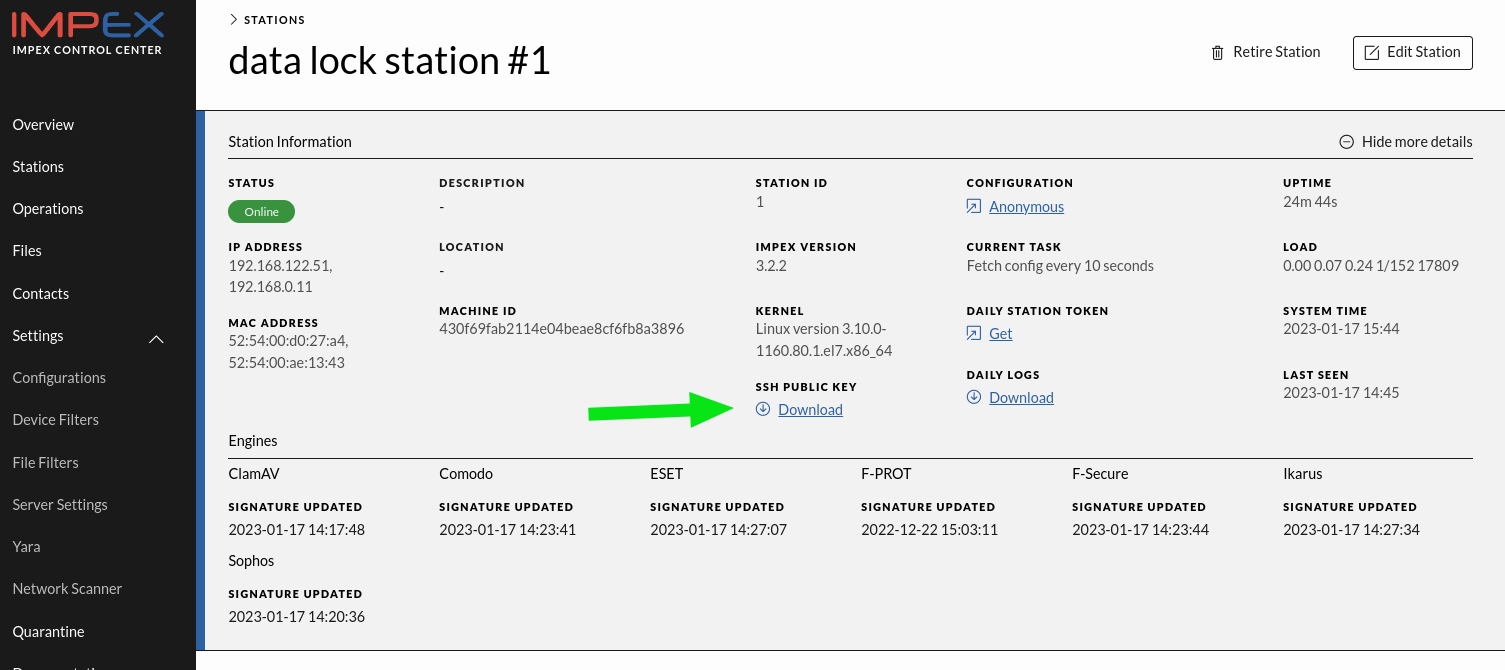
Station Details
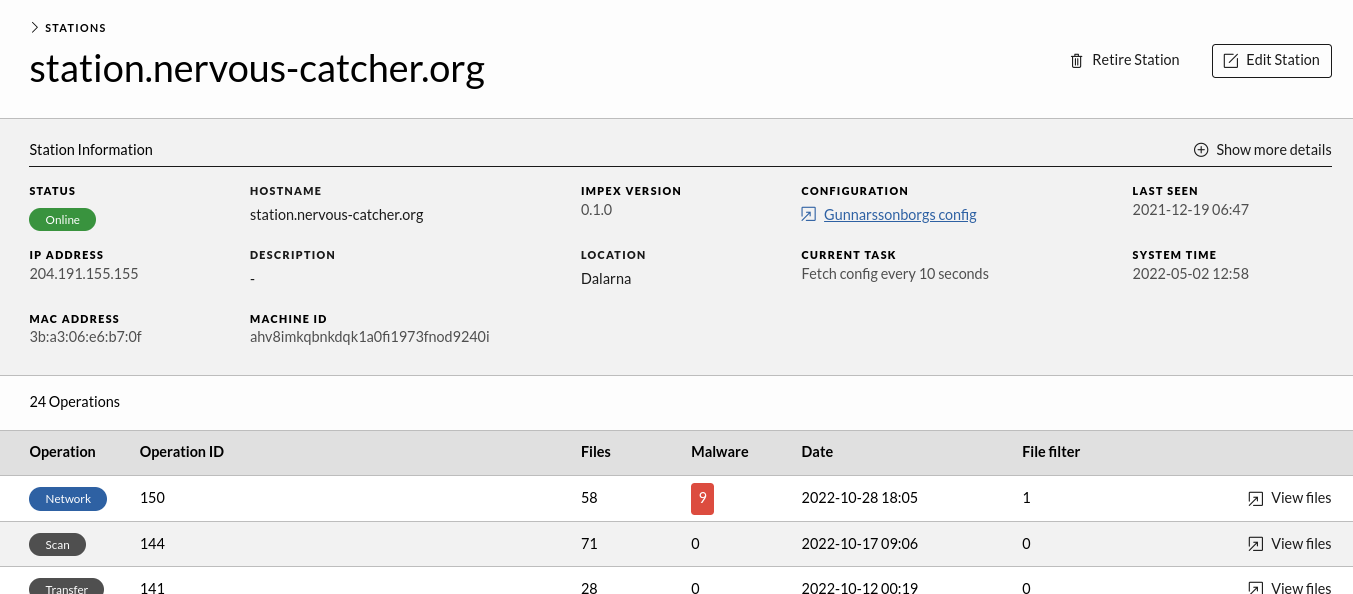
The Station Detail view contains station information and the operations belonging to it. This includes scans, formats and shreds. Here one can edit station information details.
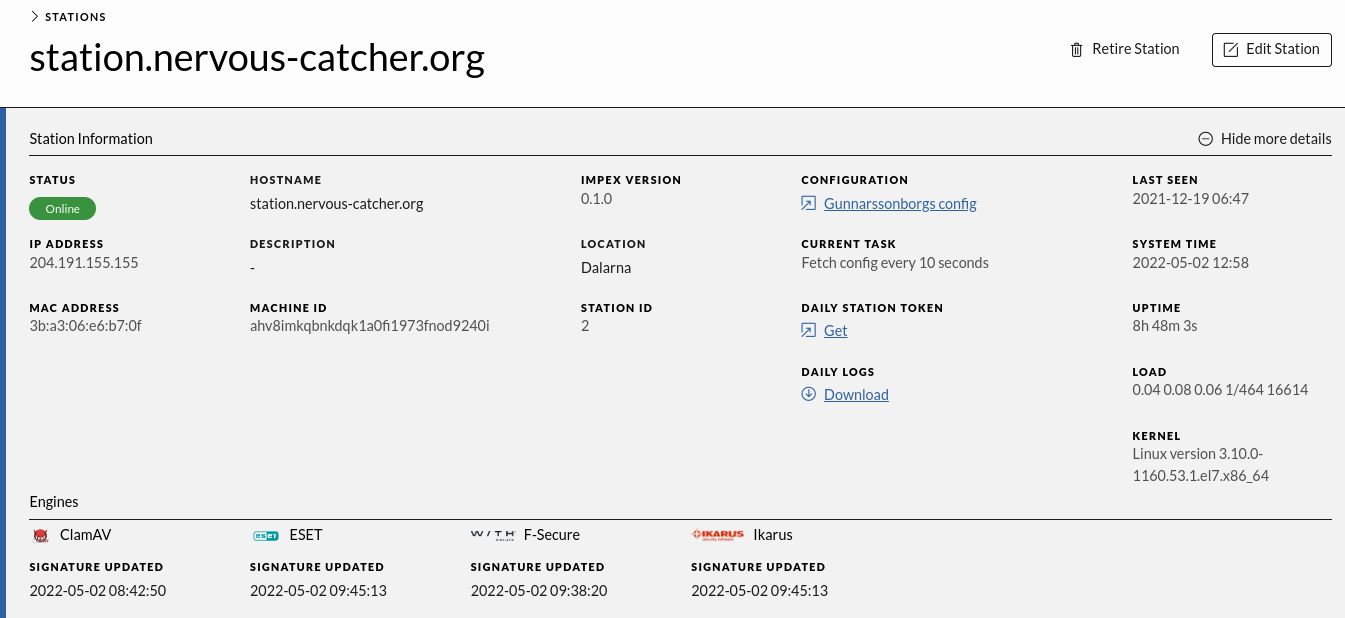
Clicking “Show more details” also shows information about the Scanning Engines used by this station and their status.
Notable fields in the expanded view is explained in the sub chapters
Station name
Here set to station.nervous-catcher.org, this can be set to any string
Hostname
The value here is used to set the impex station’s hostname
Configuration
Link to the configuration used by the station
Daily Token
This link leads to the daily token used for station administration. The token is a password that can be used to login locally on the station by an administrator. We refer to the station operation guide or SYSCTL support for more information on how to login
Daily Logs
Stations upload their log files to the ICC once every night. If a station is rebooted it will upload its logs after one minute. This is useful if something happened during the day and the logs need to be inspected without having to wait for the nightly log upload.
To download logs:
- Navigate to Stations in the left pane and then choose View station for the station you want logs from.
- In the station view, select Show more details to display the full information panel.
- Under Daily Logs, click the Download link to retrieve the compressed tar file containing all available logs for that station.

If the logs need to be reviewed for application-related issues, make sure Send Application Logs is enabled in the configuration card before the station uploads logs to the ICC server.
Note: The downloaded file is a compressed .tgz archive. Inside, each log is stored as a plain-text file along with any rotated, compressed log files.
Network edit signify bundle
This bundle when used will make it possible to change network settings on the stations. Note that the bundle is restricted to only run on the stations connected to the ICC and is only valid for a week. The bundle gets re-generated every Monday morning. This precaution is there to make sure a misplaced USB drive cannot be misused.
SSH Public key (DataLock only)
The public SSH key for the station. This can be used to cryptographically verify the produced receipts. Read more about this in the Datalock chapter.
Station Operations
The different operations performed by the USB Protect station and the DataLock will get logged and transferred to the ICC server where it is stored as a historic database over actions that have been performed by the different devices and the different users.
- Format. A user has requested that an USB device be formatted to remove its content. This operation is performed on an USB Protect station.
- Shred. A user has requested that an USB device be shredded to remove its content. This is a more in-depth version of media formatting. This operation is performed on an USB Protect station.
- Scan. A user has requested that a USB device be checked when it is inserted into one USB port. This operation is performed on an USB Protect station.
- Transfer. A user has requested that the content of a USB device be checked as it is transferred onto another USB device. This operation is performed on an USB Protect station.
- Network. A network file upload has been done to a DataLock.
In the picture below, you can see the different operations that have been performed by different devices under the control of an ICC.
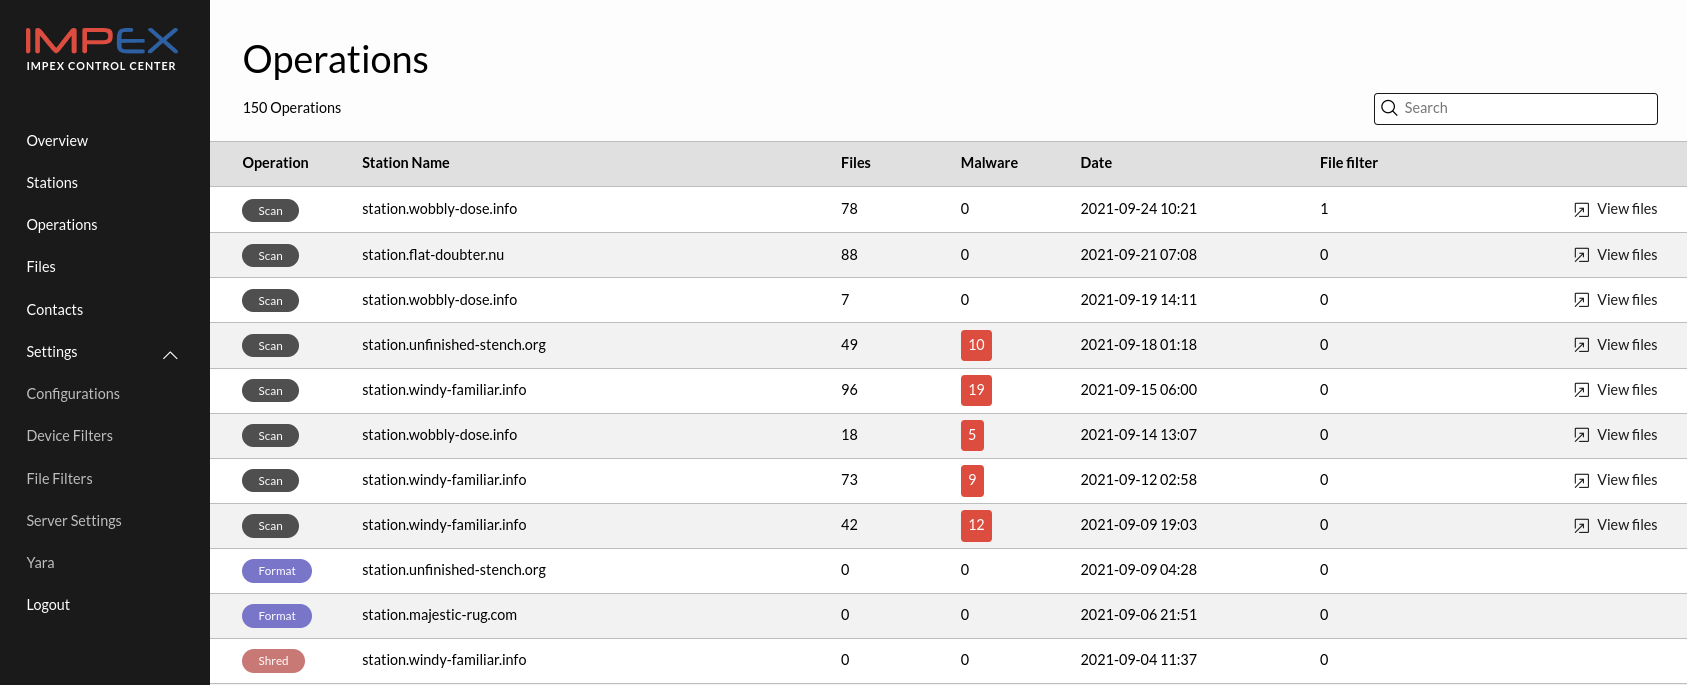
When an Impex Station is used the operation result is uploaded to the server3. The Operations page shows all scans, formats and shreds from all stations.
Each row is an operation. To see more information, expand the row by clicking it.
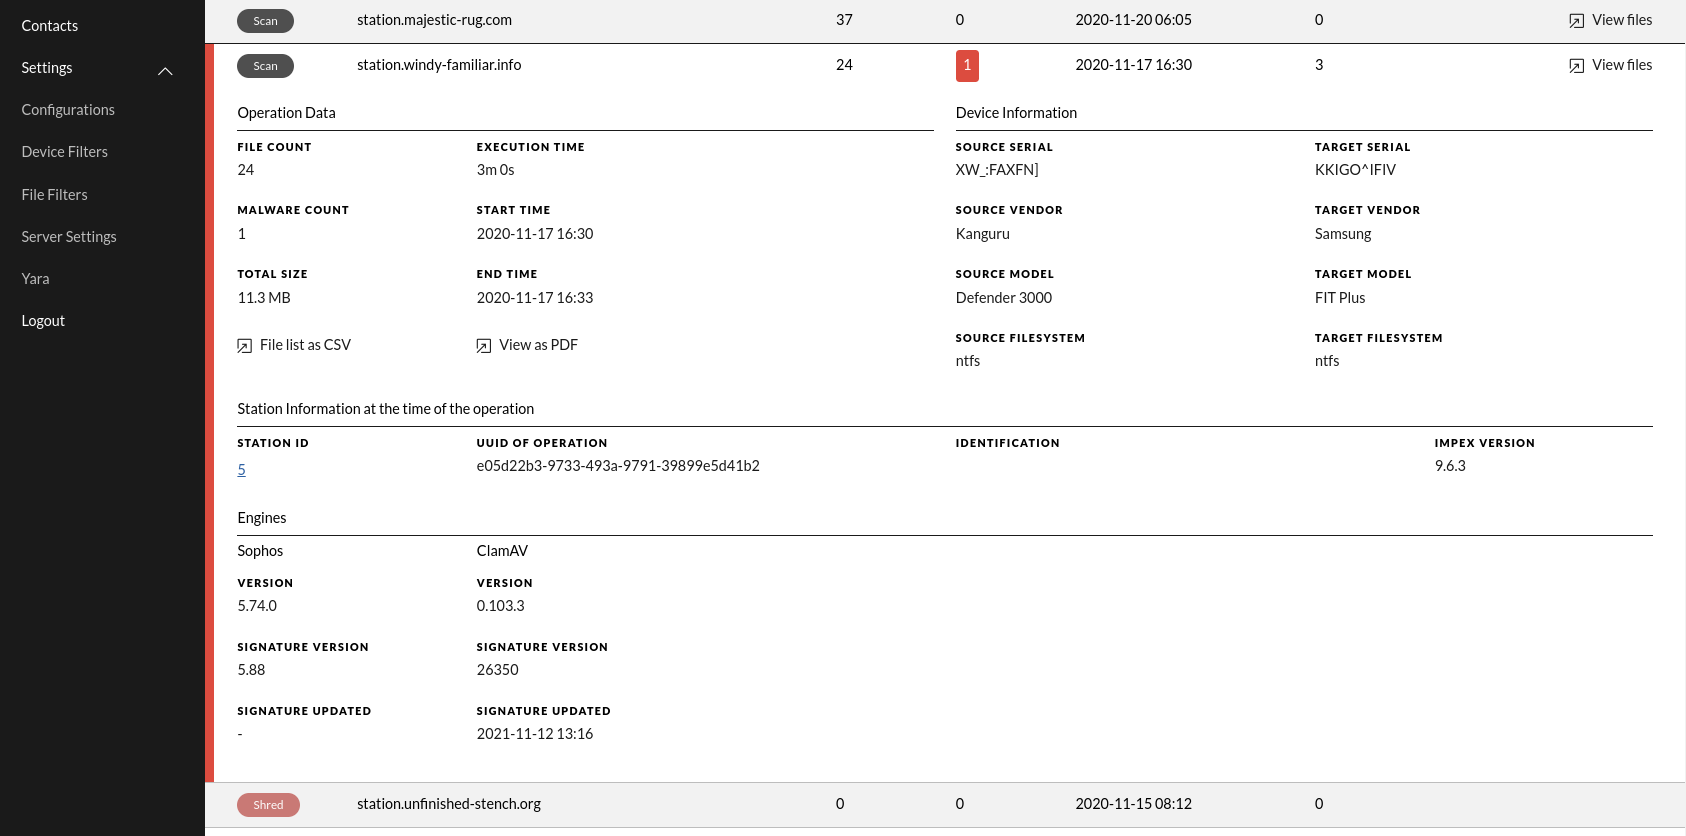
The expanded view contains detailed information about the operation. Most are self explanatory but these are explained in detail:
This information is especially useful when writing USB device black and whitelists.
- UUID of scan, an unique number for this operation which can be used for reference
- Identification, in the case that “Require Identification” is turned on, this fields will contain the identification field’s value entered when doing the operation
Scanning engines used, their DB versions and last updated signatures are also included, as well as Impex software version running on the station.
In the case the operation is a Scan operation, the view, including the files, is also available for download as a PDF or as a CSV file by clicking the “View as PDF” or “File list as CSV” button. The PDF report is limited to include a maximum of 1000 files due to the resources used. This is approximately 128 pages and takes about 10 seconds to generate.
To see the actual files belonging to a scan operation, click View files.
In the case of a “Scan Only” operation the USB target fields are empty, otherwise they contain the serial id, vendor and model information for the target USB device.
The source and target USB device fields are useful when creating Device Filters.
ICC Users
This view lists the ICC users. These are the users that can login to the ICC. They can be normal admin accounts, super admin accounts and read only accounts. The read only accounts can view everything but change nothing.
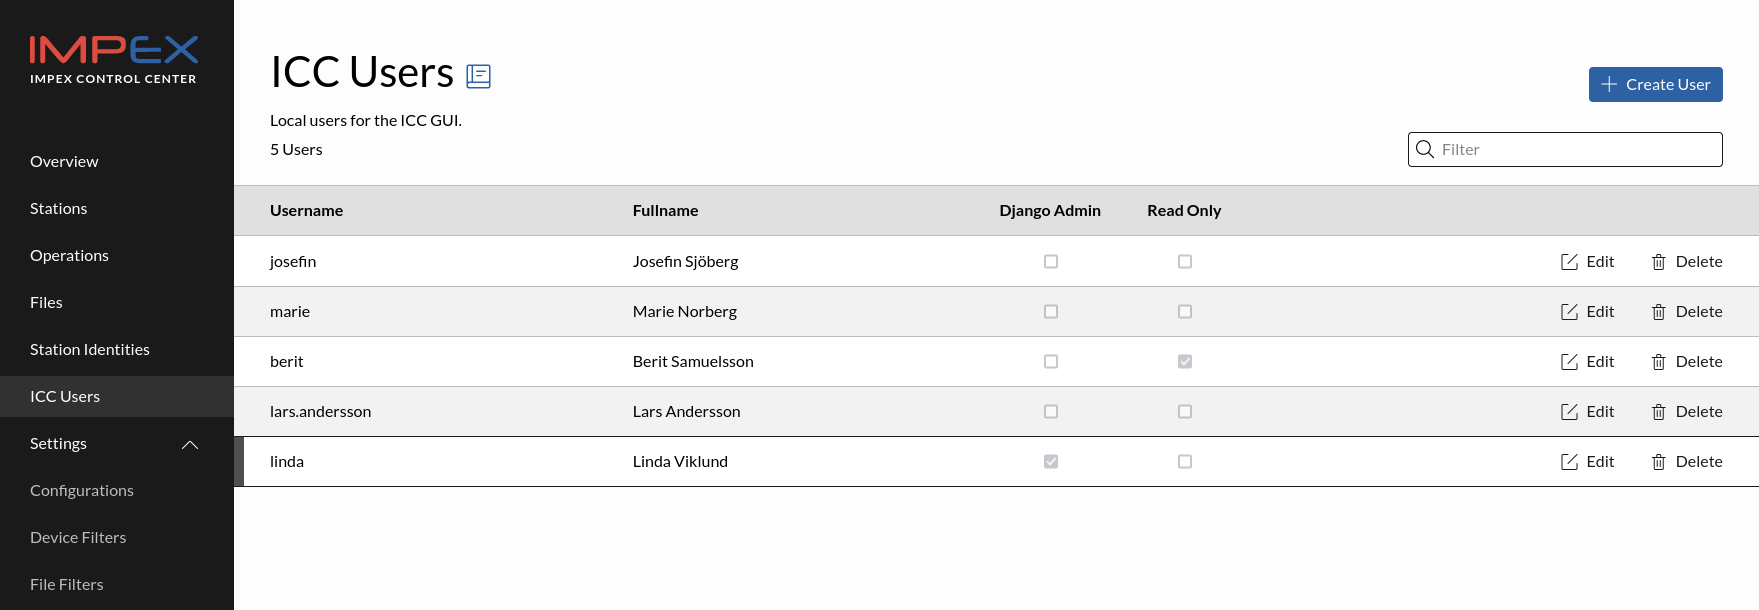
To create a new user, click “Create User”. All users created here will have so called staff status, this means they can view, edit and delete everything. If the read only box is checked they can still view everything but they cannot change or delete anything.
“Super Admin” access means that the user can also access the /admin page. This is something that normally is never needed. This view gives raw access to the database behind the ICC and changing anything here can make ICC stop working and thus, the entire fleet of Impex scanners connected to it.
Files
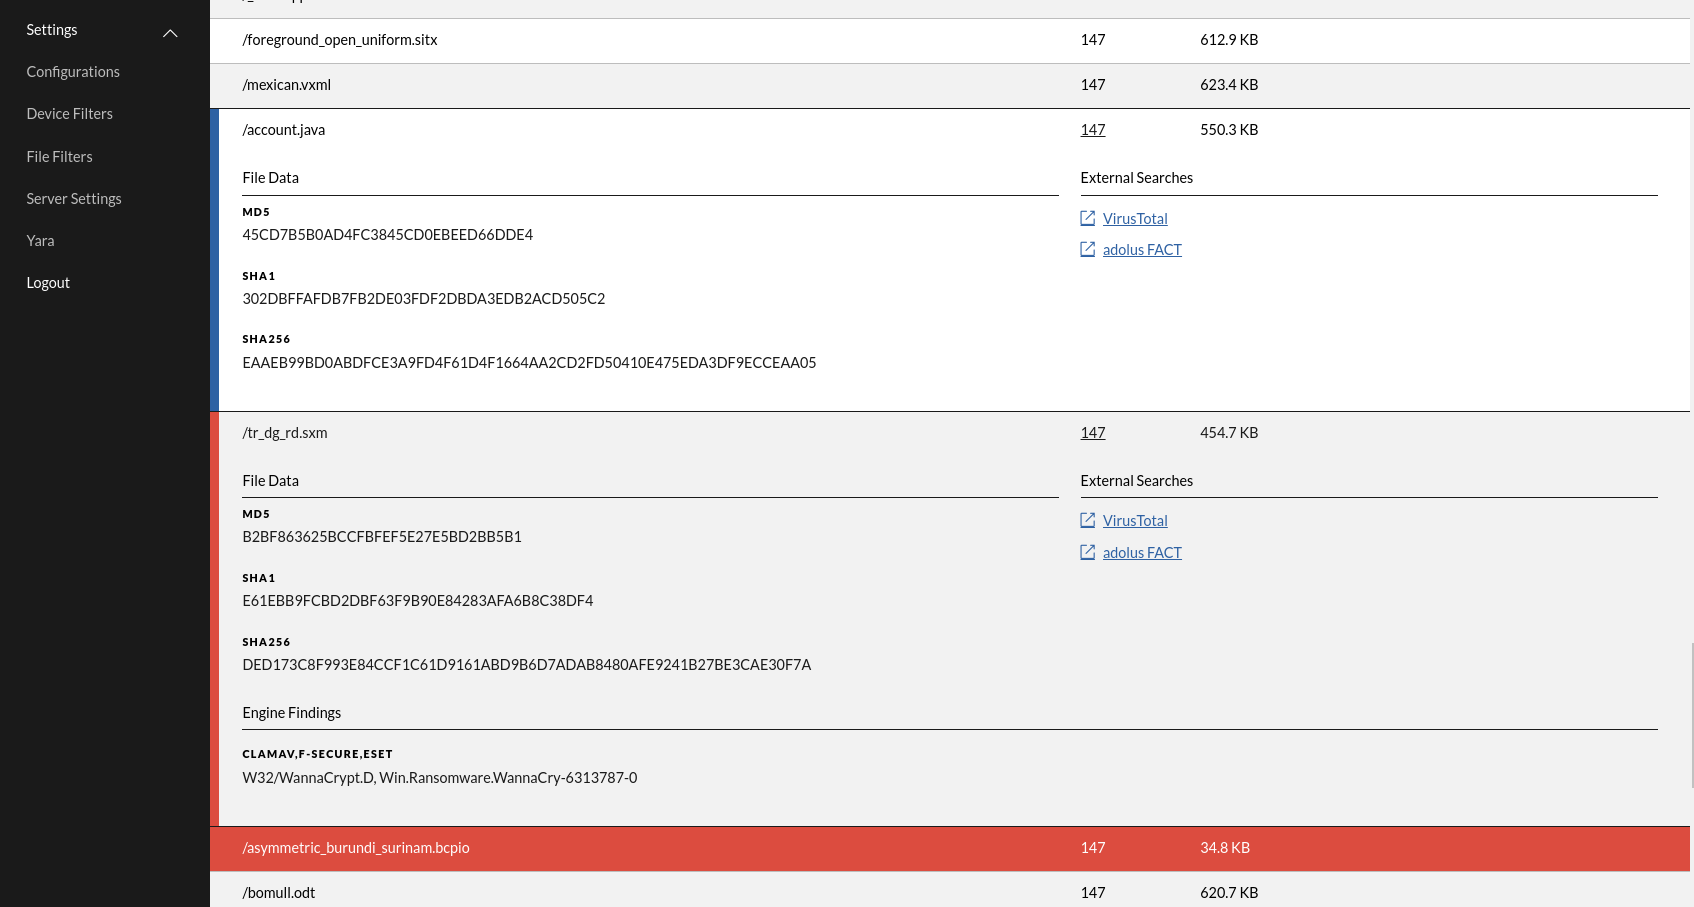
This view lists all the scanned files. If one came here through clicking on View Files on the Operations-page they are automatically filtered on the Operation ID.
Each row is a file and by clicking on it, it expands and lists more details:
- Size, size of the file in bytes
- Operation ID, the operation id this belongs to
- Engine Findings, this section contains names of the scanning engines that tagged this file as malicious and the tags from that engine for this finding.
- MD5, SHA1, SHA256, different algorithm checksums for this file
- Filter Rule, name of the matched File Filter rule, if any
If you are looking for a specific file, use the “Search” box at the top of the page. Note that this will do a text search on the entire file database.
Configurations
This is where the control is in the Impex Control Center. Each section is a configuration group setting, configuration card, that can be assigned to a station in the station detail view. The idea is that one has a configuration setting, for example the internal ICS/SCADA environment and then another for the Impex stations in the office areas. That is, two configurations but many stations.
In the configuration you specify which scanning engines you want active, which options should be activated in the Impex Station, which ICC server to report to. You can also choose which, if any, Device or file filters should be used.
Settings
Require identification
If this check-box is ticked, the user has to provide identification to use the Impex Station. This can be anything (depends on the policy set by the company). If the user wants a scan report it needs to be an email address. Note that the ICC admin must have configured SMTP correctly for this to work and also ticked the box “Send scan reports”.
Email Scan Reports
If this checkbox is ticked, the user will get an scan report via email. This require that the user is identified by a valid email.
Email scan report type
Normally the email that gets sent on a scan only contains basic information on the scan. Potentially sensitive information like file names are not included. By changing this setting one can get a PDF report attached to the email or a PDF report and a zipped CSV file with all the files scanned. These are just like the reports one can download from the Scan view.
The PDF report, due to resource limitations, contains a maximum of 1000 files. Files with malware hits will be included first to ensure that they are included even if the scan contains more than 1000 files.
The CSV report, due to size limitations, will only be produced and attached if the amount of files are below or equal to 800 000.
Save Report on USB
Enabling this option will add scan reports to a “.impex” folder alongside scanned files for the transfer and Xtransfer operations. This increases traceability as the scan results stays with the scanned files and also lets you more easily separate “clean” from “dirty” USB devices. This option does not include the scan only operation which needs to be toggled separately. Supported report types are:
- CSV
- JSON
Report on “Scan Only”
This option also saves scan reports on USB when performing a scan only operation. Normally the source media is never touched when doing a scan so this option changes that behavior. Reports cannot be added for readonly devices such as CD-R discs.
Sign Saved Reports
With this option enabled, reports saved on USB will be signed. The signature is made with the station’s SSH key which in turn is signed by the ICC. Standalone stations without an ICC can therefore not use this option. With the signature along with the checksums from the report, it is possible to prove the authenticity of the scan result.
To verify the signatures on reports from a specific station you first should make sure you have the ICC public key from your ICC, it can be downloaded using the “Download ICC Signify Public Key” link on the “Server Settings” view in the ICC.
Given that you have a signed transfer, either from a target USB drive or an import from an Xtransfer to a network share, that has the following file listing:
fil1.txt
fil2.txt
.impex/
.impex/key.pub
.impex/key.pub.icc-sig
.impex/scan_report.pdf
.impex/scan_report.pid.sig
On Linux you can then verify that the key.pub is properly signed by the ICC signify key with:
$ signify -C -p icc_signify_pub -x key.pub.icc-sig key.pub
Create an allowed_signers file:
$ echo -n "usbprotect $(<key.pub)" > allowed_signers
Now you have all you need to verify all reports produced by this station.
$ ssh-keygen -Y verify -f $PWD/allowed_signers -n report-sign@sysctl.se \
-I usbprotect -s scan_report.pdf.sig < scan_report.pdf
Good "report-sign@sysctl.se" signature for usbprotect with [ ...]
Note that the way DataLock sign receipts is different at the moment.
Sound Enabled
USBProtect will play sound effects if this checkbox is ticked after an operation.
Support Contact
Select the Station Identity that should be used to for support contact information on USBProtect.
Color Left Side
The color that should be associated with the left side
Color Right Side
The color that should be associated with the right side
Default Locale
Sets the default language for the station
Paper Receipt Type
By default only details about malicious files are printed on the receipt. Changing the “Paper Receipt Type” to the “Full File Listing” option turns on printing of details for each file scanned.
Proxy Server
The proxy that the station should use to access the ICC.
Upload File Meta Info
This uploads the Scan, Format, Shred and Files meta information that are listed below the Operations and Files menus. This is needed for statistics and audit trails. There are use cases when files names and checksums should be kept private in which case this can be turned off for that Impex Station Configuration.
Print Receipt
If this is enabled and a receipt printer is attached, a scan will result in a printed receipt containing a summary of the scan together with its unique scan number
Show Format Option
Enable this if it should be allowed to use the Impex Station to format a USB device with the FAT32 or EXFAT file system. When enabled, a new button will appear on the Impex Station when a single USB drive is inserted.
Show Shred Option
Enable this if it should be allowed to use the Impex Station to shred a USB device. When enabled, a new button will appear on the Impex Station when a single USB drive is inserted. Shredding a device means writing random bytes to each sector of the device to make the potential recovery of information harder.
Note: bitlocker drives cannot be shredded at the moment because Impex cannot re-create the bitlocker container. If a device has a bitlocker container on it, the shred-button will not be shown. Until this is resolved we recommend changing the bitlocker password to something very long which is practically the same as shredding it.
Show Scan Option
| Enable this option if there is a use case for only scanning devices without transfer. When enabled a | Scan button appears on the Impex Station when a USB device is inserted. Single scan results are also uploaded to the ICC (if the “Upload File Meta” is enabled) and a receipt is printed if a printer is attached and enabled. |
Enable File Selector
Enables selecting which files are transferred. This is useful when only a few files need to be scanned without having to scan all the files on the device. This option requires internal storage and affects transfer, transfer-without-formatting and Xtransfer.
Disable transfer mode
Transfer mode is enabled by default and allows users to scan a device and then transfer the files to another device connected to the secondary USB port. There is no direct setting to disable transfer but the Device Filter functionality can be used to block transfers. The following Device Filter rule with empty vendor, model and serial number configuration will block transfers.
| Configuration name | Configuration value |
|---|---|
| NAME | disable transfer |
| VENDOR | |
| MODEL | |
| SERIAL | |
| APPLIES TO | target |
| TYPE | Block |
Identity List Completion
If “Require Identification” is enabled there is an “Identification” step where the user needs to enter an identity using the on-screen keyboard. If this option is enabled and a Identity List has been created using the Identities view the user will be presented with a matching list of identities when starting to enter an identity using the on-screen keyboard.
Send Application Logs
The Impex station sends the system logs to the ICC server every night. If this checkbox is ticked, the application logs will also be uploaded. This can help greatly if SYSCTL needs to investigate an issue a customer has. The application logs contain file names and identification entered which, in some industries, should never leave the scanning station.
Screensaver timeout
Screensaver timeout in minutes, setting it to 0 disables it. This makes the initial start screen dim out if no one interacts with the screen in the configured time period.
Lock station
Enable this to lock the Impex station interface so that only users who identify themselves can use it. At the moment only unlocking with NFC UID is supported. The coupled identity will then be “logged into” the station and the “identification” field of the coupled identity will be automatically used for the identification step.
Unlocking with NFC PIV or AD username and password can be added on customer demand.
Config update interval
Impex stations regularly check for changes to its configuration set in the ICC. This includes the configuration card, file filters, yara rules, etc. This update interval is set by default to 10 seconds but can be increased to help reduce traffic to the ICC server.
Malware Alerts
Enter a comma separated list of email addresses that should get an alert email if a malware was found in a scan. This will use the SMTP settings entered under the “Server Settings” menu. When set, emails like below will be sent.
 {#id .class height=300px}
Offline Station Alerts
Enter a comma separated list of email addresses that should get an alert email if a station has been offline for six hours or more. This will use the SMTP settings entered under the “Server Settings” menu. The “Offline Monitor” checkbox also needs to be checked in the Configuration card.
Offline Monitoring
A mail will be sent to the email addresses specified in the “Offline Station Alerts” field in the Configuration card if a station has been offline for six hours or more.
Quarantine Files
When set, files containing malware will be uploaded to the ICC and will be available in the Quarantine View for further analysis.
Pause system updates until
Setting this will pause stations fetching operating system updates until the set date.
Pause engine updates until
Setting this will pause stations fetching Anti Virus Engine signature updates until the set date.
Timezone
Specify which timezone the connected stations are to use.
ICC Server
In case an Impex Station is moved or for some other reason should point to another ICC Server, this is where this is changed.
The proxy server configuration. E.g. “http://proxy.tld:3128”
Device Filter Set
This is a drop-down list of the available USB Device Block/Allow Filters. By default all USB storage devices are allowed so if nothing is chosen, nothing is blocked.
When a change has been made, “Save” must be clicked for this to be saved to the server side. Press “Close” if there is no need for saving or if you want to discard your changes.
The settings get picked up by the Impex stations the next time they poll which is configurable per station. See the station setting config update interval.
File Filter Set
This is a drop-down list of the available file filter sets. File Filters are useful for collecting sets of files that should never be marked as malware. See the file filter chapter on how to create and maintain these sets.
Advanced settings
On the configuration card there is also a “Show advanced settings” sub menu which when it gets expanded has additional settings which normally should not be changed.
UDEV Rules Enabled
To make sure nothing else than USB Storage Devices can be attached to the Impex Station there are Linux UDEV rules which can be activated, making it impossible to connect a keyboard or, more importantly, do any kind of rubber-duck4 attack. The Filesystem filter functionality also uses UDEV rules to block devices. This setting is exposed if there is a need to attach a keyboard for console login. We strongly advice against leaving it off in production since the KIOSK mode is weakened and some functionality is disabled.
Devices blocked by UDEV are logged to ICC in the following format:
device was blocked by udev: {"id":"da4a61e9-7ae6-4699-b57e-c61cc34289ee","date":"2025-11-17 14:20:34+01:00","message":"The device is not a storage device","devtype":"usb_interface","address":"/devices/pci0000:00/0000:00:14.0/usb1/1-2/1-2:1.0","side":"right","vendor":"N/A","model":"RT2870/RT3070 Wireless Adapter","model_from_database":"RT2870/RT3070 Wireless Adapter","misc":"subsystem: usb, driver: , device: "}
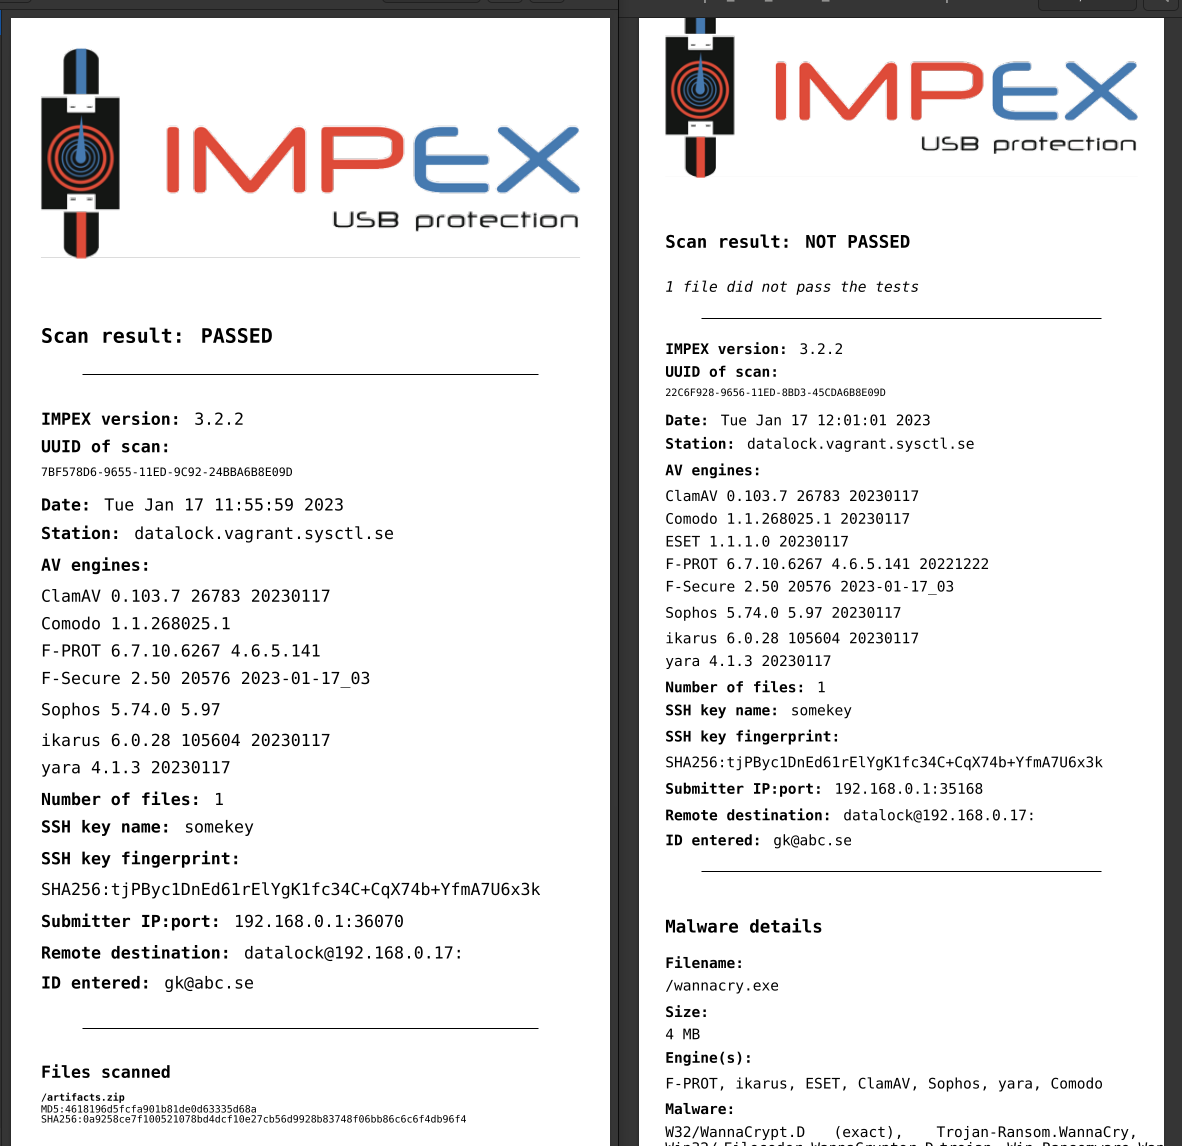
Receipt type
The default receipt printed when receipt printing is turned on includes:
- Impex version
- UUID of scan
- Date of scan
- Station used for the scan
- AV engines, their versions and the date when their db signatures were last updated
- Number of files scanned
- USB device information, like USB serial number, model and maker
- File system
- ID entered if one was entered
If any malware is found during the scan, details about the malware is added to the receipt:
- Filename with malware
- Size of file
- AV engines that detected the malware
- Malware classification names
- MD5 and SHA256 checksums of the file in question
Then there is another receipt type that is called full file listing that can be chosen that includes all of the above but also adds a complete listing of all scanned files together with checksums of each file. This can lead to very long printed receipts which is why it is not turned on by default. This option can be useful for example when shipping software to customers and including proof it was scanned and a full file listing with checksums of files included in the shipment. There is currently a limit on 1000 files.
Disable temporary file storage
By default, Impex USB Protect stores all files from the source device on the local hard disk. If the device contains sensitive data and temporary storage might pose a risk, it is possible to turn this feature off. By turning it off, Impex USB Protect will instead scan directly on the source device without saving any files on the local hard disk. The downside is that the scan will take longer, around five times longer with five engines enabled.
Default File System
Whenever a format operation is needed and there is no source USB device hint on what filesystem to use, this setting will choose which filesystem to create. The default is “vfat” which automatically gets upgraded to “exfat” if the target drive is larger than “vfat” can handle. One can also choose “ntfs” or to always use “exfat” directly. NTFS is slightly slower to create but it is the only of these filesystem to support symbolic links which might sometimes be used on CD/DVD media.
Restrict Network Information
By default Impex USB Protect show detailed information about the connection to ICC and network interfaces. For example IP addresses, DNS, gateway etc. If this is not a desired behavior it is possible to restrict the view to only show information about the connection to ICC and hide all information about the network interfaces.
User filesystem selection
This setting allows the user to choose whether the media should be formatted with vfat, ntfs, or exfat. A dropdown menu will appear before initiating either a format or a shred operation.
Disable Format Transfer Target
Control whether the target media should be formatted before transfer or left intact. If not formatted, a directory named “impex-YYYY-MM-DD-HHMMSS” will be created on the target, and files will be transferred into that directory.
Note that only files on the source media are scanned. Existing files on the target media are never scanned.
We advise formatting the target media to ensure a clean, trusted environment where all files have been vetted. However, if the customer has their own control processes and understands the implications, they may choose not to format. This setting allows for that flexibility.
Enable Filesystem Filter
When this option is enabled, a list of supported filesystems that Impex USB Protect can handle will be displayed. Select the filesystems that should be permitted. Any filesystem not selected will be blocked, and attempts to mount an unapproved filesystem will result in a device blocked message being shown to the user.
If the Filesystem Filter is enabled but no filesystems are selected, all filesystems will be allowed. Blocking all filesystems would make USB Protect unusable, since it would not be able to read any media.
Decrypted archives suppress Yara
If you want to block all encrypted archives by using the Yara rules that SYSCTL supplies but want to make an exception if the user decrypts the archive on the Station before scanning, enable this. You can also use your own Yara rules but then you need to make sure the Yara rule name contains the string “_encrypted_”.
Device Filters
Overview
Impex supports blocking USB devices on vendor, model and serial numbers. Wildcards can be used. One can define rules that override blocking rules or vice versa. Impex uses Rule Sets to organize rules into groups where the last matching rule takes precedence.
Sets
On the configuration card one attaches a Device Filter. These are created on the Device Filters page.
A set is a grouping of rules where the implicit first rule is to allow all USB storage devices. To create a new set, click the button “Create Rule Set” on the top right side, give it a name and then save it by pressing the Save button. To get to the rules view click the “Manage Rules” button next to the “Create Rule Set” button.
A set can also include another set making it easier to maintain one set of blocked devices for example that all other sets can inherit from.
To add a device filter set to a configuration, edit the configuration and select the device filter set from the dropdown.
Rules
In the Manage Rules view one can create Block or Allow rules matching on USB serial ID, USB vendor and USB model name. Each field can contain wild cards and an empty field is the same as a wild card. One can choose to apply a rule for the left, right or both sides. One can also choose to apply the rule only to the source or target side which only means something after an action has been chosen, like for example “Format device” in which case the target rules apply.
It should be noted that the Device Filter feature is only for USB storage devices, not for files. For that one should use File Filters instead.
The USB Device filter rules and rule sets get fetched by the Impex station each time it polls its configuration.
Evaluation order
Evaluation order is: first the rules in the actual set and then the other included sets from the top down. See example below where the ruleset assigned to the station is “Blocked USB Drives 2021” with id 2.
| order | rulename |
|---|---|
| 1 | “20210101 drive #1” |
| 2 | “op #523 usb drive” |
| 3 | “Super Safe Vendor USB” |
| 4 | “USB drive #1” |
| 5 | “Another USB drive #2” |
File Filters
If a scan engine detects a malicious file but it should be allowed, a file filter rule can be created to ensure the file passes the scan.
On ICC the scan will show that a file filter rule matched and the file linked to that scan will have information about the malware name and which file filter rule that matched.

Denying a file by its SHA256 sum is not currently supported, but it can be achieved by using YARA rules until the feature is implemented.
Create a file filter set
New file filter sets can be created in the file filter view with the “Create Rule Set” button.
Sets are groupings of rules and can include other sets as well.
To add a file filter set to a configuration, edit the configuration and select the file filter set from the dropdown.
Create file filter rules
New rules can be created along with the rule sets, or from the Manage Rules View accessed by the “Manage Rules” button.
Requirements for a file filter rule is a name and a valid sha256sum, the description field is optional.

Station Identities
The “Identification” step on the Impex Station is when a user uses the on-screen keyboard to enter an email address, a name or a work-order item number. In the case that “Identity list completion” has been enabled for a station the list of identities on this page is used for completion on the stations.

There is nothing special about the identity entry, it can contain any string, it does not have to be an email address. Note that if the identity wants to receive scan reports through email, the entry must be an email address.
To create a new identity, click “Create Identity” on the top right.
The identity list is fetched by the Impex stations each time they poll their configuration if the configuration card has the identity list completion checkbox checked.
If the station is a Impex USB Protect Gen2 or later, it also has support for unlocking a station with a NFC token. The UID of the token can then be coupled with an identity by adding the UID to the identity. The last unknown NFC UID seen by a station is logged and added to the “Station” details view to assist in coupling a NFC token to an identity.
Support Contact
If a support contact is created and selected in the Configuration, it will be visible under the Support tab on the station in the Settings page. This might be useful for organizations where the users of the station might not be aware of whom to contact in case of problems or questions.
The support contact can be set per configuration card which makes it possible to have different support contacts per organization unit.
The process to add a support contact is the same as adding a user identity, except making sure the “Support contact” checkbox is checked.
Link the support contact to the configuration and the Impex station will list that contact on the System Configurations view under the Support tab.
Server Settings
The server settings page contains a separate card for each ICC server setting that can be changed.
SMTP Settings card
Mail From
This field should have the address from where an email should come from, like impex@example.com. If there is no @ in the address, the SMTP Server Host will be appended as the hostname in the From address.
SMTP Server Host
This hostname needs to be resolvable by the ICC server but it can also be an IP address
SMTP Server Port
The port of the SMTP server, for example 25
SMTP Server Username
If the SMTP server requires authentication, enter its username here
SMTP Server Password
If the SMTP server requires authentication, enter its password here
Require TLS
If the server requires TLS, mark this checkbox
Last Error Logs
Any errors that occur during mail sending using this SMTP server will be shown here. There might also be error messages in the ICC syslog.
Known issues
When editing the card and entering an email for sending a test email the last error log will not be updated. Reload the page to see the result.
Repository card
This card controls which repository server the ICC server should fetch its updates from. The settings entered here are used by the update program which runs once per day. Incorrect information entered here will stop the ICC server from getting updates for itself, the operating system and Anti Virus definitions updates from upstream.
After entering information here, please use the Test Connection Now button to verify that you entered it correctly and that no proxy or firewall is blocking the connection. This information will automatically by shared with the stations so that they can fetch updates using the same settings.
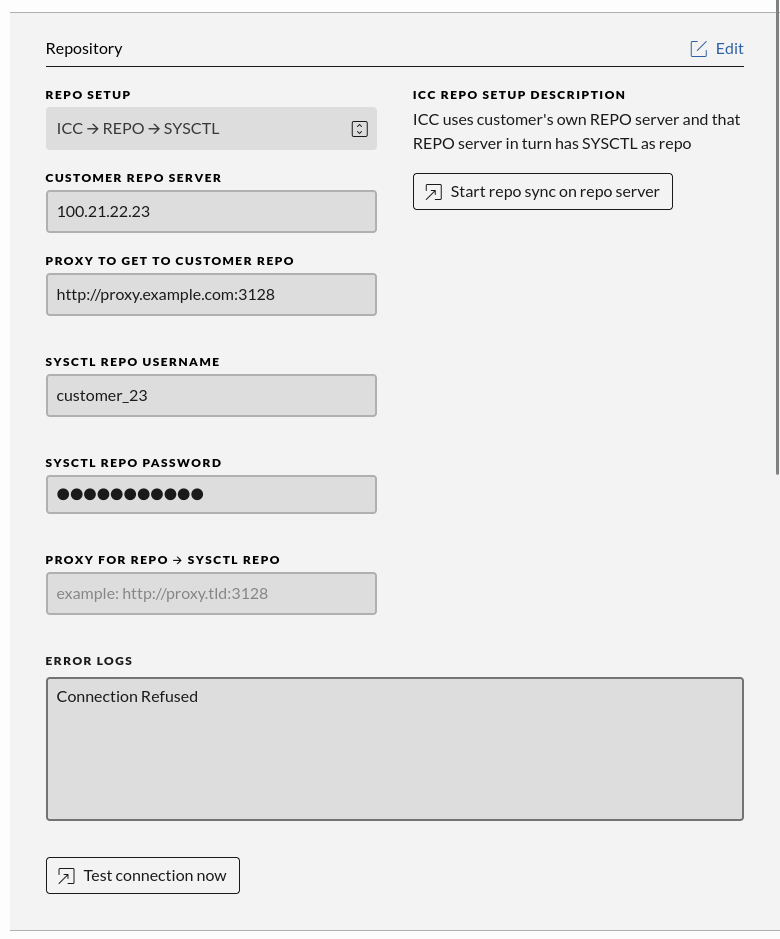
Click “Edit” to fill in the settings and then “Save”. If there are any errors they will be shown in the “Error Logs” box.
If there are TLS certificate errors a button shows up which offers to add the Repository server’s CA certificate to the ICC trust database. Please be aware that this should never occur during normal operation. Only click this button if you are sure this is ok. After clicking this button the ICC server restarts. Reload the page and save the Repository settings again.
Repo Setup
This is a drop down box with five options:
-
No setup, this is the initial value in which your ICC and connected stations have no way to get updates
-
ICC → SYSCTL, the ICC gets its updates directly, or via a proxy, from the official SYSCTL repository. Connected USBProtect and Datalock stations get their updates through the ICC, effectively using the ICC as a proxy.
-
ICC+REPO → SYSCTL, the ICC synchronizes the upstream SYSCTL repository to its own disk and gets its updates from itself. Connected USBProtect and Datalock stations get their updates directly from the repository that the ICC has synchronized.
-
ICC → REPO → SYSCTL, the ICC connects to a customer hosted Repository server which in turn downloads updates from the official SYSCTL repository.
-
ICC+REPO → REPO → SYSCTL, the ICC is also a Repo server, using its own customer hosted Repository server which in turn downloads updates from the official SYSCTL repository.
Different input fields are shown depending on which Repo Setup is chosen.
SYSCTL Repo Username
The username used for authentication to the official SYSCTL upstream repository.
SYSCTL Repo Password
The password used for authentication to the official SYSCTL upstream repository.
Proxy
Optionally proxy for the ICC to use to get to the official SYSCTL upstream repository, for example http://proxy.tld:3128.
Customer Repo Server
In case a Repo Setup has been chosen with a self-hosted Repository server this input field is shown.
Proxy to get to the customer Repo server
Optionally proxy for the ICC to use to get to the customer Repo server, for example http://proxy.tld:3128.
Station registration settings
Impex stations need to register with their ICC so they can be configured and managed. The registration process is
- A station connects to the ICC server it has been configured to connect to. This can either be pre-configured by SYSCTL before the Impex station is shipped to a customer or it can be done by the customer itself through the System Information -> Network settings view on the station. This view is editable as long as the station is not registered to an ICC or if a signify network bundle was used (see the ICC Signify card section).
- The station sends its hostname and machine id (a per station-installation unique id) to the ICC.
- An administrator on the ICC gets a bar in the GUI showing there is a new registration attempt and gets the choice to ignore or approve the registration request.
- If the station registration attempt is approved, the station gets its own unique credentials and the station will add the CA certificate used by the ICC to its trust store.
Anyone can send a registration attempt and to limit the exposure the ICC only accepts 10 registrations per default. It is also recommended to turn off the registration process once all Impex stations planned for are connected.
Open for new registrations
This is by default true but it is recommended to turn it off after all Impex stations planned for are registered.
Max open registrations
This is the maximum number of simultaneous stations that can connect to the registration API on the ICC server. This is not the maximum number of stations that can be connected to the ICC server.
This is by default 10 to avoid someone abusing the registration process being able to fill the database.
Blocked IP addresses
If, during the deployment of new stations, someone or something is filling up the registration slots, it can be blocked by adding it to a comma separated list of IP addresses like in the placeholder example.
NTP servers
This card allows you to configure time sources to set the server time. The ICC supports up to three different NTP servers. The values for each server can be either IPv4, IPv6 or FQDN.
DNS server
This card allows you to configure DNS servers to allow the ICC to do name resolution. The ICC supports up to three different DNS servers. The values can be either IPv4 or IPv6 addresses.
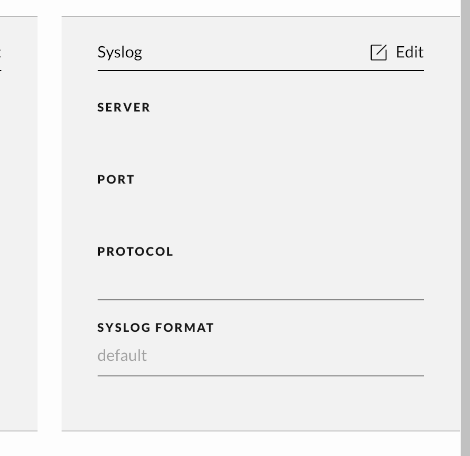
Syslog
This card allows you to configure a remote syslog server which the ICC will send syslog messages to.
Syslog format
There are two log level formats, default and the more detailed JSON format. The default level only informs that malware has been found and a link to the scan for further information, whereas the detailed JSON format provides more details on operations and found malware.
Oct 24 12:40:16 icc journal: ICC WARNING [log:15] Station detected malware (https://icc//v/operations?byId=20)
When JSON format is selected ICC will log detailed information about user initiated operations and detailed logs on any file that contains malware. To keep the log size down station description is truncated to a maximum of 100 characters. If a descriptions exceeds this limit, it will be shortened to 97 characters with ‘…’ added to indicate that truncation has occured.
 {#id .class height=300px width=291px}
An example operation JSON log message. Note that newlines have been added here for readability.
May 27 13:47:07 icc journal: ICC INFO [log_scan_uploaded:605]
{
  "operation_uuid": "e57791fe-599f-4316-9b31-ac7fc55296e2",
  "operation_type": "scan",
  "files_count": 3,
  "malware_count": 1,
  "total_size": 589645,
  "start_time": "Tue, 28 May 2024 10:32:19 GMT",
  "end_time": "Tue, 28 May 2024 10:32:33 GMT",
  "identification": "test user 3",
  "station_type": "USB Protect",
  "machine_id": "752c470a6ddf431686a1673533c35330",
  "hostname": "station.vagrant.sysctl.se",
  "location": "Exempelby 31",
  "description": "Lorem ipsum dolor sit amet",
  "source": {
    "serial": "1-0000:00:01.2-1",
    "vendor": "QEMU",
    "model": "QEMU HARDDISK",
    "filesystem": "vfat",
    "is_bitlocker": false
  },
  "target": null
}
An example malware JSON log message. Note that newlines have been added here for readability.
May 27 13:47:07 icc journal: ICC INFO [malware_alert:578]
{
  "operation_uuid": "e57791fe-599f-4316-9b31-ac7fc55296e2",
  "identification": "test user 3",
  "station_type": "USB Protect",
  "machine_id": "752c470a6ddf431686a1673533c35330",
  "hostname": "station.vagrant.sysctl.se",
  "location": "Exempelby 31",
  "description": "Lorem ipsum dolor sit amet",
  "sha256": "9C891EDB5DA763398969B6AAA86A5D46971BD28A455B20C2067CB512C9F9A0F8",
  "filename": "/malware.ex_",
  "engines": {
    "ClamAV": "Win.Worm.Stuxnet-11",
    "ikarus": "Trojan.Win32.Stuxnet",
    "ESET": "Win32/Stuxnet.A worm",
    "F-Secure": "Trojan.TR/Drop.Stuxnet.A",
  },
  "source": {
    "serial": "1-0000:00:01.2-1",
    "vendor": "QEMU",
    "model": "QEMU HARDDISK",
    "filesystem": "vfat",
    "is_bitlocker": false
  }
}
Server
The remote server, the value can either be IPv4, IPv6 or FQDN.
Port
The remote port which the remote server will use to receive the syslog messages.
Protocol
The protocol which the remote server will use to receive the syslog message. This can either be TCP or UDP.
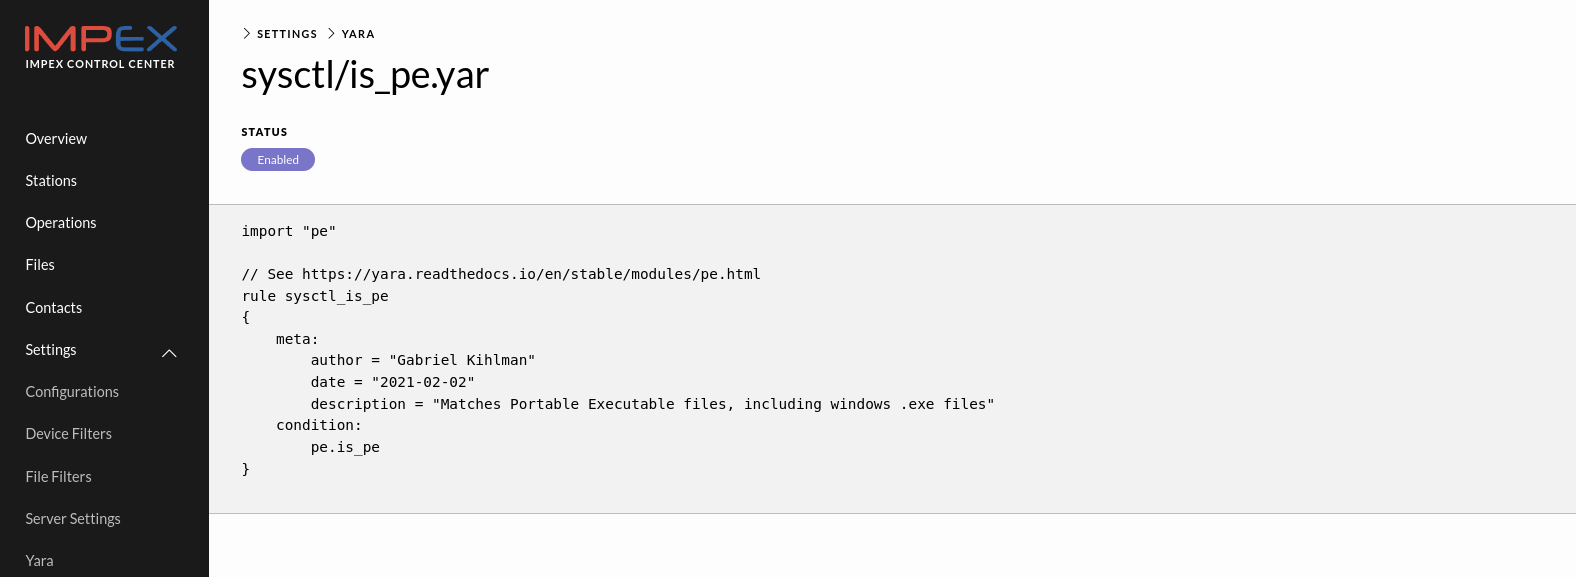
Yara
YARA is a tool designed to help malware researchers identify and classify malware samples. It has been called the pattern-matching Swiss Army knife for security researchers and others.
Introduction
Yara is a powerful tool aimed at, but not limited to, detecting malware based on analysis of file content. It uses rule files that can contain simple or advanced rules to match almost any pattern. These rule files are then used by Yara to match patterns in files.
It can for example be used to detect office documents containing certain words, exe files with specific embedded strings or obfuscated IP addresses in data files. Many threat hunting and forensics teams share IOC, Indicators Of Compromise, that can be used in writing Yara rule files to detect any threats being brought into your organization through USB drives.
Yara rule language
Yara uses a domain specific programming language to express patterns and conditions that apply to search patterns in rules.
Rules in yara are generally composed of two distinct sections - string definitions and conditions.
An example of how a yara rule look can be see below
rule ExampleRule
{
    strings:
        $my_text_string = "text here"
        $my_hex_string = { E2 34 A1 C8 23 FB }

    condition:
        $my_text_string or $my_hex_string
}
A more complete example can look like this, where more keywords are used:
rule silent_banker : banker
{
    meta:
        description = "This is just an example"
        author = "yara documentation"
        date = "2022-02-02"
        threat_level = 3
        in_the_wild = true

    strings:
        $a = {6A 40 68 00 30 00 00 6A 14 8D 91}
        $b = {8D 4D B0 2B C1 83 C0 27 99 6A 4E 59 F7 F9}
        $c = "UVODFRYSIHLNWPEJXQZAKCBGMT"

    condition:
        2 of ($a,$b,$c) and filesize > 100KB
}
If you plan to write yara rules for use with Impex, see the section on Custom yara rules and see the references listed in the resource section.
Yara in Impex
By adding Yara in Impex it brings several capabilities:
- A way for sysctl to provide scanning rules not available in any commercial malware scanner
- A way for an Impex customer to download and use publicly available Yara rules, for example as published as IoC’s by CERTS or in vulnerability notes
- A way for an Impex customer to create local, unique, rules that only exists in their environment
- A way to extend Impex to not only scan for malware, but to check for other file content, e.g. policy violations, information leaks, sensitive information (PII, credit card numbers, etc)
Enabling Yara
To make use of Yara in the Impex solution, make sure the Yara engine is enabled in the configuration card your stations use. It is listed in the Engines on the Configuration card.
Yara view in ICC
On the Yara view page one can upload custom yara rule files.
The rule name will be prefixed with “customer_” automatically by ICC to avoid clashes with sysctl-provided rule files potentially already present.
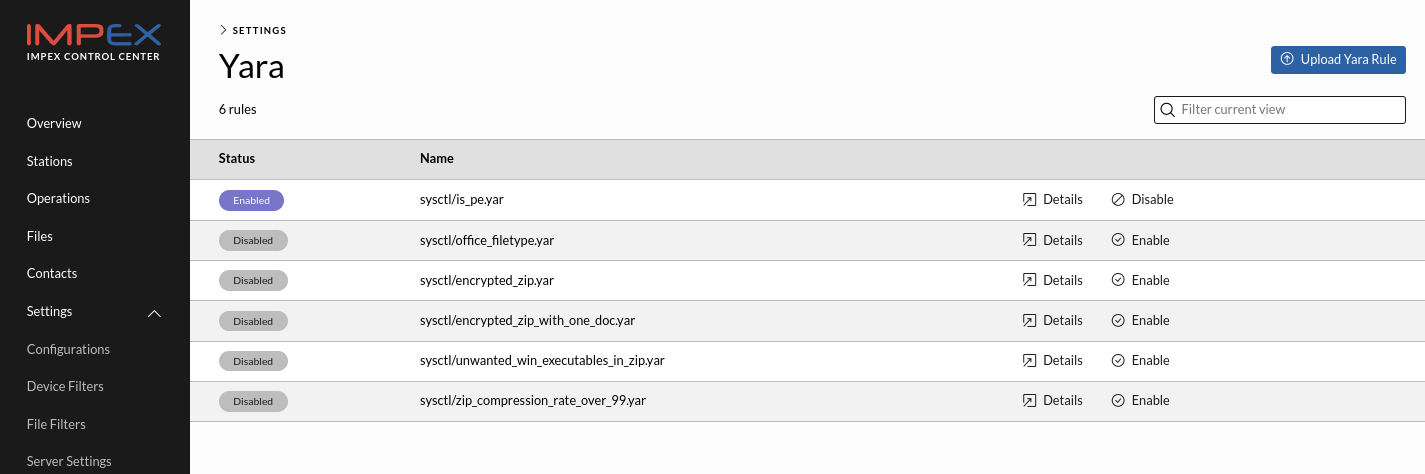
After a yara rule has been uploaded to ICC it will automatically be evaluated and if it is valid. If not, it is clearly marked with an error message. If it is valid, it can then be enabled by clicking the enable button.
When such a rule matches a file being scanned it will be marked as malicious and the malware name will be “customer_$YOUR_RULE_NAME”.
It is possible to view the content of a Yara rule on the server by clicking on the “Details” button associated with a specific rule. See the example below
Files view in ICC
In the file listing view on the ICC server, files scanned and detected by yara rules are explicitly marked as such.
Curated Yara rules
There might already be rules present provided by sysctl.
Curated Yara rules in Impex:
- will always be named “sysctl_” to identify that these are curated rules
- will always contain some metadata describing the usage of the rule, creation date, author, usage
- will always be disabled by default. They require an explicit action from a customer to enable. This is important to avoid some of the broader rules to interfere with normal Impex usage
- cannot be deleted in the rule listing view. A curated rule can be disabled or enabled
Custom Yara rules
Custom rules can perform checks for specific file content, for files that are prohibited by local policies, etc.
We encourage you to write your own rules and use them with Impex.
Custom Yara rules in Impex:
- will always be named “custom_” to identify that these are customized rules
- can be deleted
Please note that it is possible to write rules that have a huge performance impact on the Impex scanning. For Impex users that plan to write custom rules, we recommend that you read and understand the content of the Yara performance guidelines to avoid writing problematic rules. A reference to this document is listed under resources.
Implementation notes
- Only stations where the configuration card has “Yara enabled” set will run the uploaded yara rules
- The ICC will prefix all customer rules with “custom_” and will be listed in the web view with file prefix “custom”
- Curated rules supplied from Sysctl will get the prefix “sysctl_”
- Once uploaded, all single rule files will be assembled into one big yara rule file
- This unified rule file is distributed automatically to all stations the next time they poll for updates (by default every 10 minutes)
- The rule files uploaded need to be self-contained and cannot include any other files. The include directive in yara must be avoided
- At the time of this publication the Yara version used is 4.1.3
Limitations
Currently, Yara rules can only be used to deny or block files on an USB Protect or DataLock.
Resources
Read more about yara and writing yara rules: https://virustotal.github.io/yara/
A good article on yara rules: https://blog.malwarebytes.com/security-world/technology/2017/09/explained-yara-rules/
Another easy to read article on how yara rules are written: https://www.varonis.com/blog/yara-rules
A collection of yara performance guidelines: https://github.com/Neo23x0/YARA-Performance-Guidelines/
A description on how to write efficient yara rules: https://www.nextron-systems.com/2015/02/16/write-simple-sound-yara-rules/
A good collection of existing yara rules - Yara Rules Repository Curated by the Yara Rules Project - that can be uploaded to ICC, or used as inspiration for writing own rules: https://github.com/Yara-Rules/rules
Another collection of existing yara rules that can be uploaded to ICC: https://github.com/InQuest/awesome-yara
DataLock
The ICC server also manages DataLock stations.
A DataLock is similar to USB Protect in functionality, but the latter works on mobile media and the previous one works with network file transports. The USB Protect is a physical kiosk computer but the DataLock is a server component providing the scanning and checking as a service on the network.
Please note - views for management of the DataLock are visible in the menus in ICC, even if you have not installed any DataLocks. Contact sysctl if you want to procure licenses for DataLock to use in your environment.
A DataLock is a service running on a scanning appliance (physical or virtual) that accepts uploads via a network protocol. When files have been uploaded the service checksums, audits and scans them and then, together with a signed report, if all checks are cleared, the DataLock sends the files onward to a customer server according to the configuration. If any AV or YARA rule is triggered, a signed report is produced and then only that gets sent onward. Malicious files can be sent to the quarantine, depending on ICC settings for that specific DataLock.
Configuration of DataLock
In the DataLock part of the management server ICC, there are two views which are used to set up and configure how files are managed in the DataLock. One view is called ‘flows’ and the other is called ‘users’ or ‘ssh keys’.
The DataLock station will allow a user to upload files to be scanned and then, depending on which flow the user/key belongs to, the scanned files (and the scan report) will be uploaded to the destination folder on the destination host.
Below we describe the flow and user/key view in more detail.
Flow view
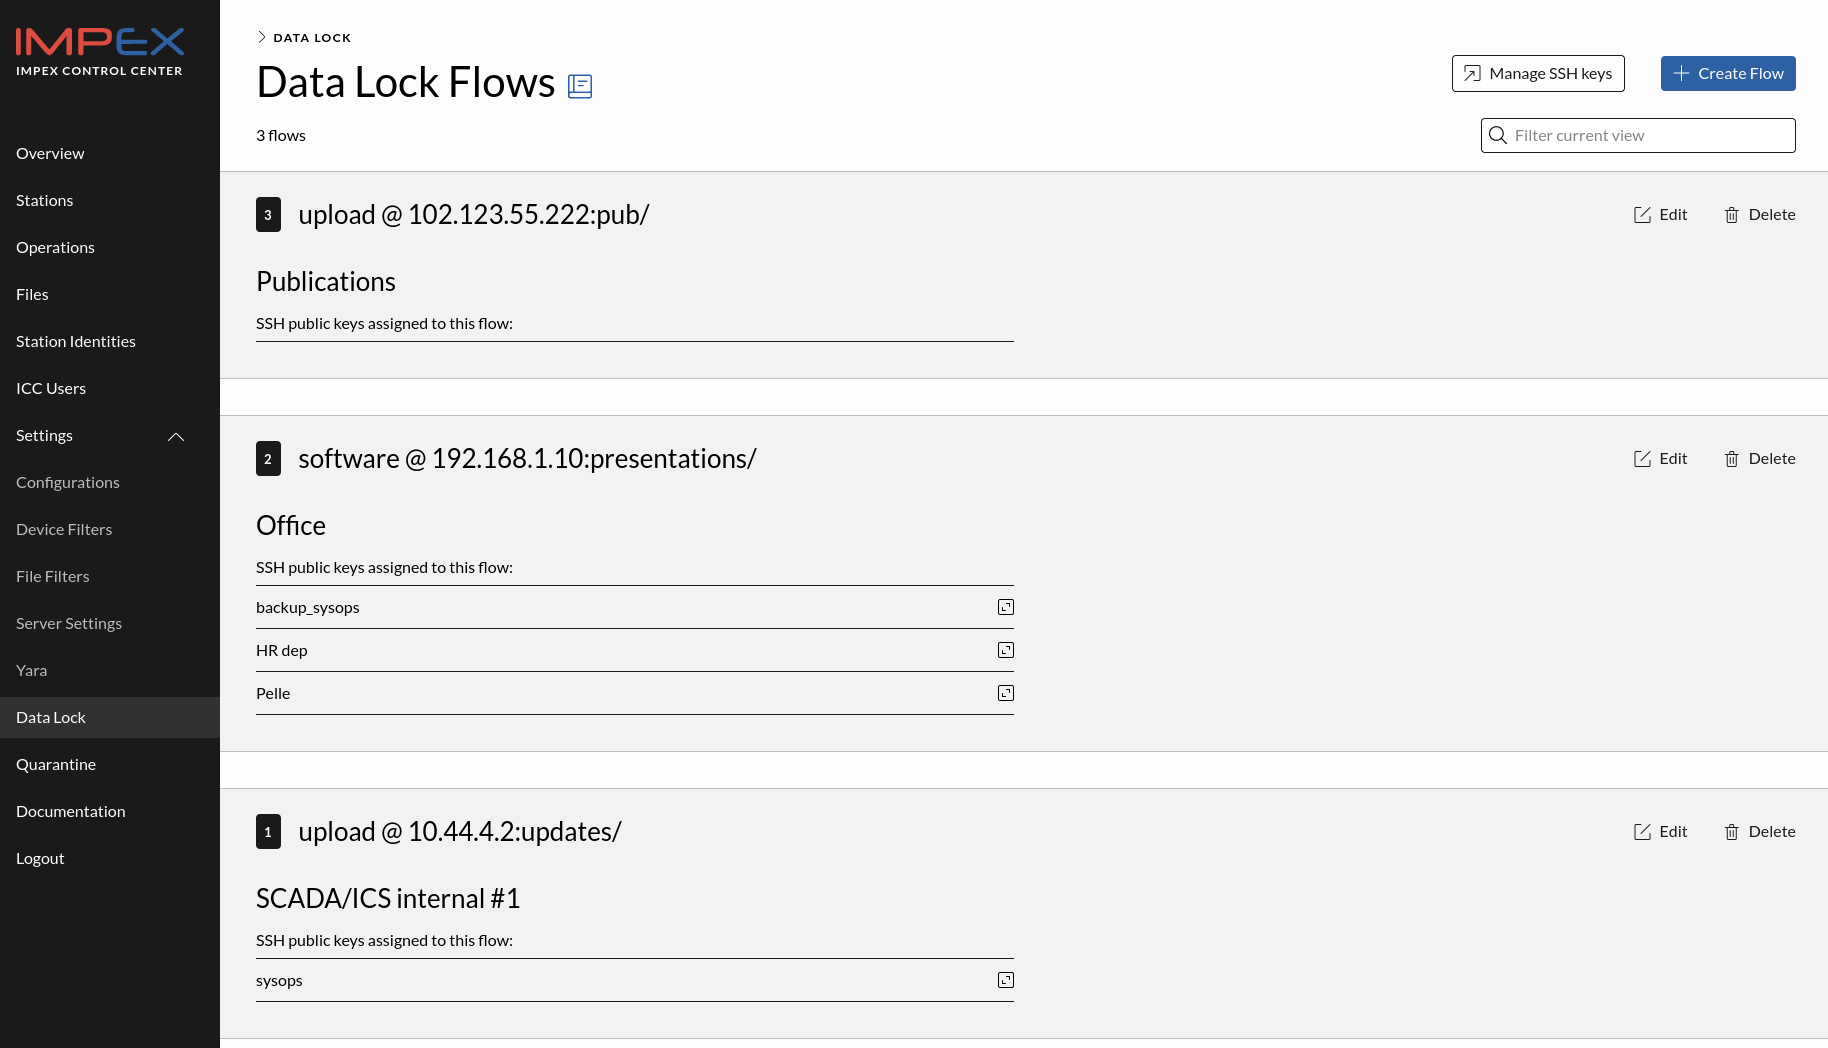
The first view, called DataLock Flows, is used to set up the flow from when files are received by the Impex DataLock and, if all checks are cleared, the files are forwarded onto a destination. Here you can see all existing flows as well as create new flows or delete obsolete ones.
The picture below shows the Flows view. As can be seen from the example in the screen dump, we have different users, on different destination IP:s and different target directories. Also seen in the example is that some of the flows have multiple SSH keys associated with them. In those cases multiple sources can upload files to be sent through a flow to a specific destination.
To create a new flow, in the flow view, as an Impex administrator select and enter
-
the destination for the scanned files and the report, an IP address or FQDN
-
the username for the destination address
-
the directory on the destination to upload the files into
-
connect the receiving transport part to an authentication method, e.g. a SSH keys
In the screen dump that shows flow key details, we see more details about a specific SSH key that is used within one of the flows. Here we see the name of the key, the fingerprint of the key and finally the actual public key.
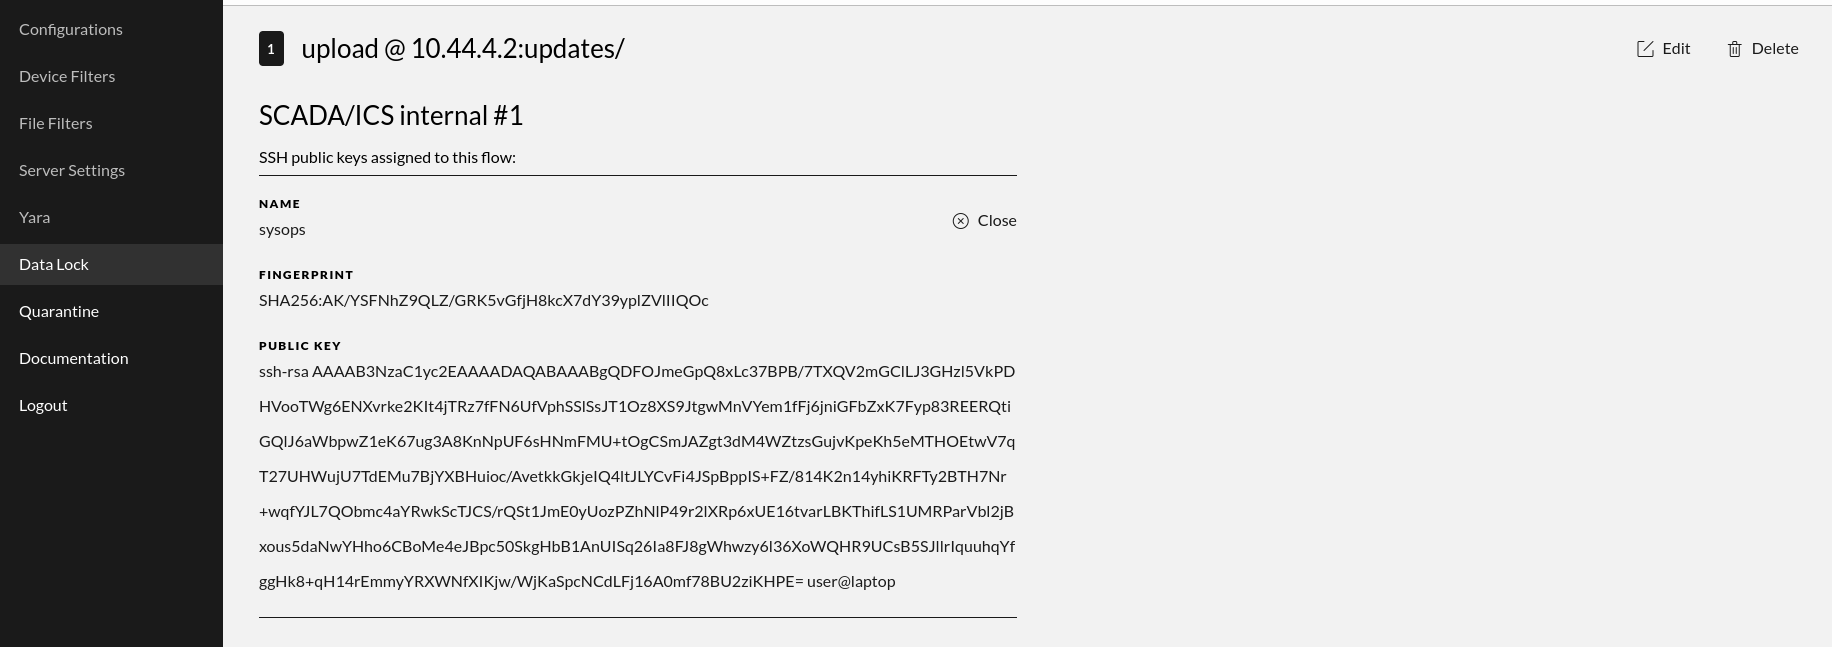
Clicking a listed authentication key belonging to a flow expands the view making it possible to see more details of the authentication entry for the relevant flow.
User/SSH-Key view
Before an authentication method can be used, related info needs to be created in the other view of the DataLock - the users pane. The user pane lists all authentication information uploaded into the DataLock, such as SSH keys for specific users. Click the “Manage SSH Keys” in the upper right corner to get there.
In this part of the window, you will upload an SSH key to be stored on the ICC which then gets distributed automatically to the correct DataLock.
In the example below, you see a screen dump of the popup window that is displayed and where you can paste your public ssh key and connect it to a Flow and an identity (a Contact). If the contact has an email address in its identification field one can get automatic reports sent to it if that is enabled in the configuration card.
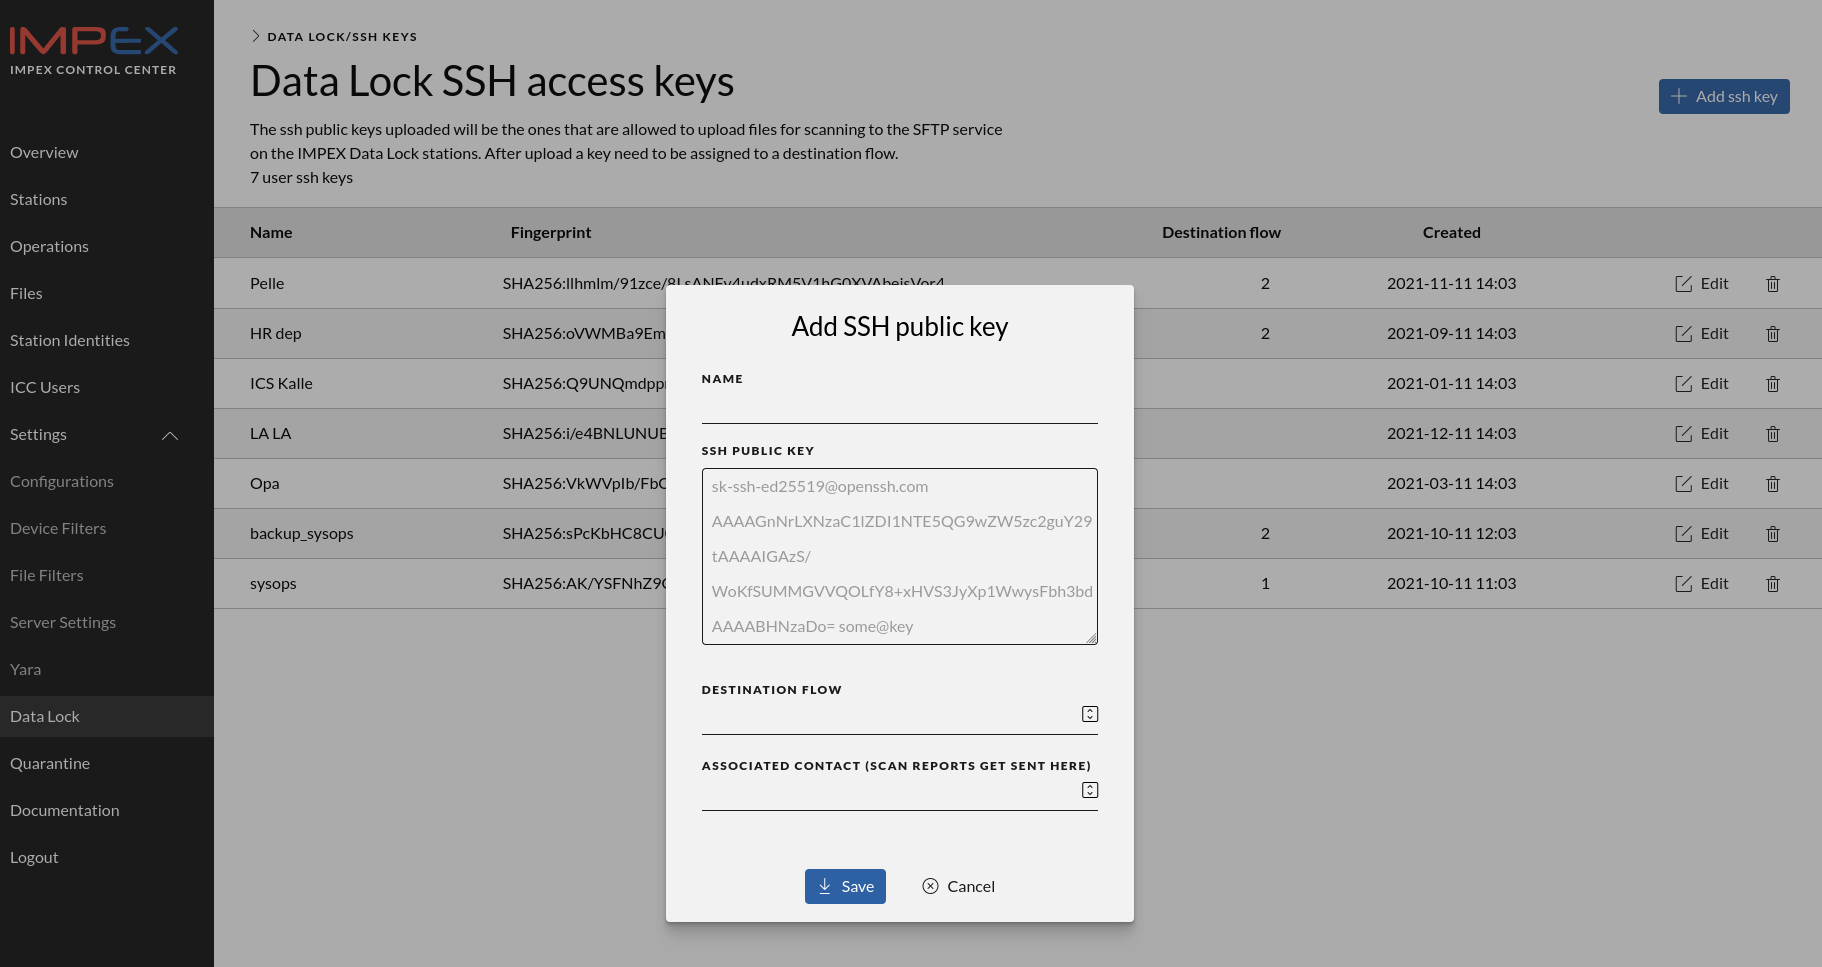
NB - Make sure that the public SSH key is used, not a private SSH key. If you have a Linux or Unix server, the files are normally located in the directory .ssh in the user’s home directory. In that directory, you copy the content from the file that contains the extension ‘.pub’, for example ‘id_rsa.pub’.
Flow errors
In case the upload to the remote destinations fails, the flow configuration affected will show the latest error message to help in debugging.
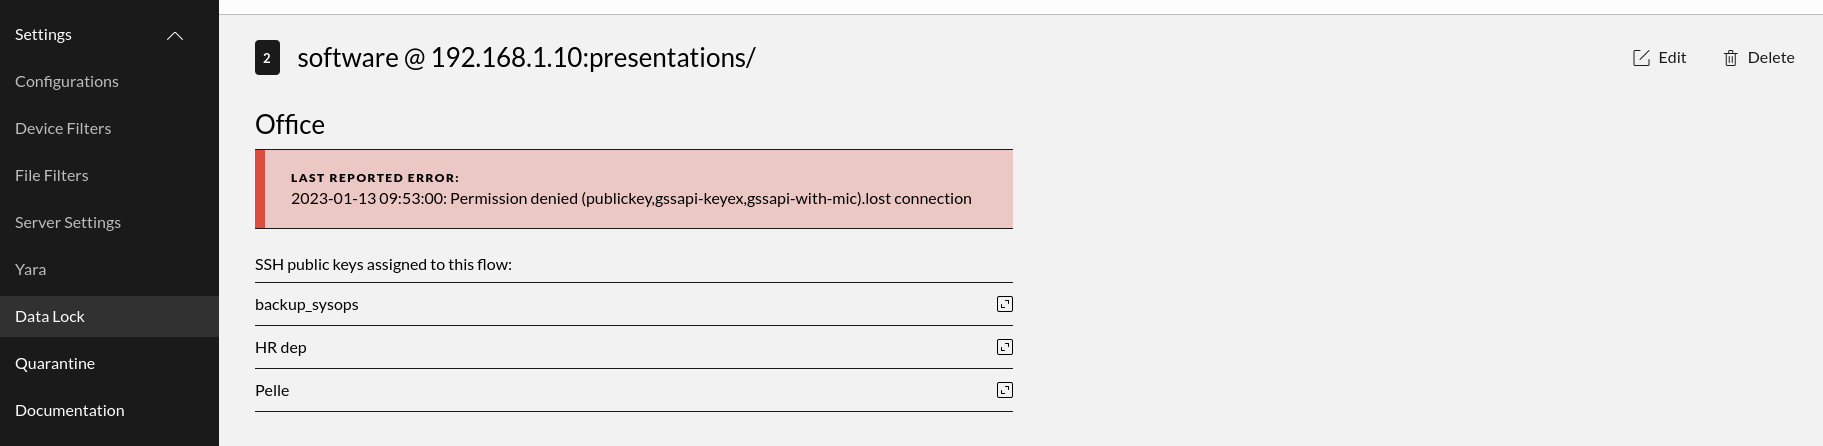
The upload to the remote destination will be re-attempted with an exponential back-off time. If the flow configuration is changed the back-off time will be reset. First retry will be after 10 seconds and then 20, 40, 80 seconds and so on. After 48 hours the upload will be canceled and files on disk will be removed. This is to avoid filling the internal disk.
The flow error will be shown for one hour even if the upload starts working again. This is to make sure intermittent errors are not missed.
DataLock Station
In the ICC platform, it is possible to manage both classic USB Protect stations and DataLocks side by side.
In the following picture we see both a USB Protect station and a DataLock. The green arrows added to the screenshot show the icons that help in telling them apart. The first icon is a DataLock in a network and the other icon is an USB Protect Station. Choosing names and having a better description that in this example is also recommended.
In the following picture, we zoom in (click) on the Impex DataLock and see the DataLock specific configuration items in the configuration card.
Each DataLock station has its own public ssh key. To configure the remote server to allow the station to upload scans one downloads the SSH public key for the station from the station card and puts it into the remote servers ~user/.ssh/authorized_keys file. After this the station can upload scanned files to the destination server. Configuring different remote destinations is done in the DataLock Flows view.
Receipts
One thing that gets created automatically in the DataLock is electronic receipts. The receipt is also electronically signed and that signature is stored as a detached signature in a separate file. These newly created files get forwarded to the destination host as part of the flow.
By having these electronic receipts, it is possible to perform some checks and controls that files have been scanned and that the files were not manipulated during the transit. The receipt and the detached signature is extra useful if the destination is behind a Data Diode. This allows the DataLock to communicate with the receiving part behind the data diode, even if files are blocked because of malicious content. That way the receiving end can detect that files were sent, but blocked on route to the destination.
The reports produced are signed with the station SSH private key and can be verified by using for example a common tool like OpenSSL:
openssl dgst -verify key.pub.pem -signature report.sig report.pdf
which will print “Verified OK” if the signature matches.
The Datalock’s public key is in the “more details” view on the station card in the ICC. It is in OpenSSH format and if you want to use OpenSSL to verify signatures you first need to convert it to a PEM format that OpenSSL understands:
ssh-keygen -e -f key.pub -m pem > key.pub.openssh_pem
openssl rsa -in key.pub.openssh_pem -RSAPublicKey_in -pubout -out key.pub.pem
SSH keys
In the screendump below you see a view of when multiple users have had their keys uploaded to the ICC, which in turn forward the relevant keys to the DataLock that will use the keys for authentication purposes.
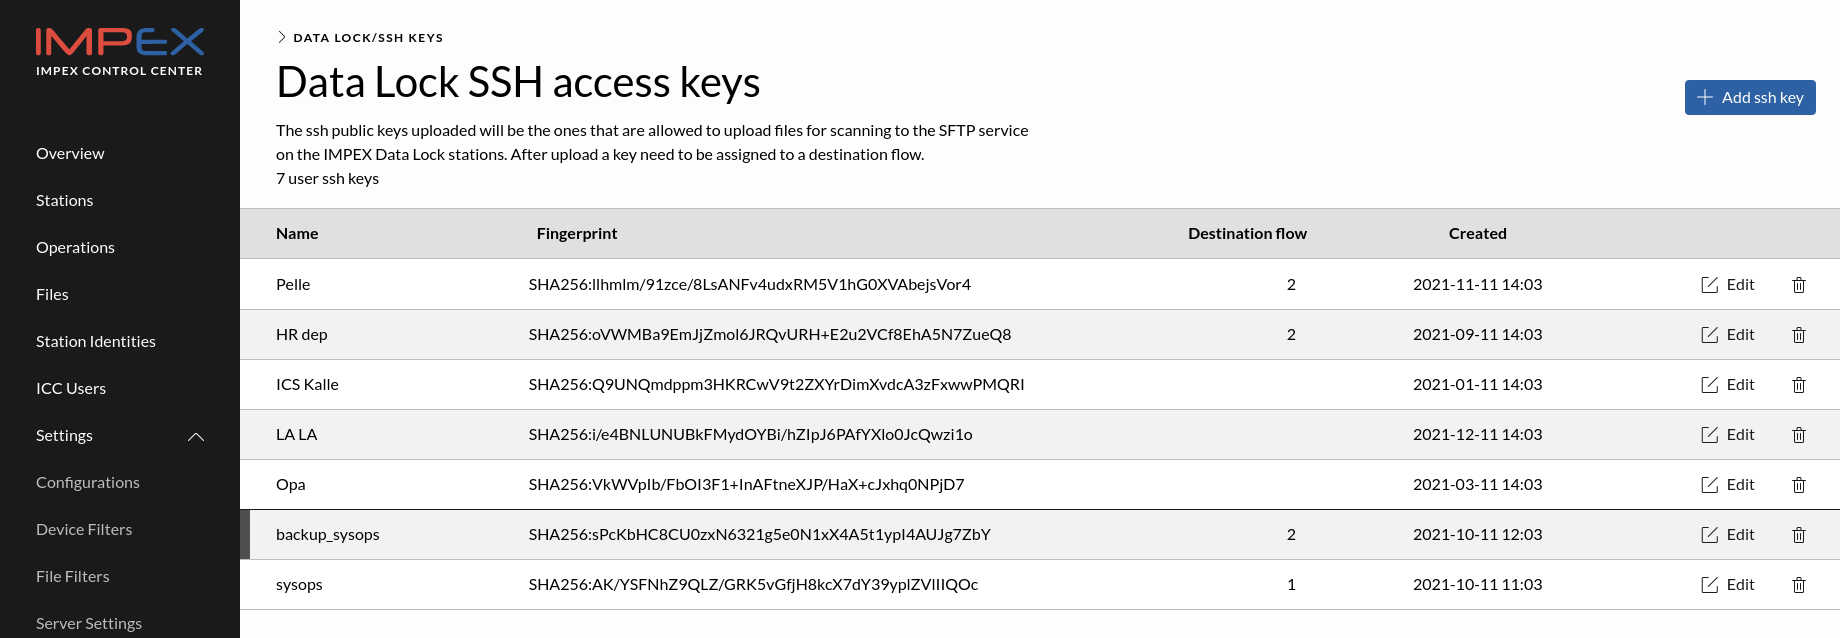
The ssh public keys uploaded here will be downloaded by each DataLock station and controls who may upload files for scanning.
DataLock uses the SSH keys for authentication and require the username “datalock”.
Some examples of usage:
$ sftp -i privkey.key datalock@datalock-ip
Connected to datalock.
sftp> put /home/user/Downloads/WannaCry2.exe
Uploading /home/user/Downloads/WannaCry2.exe to /WannaCry2.exe
WannaCry2.exe                                     100% 5144KB 165.7MB/s   00:00
sftp> quit
$
$ scp -i vagrant/datalock.key -r somefiles datalock@datalock-ip:
WannaCry2.exe                                     100% 5144KB 227.1MB/s   00:00
Behörighet - kopiera nycklar.odt                  100%   73KB 111.7MB/s   00:00
$
SSH key generation in Microsoft Windows
To generate a new SSH key on a recent Windows machine, open a terminal and type ssh-keygen and choose a name for the key.
Please note: when prompted for a passphrase you need to decide if this is a SSH key that will be used by a script in a M2M scenario, in which you might not be able to use a passphrase on the key. There are ways to protect and store the private SSH keys in a secure way in M2M scenarios as well, but that often require additional products or additional hardware.
An example of how this is done is shown in the next screendump.

Upload the public version of the key to the ICC and then use the built in sftp client to upload files to the station or a graphical client like WinSCP5.
An example of how this is done with the command line variant of sftp is shown in the next screendump. Please note that the ‘-i’ option is used to select the correct SSH key associated with this flow
An example of how the public SSH key is uploaded is done with the WinSCP variant which contains a GUI is shown in the next screendump.
Alternative to Microsoft Windows sftp client
Note: the default Microsoft sftp is quite old and we recommend installing a newer OpenSSH using winget:
c:\> winget install Microsoft.OpenSSH.Beta
Datalock operations
Scans being done by a DataLock will appear as a “Network” operation in the operations view in the ICC. Clicking that operation will show more detailed information on that specific event, like source IP adddress, ports, SSH keys and destination flow used.
In the screendump below, there is an example of the ICC operations view where a Network event is highlighted with a green arrow.
Limitations
File sizes
Problem with transferred files that is of certain sizes will most probably be traced to the size of the hard disk partitions used by Impex to store the files as they are intermediary stored before forwarded to the destination. Make sure that correct capacity planning for the disk size is performed as part of setting up the DataLock.
Supported protocols
The current version of the DataLock only supports file transfers via SSH (sftp and scp). Other protocols will be available in later releases.
DataLock does not allow interactive login with SSH.
Variants of the SFTP protocol
The SSH protocol exists in variants. Impex DataLock uses a newer version of the SSH protocol allowing it to use both the SFTP and SCP of the SSH protocol. Older implementations of SCP might not work with the new SSH server. There are 2 workarounds:
1. Upgrade to a newer version of SSH with a modern SCP implementation on the client.
2. Use SFTP instead of SCP on that client computer.
Performance
Impex DataLock performance is heavily dependent on multiple issues:
- which AV scanners is used
- how many AV scanners is used
- size of files in the session
- number of files in an upload session
- specification of the hardware hosting the DataLock
- configuration of virtual environment, if setup as an virtual appliance
In the end, the performance or latency is dependent on the above mix of tasks and preconditions. It is important to understand your setup and your use case to optimize the actual performance of a flow.
Consult with sysctl if you have questions or issues on how to optimize your setup.
Xtransfer
Xtransfer is a utility that authenticates users to Kerberos realms via smart cards. After a successful Impex scan, files can then be imported to an SMB share, allowing for a restricted and secure entry point for trusted files.
Xtransfer is a licensable extension to an Impex station. Xtransfer does not change the base functionality of a station and can still be used to perform all operations as normal. If needed, a station can be configured to only act as a Xtransfer by disabling other functions in the ICC configuration card. If you are interested in obtaining Xtransfer for your stations, please contact SYSCTL.
To use Xtransfer, the “Disable temporary file storage” option has to be disabled to handle file uploads.
It is not possible in the ICC to configure which shares individual users can access. This is something that has to be set on the server itself.
Xtransfer Domain Configuration
In ICC under the Xtransfer configuration tab, Xtransfer domains can be managed as an admin. You can configure as many domains as you like, each with multiple shares. Observe that the configuration tab is available even if no Xtransfer stations are installed.
To setup a Xtransfer domain you will need:
- A Kerberos realm
- Either the hostname or IP to the KDC. If both are provided, the IP will be used.
- Hostname for the PKINIT KDC to handle smart card preauthentication
- How the station will select the username based on a user’s certificate. This is the certificate on the smart card the user selects and has two options:
- Common Name – The first occurrence of commonName in the certificate
- Subject Alternative Name (SAN) – The first occurrence of otherName in a SAN certificate
- A CA certificate for the domain or certificate chain.
It is unfortunately not possible to test the configuration from ICC as it depends on smart cards being used.
Share Configuration
Within a Xtransfer domain several shares can be configured.
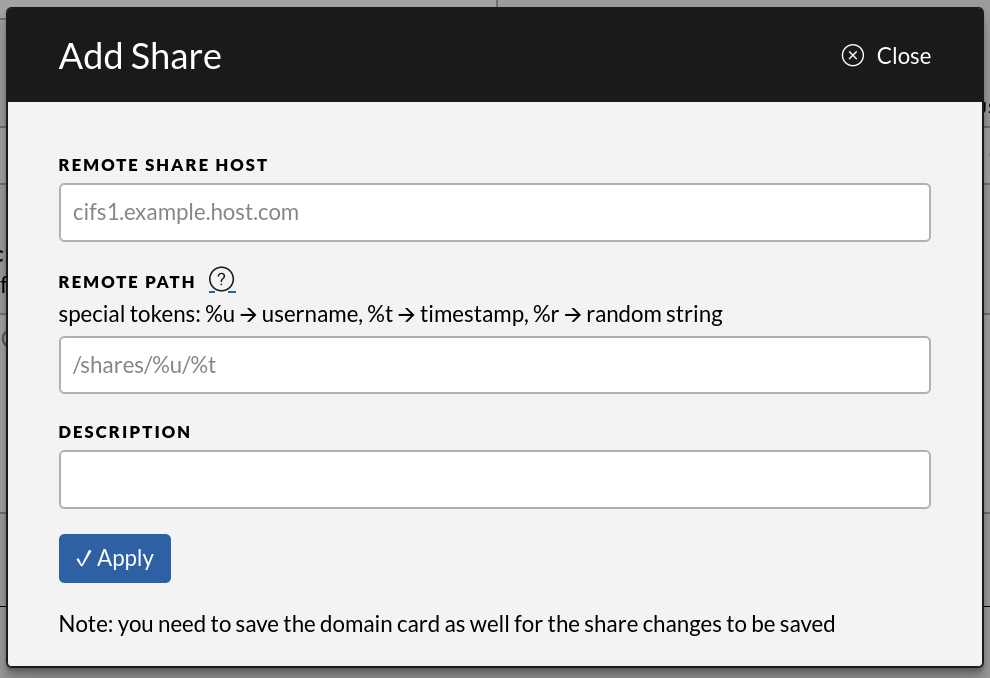
The share configuration supports the following:
- A hostname for the share
- The remote path, which designates the actual folder where files will be imported to on the share. The path uses special tokens which are replaced as indicated below. To avoid name collisions, a remote path has to include either a %t or %r token.
- %u $\rightarrow$ username
- %t $\rightarrow$ timestamp
- %r $\rightarrow$ random string
- An optional description which is shown to the user when selecting shares
Be sure to click “Save” on the domain in the upper right corner to commit any changes on the shares once finished.
Operation
Xtransfer operations can be seen in the ICC operations view.
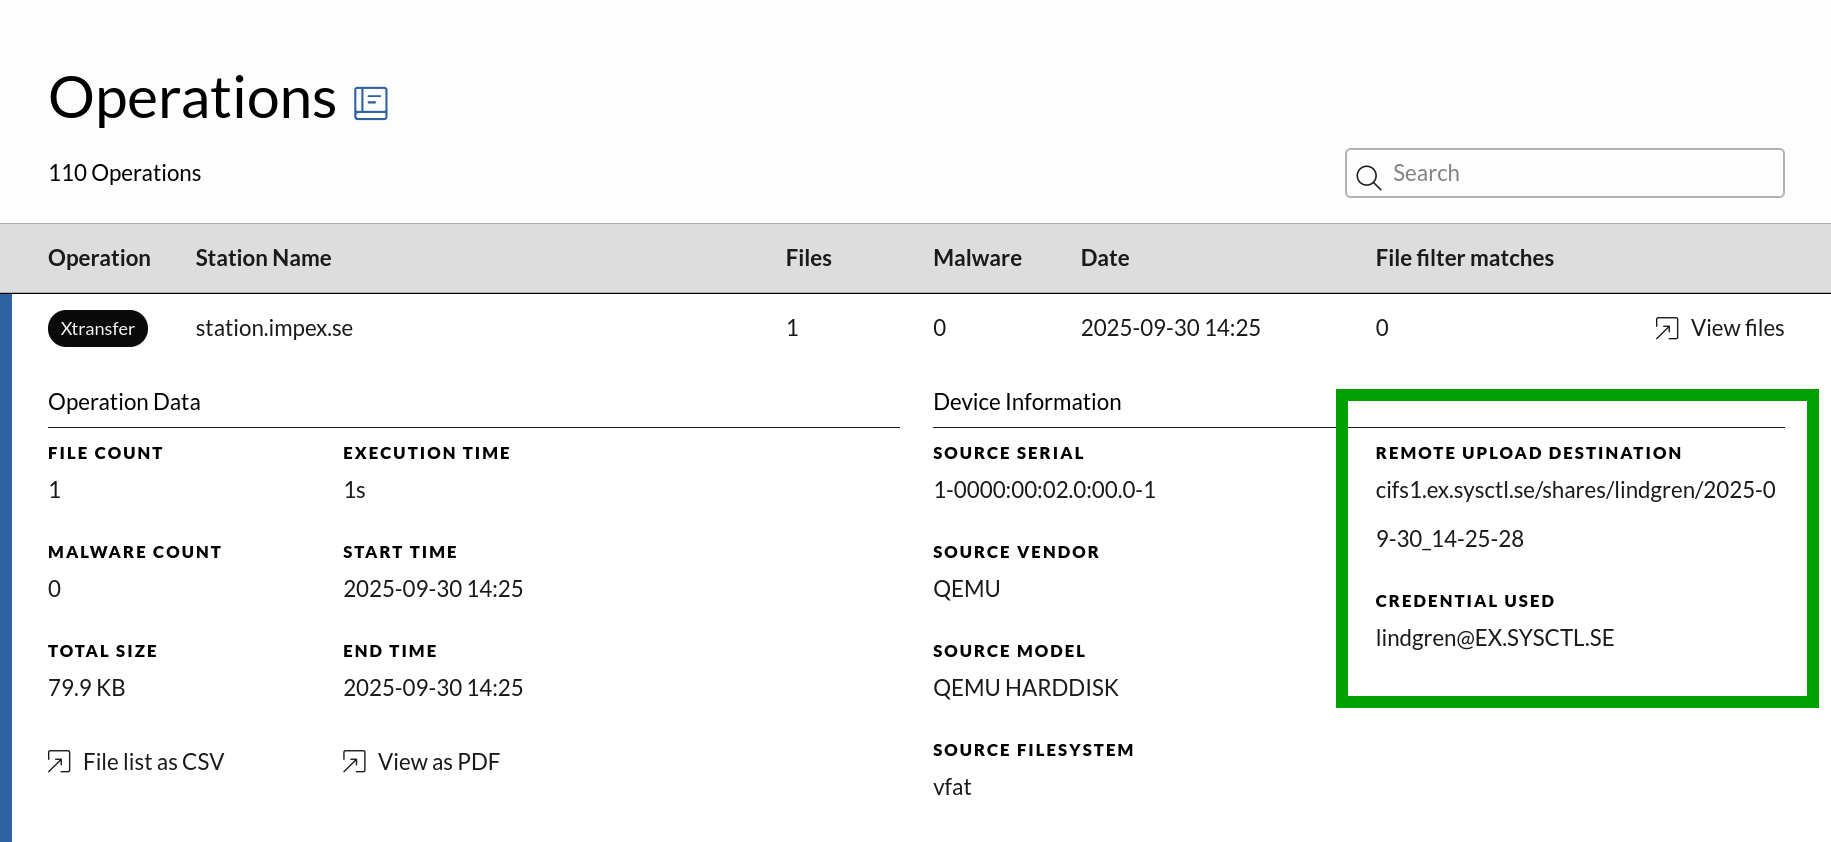
Here you can find the exact upload destination among others. Note that if a scan is unsuccessful the files will never be uploaded.
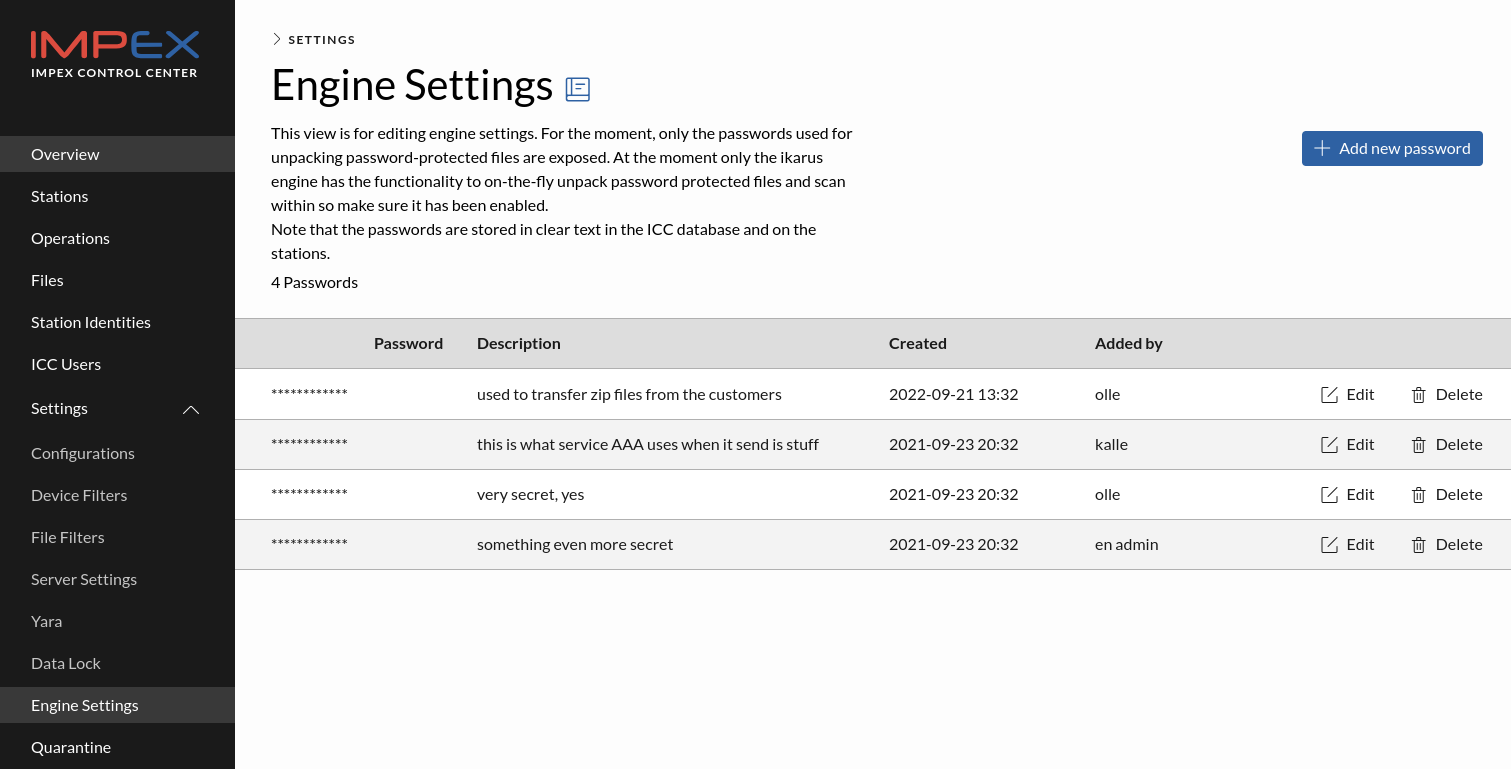
Engine Settings
This view gives administrators the possibility to add passwords to be used by the scanning engines so that they can unpack password protected files. At the moment only the Ikarus engine has support for this so please make sure it is enabled if using this feature. The passwords are then distributed to the scanning stations that will attempt to use them while scanning password protected files. The passwords are stored encrypted at rest on the stations using the TPM but they are stored in clear text in the ICC database.
Backup and Restore
Create backups of all data on the ICC and restore when needed.
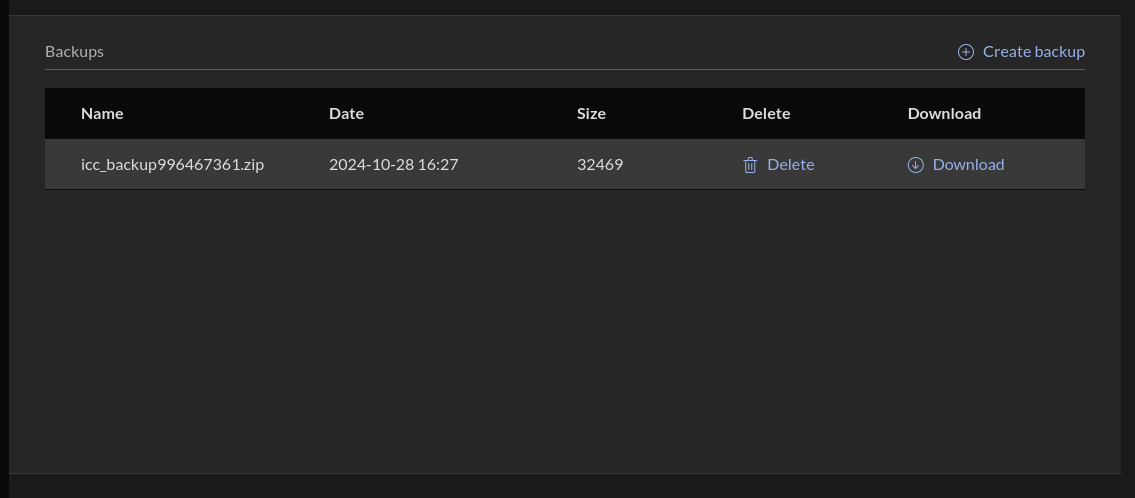
Backup
To create a backup simply press the create backup button, when the backup-process is completed the back up will be visible in the list.
A maximum of five backups can exist at the same time, and if a new backup is created when there is already five the oldest one will be removed and replaced with the created one.
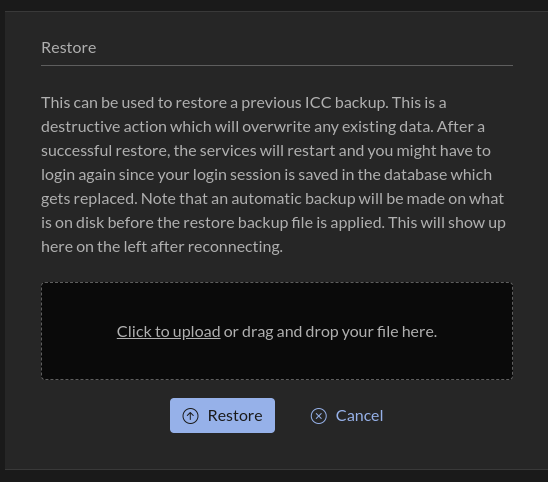
Restore
To restore from a backup upload the backup file and press restore. Remember this process is destructive and will overwrite all existing data with the data from the backup and after a successfull restore all services are restarted and you might have to login again since the login session is saved in the database.
Before the restore process is started an automatic backup will be made on what is on disk before the restore backup file is applied
Quarantine
The quarantine view is for looking at quarantined files and searching older scans for the same checksums and downloading files for further investigations.
Files that have been categorized as “malware” can be quarantined in the ICC, which has a dedicated quarantine area. Files are only uploaded to the quarantine if the option “Quarantine Files” has been enabled in the configuration for the specific Impex Station or Impex DataLock.
View
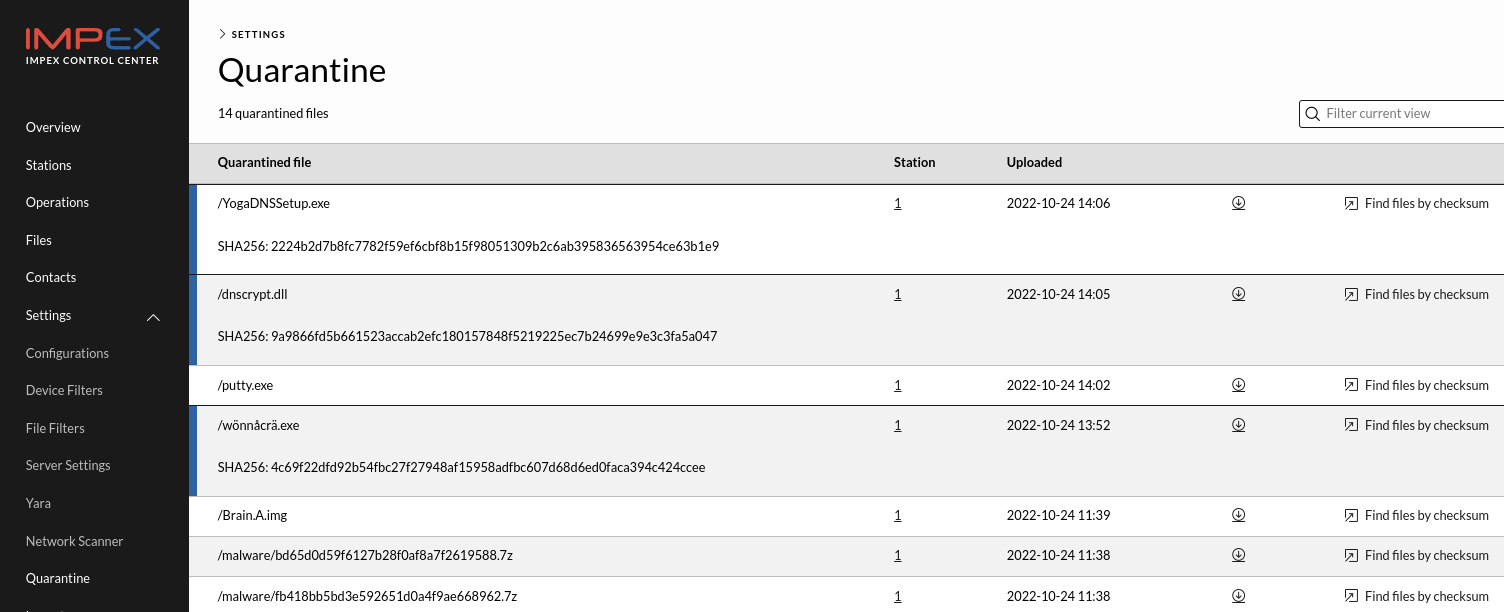
In the quarantine view, it is possible to see which USB Protect or DataLock detected the malware, and which date and time it was detected.
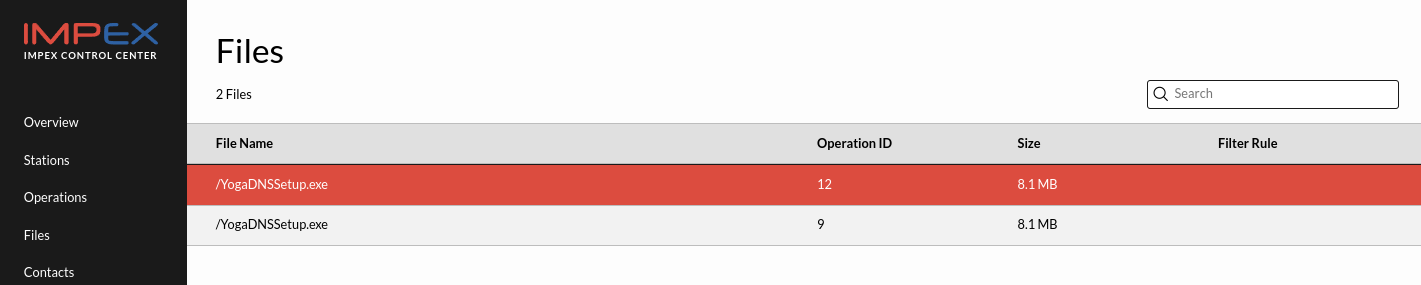
Clicking “Find files by checksum” link will search through all earlier scanned files to see if this malware got though earlier, for example before the Anti Virus started detecting it. In the image below one can see an example like that where the scan in operation 9 did not flag this file as malware but a later scan operation with id 12, did.
A quarantined file can also be quickly allowlisted by clicking the “Add File Filter Rule” button. This lets you create a rule that allows the file through scanners. Note that the rule still needs to be added to a file filter set before it takes effect, see File Filters for more information.
Download files from the quarantine
In the quarantine view, it is possible to download a copy of the quarantined file. This is useful if a file is to be further examined by other tools or other persons.
The downloaded quarantined files are saved as zipped and password protected files with the password “infected”. This is an industry accepted password which is a ‘standard’ password used in the security business for storing malware in zip files.
The name of the downloaded file consist of four parts:
- First the station ID, a numeric value
- An underscore
- A compressed version of the initial file name
- The original SHA256 checksum of the infected file, as seen in the file listing in the quarantine
PLEASE NOTE: The zipped file is not ending with file extension “.zip”
Find files by checksum
To find the scan that the quarantined file came from, click “Find files by checksum” and then expand the file view and click on the number in the Operation ID column.
Limitations
By default, Impex only uploads up to a maximum of 1 GB of a file. If a file is larger than 1 GB, the first 1 GB is uploaded as a truncated file.
PLEASE NOTE: When the file is truncated the actual checksum of the uploaded file is different from the original file. We are showing the original checksum in the quarantine view
Files in the quarantine are retained for 90 days, or if the space in the quarantine has grown over 10Gb, the oldest files are purged to make space.
Reset sides (USB ports)
In the event that the USB ports of an Impex station have been mapped to the wrong sides, they can be reset from the station card. Click on the button and the sides will be reset on the next configuration update check by the station.
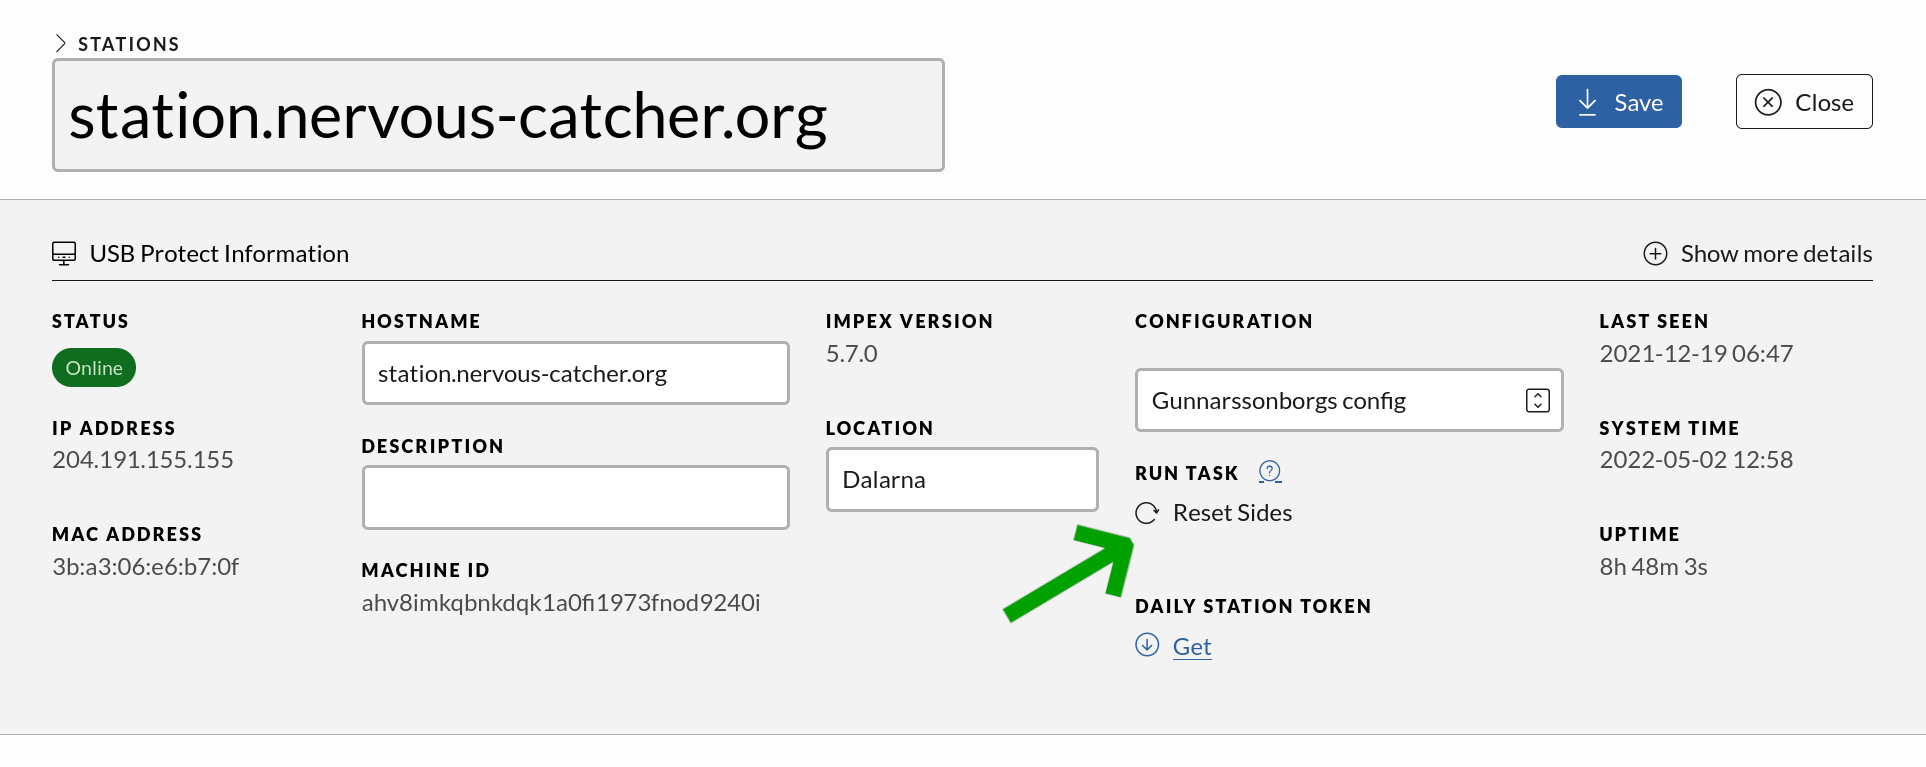
After the sides have been reset they need to be configured again on the Impex station. To configure the ports just plug in an USB drive in the desired port and choose left or right. Then you need to pull out the USB drive and insert it before the change takes effect.
Logging
The ICC logs to the syslog facility local6 which ends up in the system journal.
The log messages can be categorized into audit logs, operation log and action logs forwarded from the stations.
System log message format
The ICC follows RFC5424 and uses the following format for logs.
TIMESTAMP HOSTNAME APP-NAME: MESSAGE
- TIMESTAMP: “Dec 24 15:00:00”
- HOSTNAME: “iccserver”
- APP-NAME: “journal”
- MESSAGE: “message string”
The ICC MESSAGE format(“message string”)
"ICC Priorities [Function_name:Line_number] Function_message"
- ICC: Application name, always set to “ICC”
- Priorities: e.g. INFO, See the table below
- Function_name: Function who generate the log
- Line_numebr: Line number in function
- Function_message: Function message string
| Name (string) | Symbolic value |
|---|---|
| ALERT | LOG_ALERT |
| CRIT or CRITICAL | LOG_CRIT |
| DEBUG | LOG_DEBUG |
| EMERG or PANIC | LOG_EMERG |
| ERR or ERROR | LOG_ERR |
| INFO | LOG_INFO |
| NOTICE | LOG_NOTICE |
| WARN or WARNING | LOG_WARNING |
Log example: Station GET global Yara rules
Dec 24 15:00:00 icc journal: ICC INFO [__call__:58] [200] \
0HrPLzYVZyrH6qgFBp0J7zJVN1V7Ue@1.2.3.4 GET /yara/global (0 bytes) took 0.263s, \
returning 0 bytes
The Function message string: “[200] 0HrPLzYVZyrH6qgFBp0J7zJVN1V7Ue@1.2.3.4 GET /yara/global (0 bytes) took 0.263s, returning 0 bytes”:
- [200]: HTTP return code
- 0HrPLzYVZyrH6qgFBp0J7zJVN1V7Ue: Username accessing the API
- 1.2.3.4: IP address source
- GET: HTTP method
- /yara/global: URL-path
- (0 bytes) took 0.263s, returning 0 bytes: Transfer debug information
Malware alert log
When a scan is uploaded with a malware alert the following is logged to syslog by default:
Dec 24 15:00:00 icc journal: ICC WARNING [ICC:14] Station detected malware (https://icc.domain.tld/v/operations?byId=2)
The message includes a link to the actual scan operation report on the ICC. It will not include any sensitive information about the individual or devices involved in the scan.
This log message can be changed to a json message with more extensive information on the file and malware found under Server Settings -> Syslog format.
Station action logs
The ICC receive action logging from the stations and forward these to syslog. Note that these can contain sensitive information like device serial numbers and the identification field. These logs have the following format:
$date $hostname $application: ICC $level_name [$function_name:$line_number] $message
Here are some examples of log output for different actions. Note that instead of parsing these logs one can use the JSON API instead. The examples below also contain curl examples for making REST API queries to get the logged object.
Format device action
This is what gets logged to syslog when a user formats a device on station 1.
Mar 25 08:03:07 icc journal: ICC INFO [post:996] station 1 (Mon Mar 25 09:00:14 2024): \
  user with identification "kalle@example.org" initiating "format"
Mar 25 08:03:07 icc journal: ICC INFO [post:996] station 1 (Mon Mar 25 09:00:14 2024): \
  starting formatting /dev/sda (filesystem: vfat, size: 1048576)
Mar 25 08:03:07 icc journal: ICC INFO [post:996] station 1 (Mon Mar 25 09:00:15 2024): action "format" finished
Mar 25 08:03:07 icc journal: ICC INFO [perform_create:1420] Format uploaded: id=432, operation_type=format, \
  machine_id_id=1, created=2024-03-25 08:03:07.118425+00:00, start_time=2024-03-25 08:00:14+00:00, \
  end_time=2024-03-25 08:00:15+00:00, usb_source_serial=1-0000:00:01.2-1, usb_source_vendor=QEMU, \
  usb_source_model=QEMU HARDDISK, usb_source_filesystem=vfat, uuid=f3a9a39a-f863-431e-9877-5180727b00b2, \
  impex_version=4.0.0, is_format=True
$ curl -s -u admin:xxxxxx https://192.168.0.15/operations/?id=10&details=all |jq
{
  "count": 1,
  "next": null,
  "previous": null,
  "results": [
    {
      "id": 10,
      "created": "2021-09-21T08:40:53.708554-05:00",
      "start_time": "2021-09-21T10:40:47-05:00",
      "end_time": "2021-09-21T10:40:50-05:00",
      "execution_time_sec": 3,
      "usb_source_serial": "1-0000:00:01.2-2",
      "usb_source_vendor": "QEMU",
      "usb_source_model": "QEMU HARDDISK",
      "usb_source_filesystem": "vfat",
      "usb_source_bitlocker": false,
      "uuid": "86A43574-1AE1-11EC-92EF-04F2748B3DCD",
      "identification": "åäääåå",
      "impex_version": "2.5.0",
      "is_format": true,
      "is_shred": false,
      "machine_id": 1
    }
  ]
}
Shred device action
This is what gets logged to syslog when a user shreds a device on station 1.
Mar 25 08:26:04 icc journal: ICC INFO [post:996] station 1 (Mon Mar 25 09:25:53 2024): \
  user with identification "kalle@example.org" initiating "shred"
Mar 25 08:26:05 icc journal: ICC INFO [post:996] station 1 (Mon Mar 25 09:25:53 2024): starting shredding /dev/sda
Mar 25 08:26:05 icc journal: ICC INFO [post:996] station 1 (Mon Mar 25 09:25:54 2024): \
  starting formatting /dev/sda (filesystem: vfat, size: 1048576)
Mar 25 08:26:05 icc journal: ICC INFO [post:996] station 1 (Mon Mar 25 09:25:55 2024): action "shred" finished
Mar 25 08:26:04 icc journal: ICC INFO [perform_create:1418] Shred and format uploaded: id=434, \
  operation_type=shred, machine_id_id=1, created=2024-03-25 08:26:04.810912+00:00, \
  start_time=2024-03-25 08:25:53+00:00, end_time=2024-03-25 08:25:55+00:00, \
  usb_source_serial=1-0000:00:01.2-1, usb_source_vendor=QEMU, usb_source_model=QEMU HARDDISK, \
  usb_source_filesystem=vfat, uuid=73fc6055-84d2-4e50-96f1-c12c4e397687, impex_version=4.0.0, \
  is_format=True, is_shred=True
$ curl -s -u admin:xxxxxx https://192.168.0.15/operations/?id=11&details=all |jq
{
  "count": 1,
  "next": null,
  "previous": null,
  "results": [
    {
      "id": 11,
      "created": "2021-09-21T08:40:32.527276-05:00",
      "start_time": "2021-09-21T10:40:20-05:00",
      "end_time": "2021-09-21T10:40:26-05:00",
      "execution_time_sec": 6,
      "usb_source_serial": "1-0000:00:01.2-1",
      "usb_source_vendor": "QEMU",
      "usb_source_model": "QEMU HARDDISK",
      "usb_source_filesystem": "ext3",
      "usb_source_bitlocker": false,
      "uuid": "7689CA6E-1AE1-11EC-AD4E-CEF1748B3DCD",
      "identification": "öööööö",
      "impex_version": "2.5.0",
      "is_format": true,
      "is_shred": true,
      "machine_id": 1
    }
  ]
}
Scan action
This is what gets logged to syslog when a user makes a scan and transfer on station 1.
Mar 25 08:40:10 icc journal: ICC INFO [post] station 1 (Mon Mar 25 09:40:08 2024): \
  user with identification "kalle@example.org" initiating "transfer"
Mar 25 08:40:11 icc journal: ICC INFO [post] station 1 (Mon Mar 25 09:40:09 2024): scan: ikarus is enabled, using it
Mar 25 08:40:11 icc journal: ICC INFO [post] station 1 (Mon Mar 25 09:40:09 2024): scan: yara is enabled, using it
Mar 25 08:40:11 icc journal: ICC INFO [post] station 1 (Mon Mar 25 09:40:09 2024): scan: ClamAV is enabled, using it
Mar 25 08:40:11 icc journal: ICC INFO [post] station 1 (Mon Mar 25 09:40:09 2024): scan: F-PROT is enabled, using it
Mar 25 08:40:12 icc journal: ICC INFO [post] station 1 (Mon Mar 25 09:40:09 2024): scan: F-Secure is enabled, using it
Mar 25 08:40:12 icc journal: ICC INFO [post] station 1 (Mon Mar 25 09:40:09 2024): scan: Sophos is enabled, using it
Mar 25 08:40:12 icc journal: ICC INFO [post] station 1 (Mon Mar 25 09:40:09 2024): scan: Comodo is enabled, using it
Mar 25 08:40:12 icc journal: ICC INFO [post] station 1 (Mon Mar 25 09:40:09 2024): scan: ESET is enabled, using it
Mar 25 08:40:13 icc journal: ICC INFO [post] station 1 (Mon Mar 25 09:40:09 2024): \
  scan: waiting for checksum calculations to finish..
Mar 25 08:40:30 icc journal: ICC INFO [send_scan_report:877] Scan uploaded: id=436, operation_type=transfer, \
  machine_id_id=1, created=2024-03-25 08:40:30.452667+00:00, files_count=1, total_size=81856, \
  start_time=2024-03-25 08:40:09+00:00, end_time=2024-03-25 08:40:19+00:00, execution_time_sec=10, \
  usb_source_serial=1-0000:00:01.2-1, usb_source_vendor=QEMU, usb_source_model=QEMU HARDDISK, \
  usb_source_filesystem=vfat, usb_target_serial=1-0000:00:01.2-2, usb_target_vendor=QEMU, \
  usb_target_model=QEMU HARDDISK, usb_target_filesystem=vfat, uuid=8b936b36-a152-42b0-871b-7ff703cffdcb, \
  impex_version=4.0.0, av_info=ikarus,6.2.7,,106907,Mon Mar 25 08:22:59 UTC 2024|yara,4.1.3,,,\
  Mon Mar 25 08:03:06 UTC 2024|ClamAV,0.103.11,,27224,Mon Mar 25 08:24:09 UTC 2024|F-PROT,6.7.10.6267,,\
  4.6.5.141,Wed Aug 11 06:29:55 UTC 2021|F-Secure,2.50 20576,,2024-03-22_07,Fri Mar 22 12:08:22 UTC 2024|\
  Sophos,5.74.0,,6.06,Thu Mar 14 14:30:23 UTC 2024|Comodo,1.1.268025.1,,,
  Thu Mar 14 14:30:19 UTC 2024|ESET,1.1.1.0,,28950,Mon Mar 25 08:31:31 UTC 2024
Mar 25 08:40:30 icc journal: ICC INFO [post] station 1 (Mon Mar 25 09:40:10 2024): scan: checksums are done
Mar 25 08:40:30 icc journal: ICC INFO [post] station 1 (Mon Mar 25 09:40:19 2024): scan finished, found 0 malware
Mar 25 08:40:30 icc journal: ICC INFO [post] station 1 (Mon Mar 25 09:40:24 2024): action "transfer" finished
$ curl -s -u admin:xxxxxxx https://192.168.0.15/operations/?id=12&details=all |jq
{
  "count": 1,
  "next": null,
  "previous": null,
  "results": [
    {
      "id": 12,
      "created": "2021-09-21T08:39:50.071342-05:00",
      "files_count": 1,
      "malware_count": 0,
      "total_size": 81856,
      "start_time": "2021-09-21T10:38:49-05:00",
      "end_time": "2021-09-21T10:39:48-05:00",
      "execution_time_sec": 59,
      "usb_source_serial": "1-0000:00:01.2-2",
      "usb_source_vendor": "QEMU",
      "usb_source_model": "DYSF",
      "usb_source_filesystem": "vfat",
      "usb_source_bitlocker": false,
      "usb_target_serial": "1-0000:00:01.2-1",
      "usb_target_vendor": "QEMU",
      "usb_target_model": "HARDDISK",
      "usb_target_filesystem": "ext3",
      "usb_target_bitlocker": false,
      "uuid": "407C2A52-1AE1-11EC-BC83-3FF1748B3DCD",
      "identification": "someuser@example.com",
      "impex_version": "2.5.0",
      "exception_count": 0,
      "av_info": "F-PROT,6.7.10.6267,,4.6.5.141,2021-09-11 00:17:41|yara,4.1.0,,,2021-09-21 13:58:31|\
                  Comodo,1.1.268025.1,,,2021-09-20 11:22:09|F-Secure,1.0 build 0069,,2021-09-21_01,\
                  2021-09-21 10:24:04|ESET,1.1.1.0,,,2021-09-21 13:36:27|\
                  ClamAV,0.103.3,,26298,2021-09-21 14:00:37|Sophos,5.74.0,,5.87,2021-09-21 13:45:36",
      "is_format": false,
      "is_shred": false,
      "machine_id": 1
    }
  ]
}
Further, getting the files for that scan can be done with
$ curl -s -u admin:xxxxx https://192.168.0.15/files/?id=12|jq
{
  "count": 1,
  "next": null,
  "previous": null,
  "results": [
    {
      "id": 7,
      "file_name": "/jagm-testing.jpg",
      "file_size": 81856,
      "md5": "7bc36b22c88cd76eb78f06dc8753d475",
      "sha1": "5ac1cb2da7401706472d47577042dcb283936720",
      "sha256": "5896f1110e7007523919b3951dee966ee23fa5a50f4eb64df1a14b54dd33a2b0",
      "scanreport_id": 12,
    }
  ]
}
Note: the logging format and object fields can change between major releases.
Station audit logs
The stations log security relevant events to the ICC.
Denied device log
Inserting a USB device that is not a storage device will get blocked and logged. This could be an intrusion attempt into the station.
Nov 17 14:20:33 icc.sysctl.se gunicorn[922]: ICC INFO [post:1189] station 16, gen2ver.sysctl.se, AUDIT:broker:INFO, \
    (2025-11-17T13:20:34.229596+00:00): device was blocked by udev: {"id":"b900de8d-4cbd-4541-addc-3c035da21db3", \
    "date":"2025-11-17 14:20:34+01:00","message":"The device is not a storage device","devtype":"wlan", \
    "address":"/devices/pci0000:00/0000:00:14.0/usb1/1-2/1-2:1.0/net/wlan0","side":"right","vendor":"Ralink",\
    "model":"802.11_n_WLAN",\
    "model_from_database":"RT2870/RT3070 Wireless Adapter","misc":"subsystem: net, driver: , device: "}
In case filesystem filters are configured a blocked device log entry looks similar.
Nov 17 14:36:24 icc.sysctl.se gunicorn[917]: ICC INFO [post:1189] station 16, gen2ver.sysctl.se, AUDIT:broker:INFO, \
    (2025-11-17T13:36:25.426223+00:00): device was blocked by udev: {"id":"dff3067b-926d-49e7-956e-1016f50b9254", \
    "date":"2025-11-17 14:36:25+01:00","message":"Filesystem 'exfat' is not allowed","devtype":"partition",\
    "address":"/devices/pci0000:00/0000:00:14.0/usb2/2-4/2-4:1.0/host3/target3:0:0/3:0:0:0/block/sda/sda1", \
    "side":"left","vendor":"Kanguru","model":"Flash_Trust","model_from_database":"",\
    "misc":"subsystem: block, driver: usb-storage, device: /dev/sda1"}
NFC UID station unlock log
An audit event will be logged in case an unknown NFC access card was used to try and unlock a station.
Nov 17 14:36:24 icc.sysctl.se gunicorn[917]: ICC INFO [post:1189] station 16, gen2ver.sysctl.se, AUDIT:broker:INFO,\
    (2025-11-17T13:36:25.426223+00:00): NFC card with unknown UID aa:bb:cc:dd was seen
Successful unlock is also logged.
Nov 17 14:36:24 icc.sysctl.se gunicorn[917]: ICC INFO [post:1189] station 16, gen2ver.sysctl.se, AUDIT:broker:INFO, \
    (2025-11-17T13:36:25.426223+00:00): user Kalle unlocked station with NFC
Xtransfer smart card audit events
A failed authentication event.
Nov 17 14:36:24 icc.sysctl.se gunicorn[917]: ICC INFO [post:1189] station 16, gen2ver.sysctl.se, AUDIT:broker:INFO, \
    (2025-11-17T13:36:25.426223+00:00): user Kalle failed to authenticate for realm EXAMPLE.COM
A succesful authentication event.
Nov 17 14:36:24 icc.sysctl.se gunicorn[917]: ICC INFO [post:1189] station 16, gen2ver.sysctl.se, AUDIT:broker:INFO, \
    (2025-11-17T13:36:25.426223+00:00): user Kalle authenticated with kerberos credential for realm EXAMPLE.COM
Cached credentials was removed.
Nov 17 14:36:24 icc.sysctl.se gunicorn[917]: ICC INFO [post:1189] station 16, gen2ver.sysctl.se, AUDIT:broker:INFO, \
    (2025-11-17T13:36:25.426223+00:00): cached kerberos credential was removed
Workflows
This chapter contains a compilation of recommended workflows when using the ICC together with Impex Stations. These workflows help a user to better administer the fleet of Impex devices.
Workflows described here includes:
- Registering a new Impex station
- Enabling the Scan Only feature
- Enabling the Format Only feature
- Create a USB device filter block and allow list
- Configure Email on Malware Alerts
- Configuring the SMTP Server Settings
- Configure Email Alerts
Registering a new Impex Station
When a new Impex Station is connected it will register with the ICC but it is not enough for it to become active.

An administrator needs to look at the registration and approve or delete it. A station card is only created if an admin approves the registration. This is also an appropriate time to edit6 the title, location and description of the Impex Station to make it easier to identify. The title is automatically created from the hostname of the Impex Station and its IP address which in most cases is a bit too long but serves its purpose of initial identification.
To approve a station, login as user “admin” and click the “Approve” button on the top right corner after reviewing the station registration details.
It is possible, and recommended, to turn off registrations after all Impex stations planned for are connected. This is done in the Server Settings view.
Enabling the Scan Only feature
By default one needs to use two USB drives with the Impex Station. The concept being that one should use an internal easily recognisable USB drive as the target and then the external “dirty” USB drive as the source. But it is also possible to use only one side of the Impex Station if “Show scan option” is enabled in the configuration.
How to enable “Show scan option”:
- Click on the stations configuration name
- Click “Edit” and make sure the check-box “Show Scan Option” is checked
- Click the “Save” button
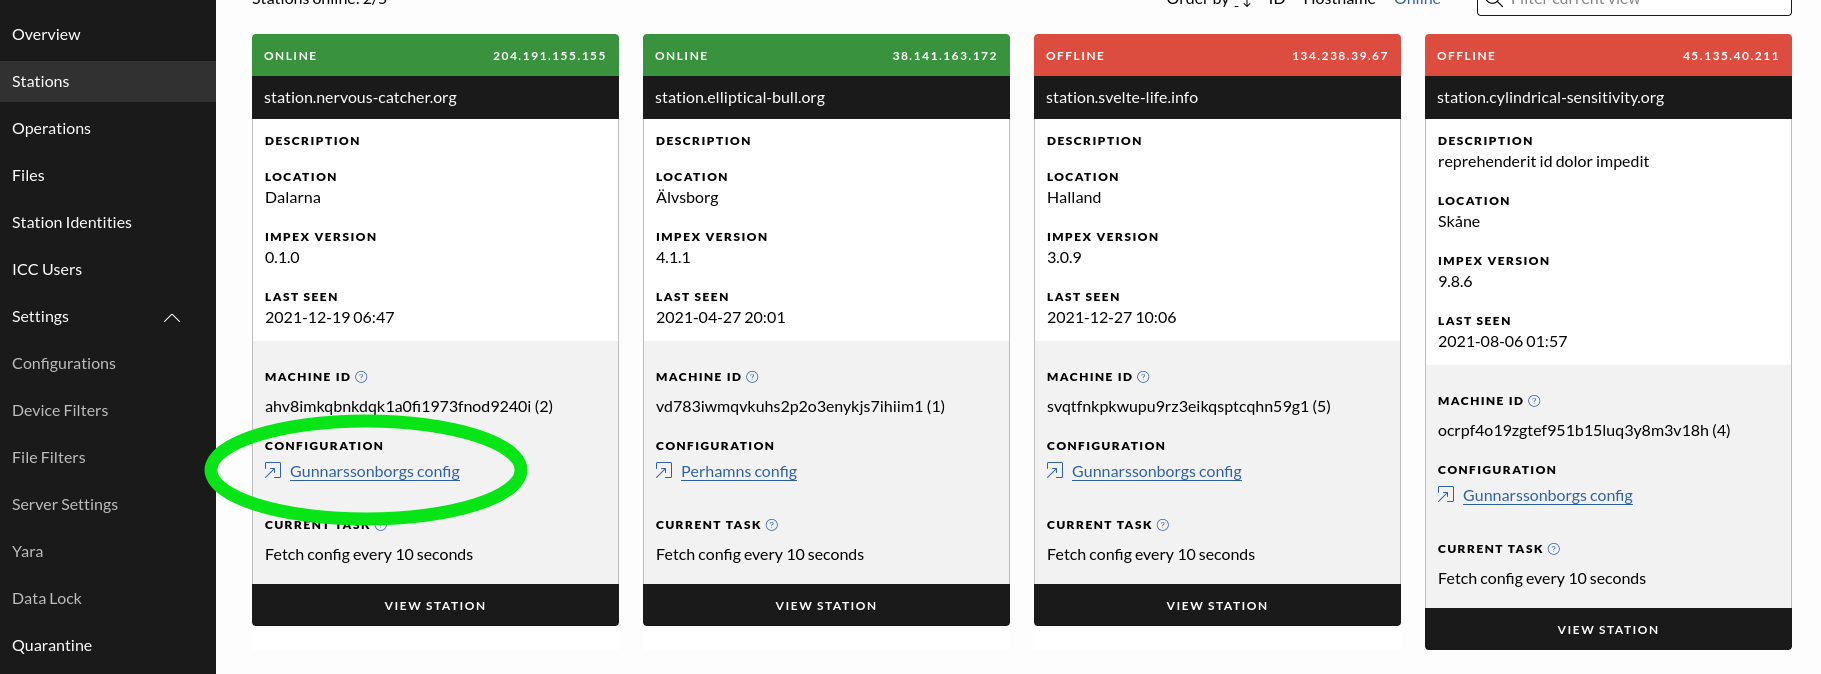
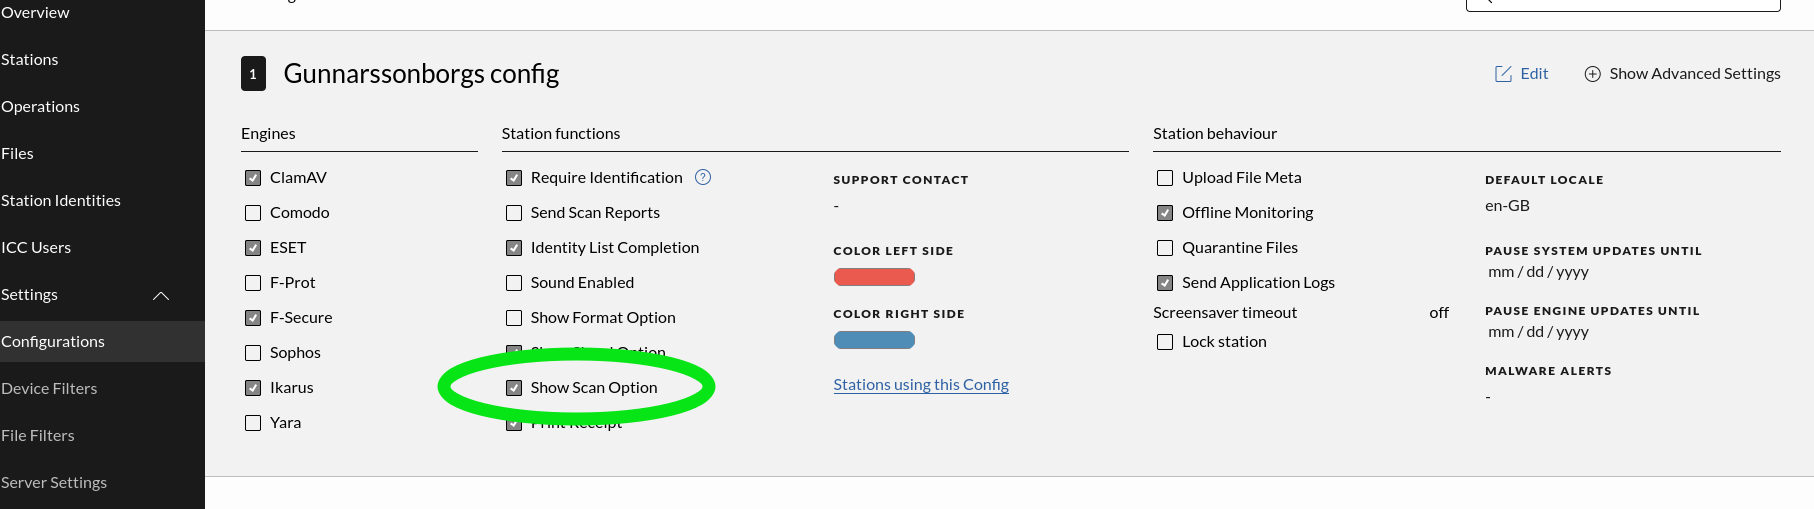
The “Scan Only” feature will now be active the next time the station fetches its config which depends on how often it is set to fetch its config.
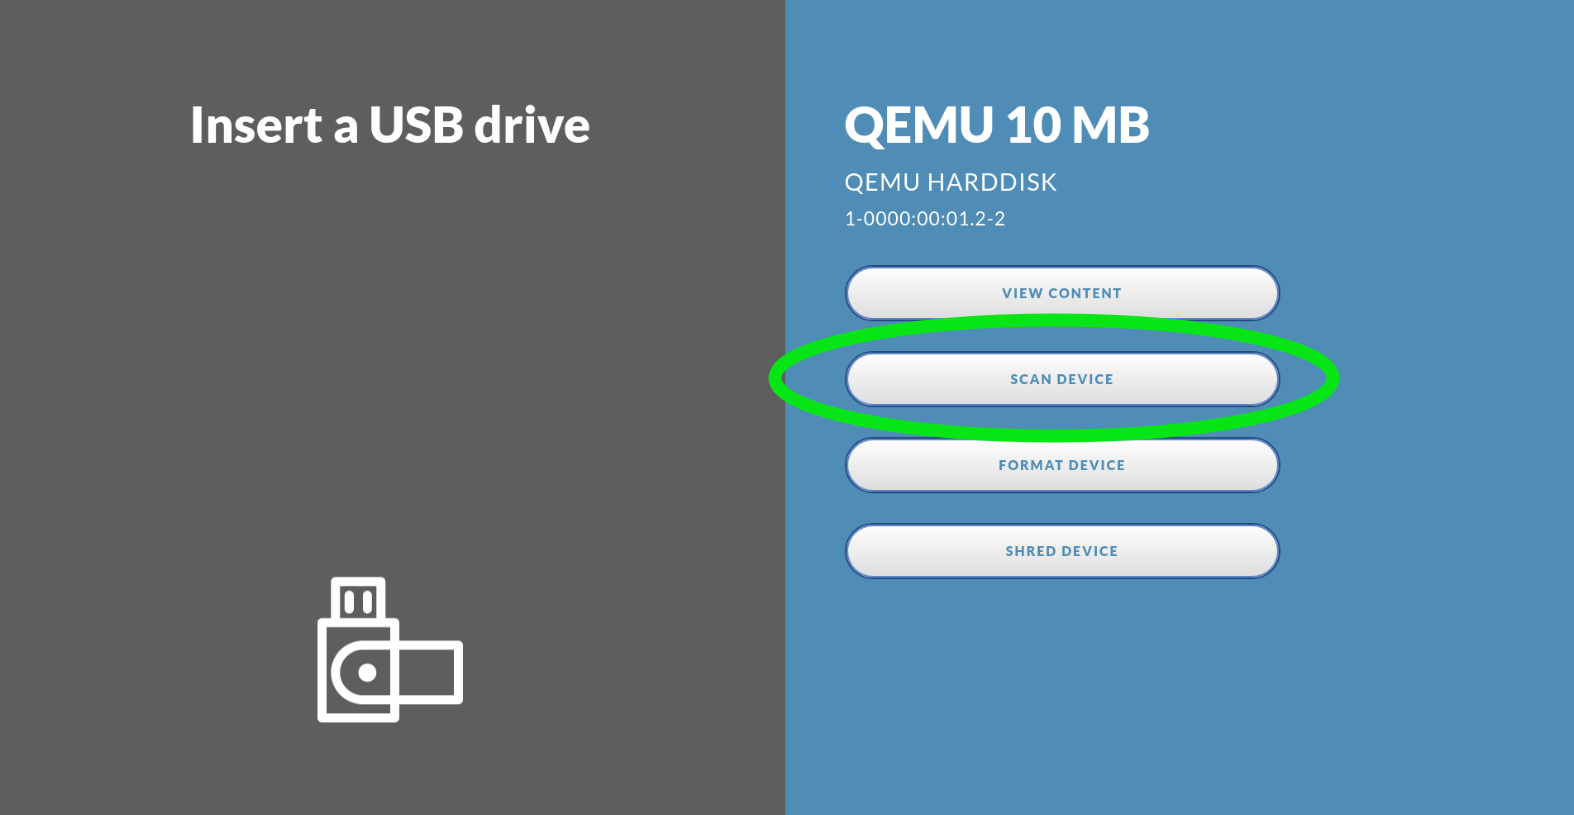 {#id .class height=300px}
Enabling the Format Only feature
It is possible to use the Impex Station to format USB drives, using any side of it. For this option to appear when a single USB drive is inserted, it needs to be enabled on the ICC for that station’s configuration. This setting is called “Show Format Option” on the configuration card.
Step by step on how to enable it for a station:
- Click on the stations configuration name
- Click “Edit” and make sure the check-box “Show Format Option” is checked
- Click the “Save” button
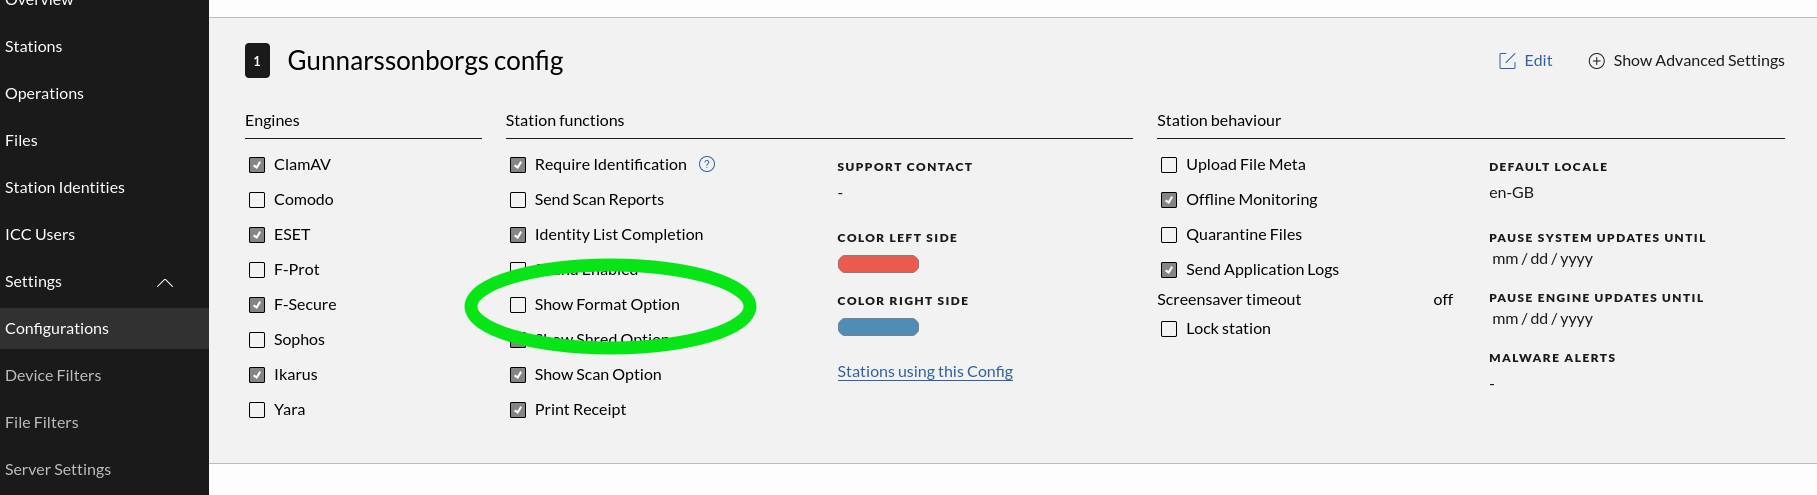
The “Format Only” feature will now be active the next time the station fetches its config which depends on how often it is set to fetch its config.
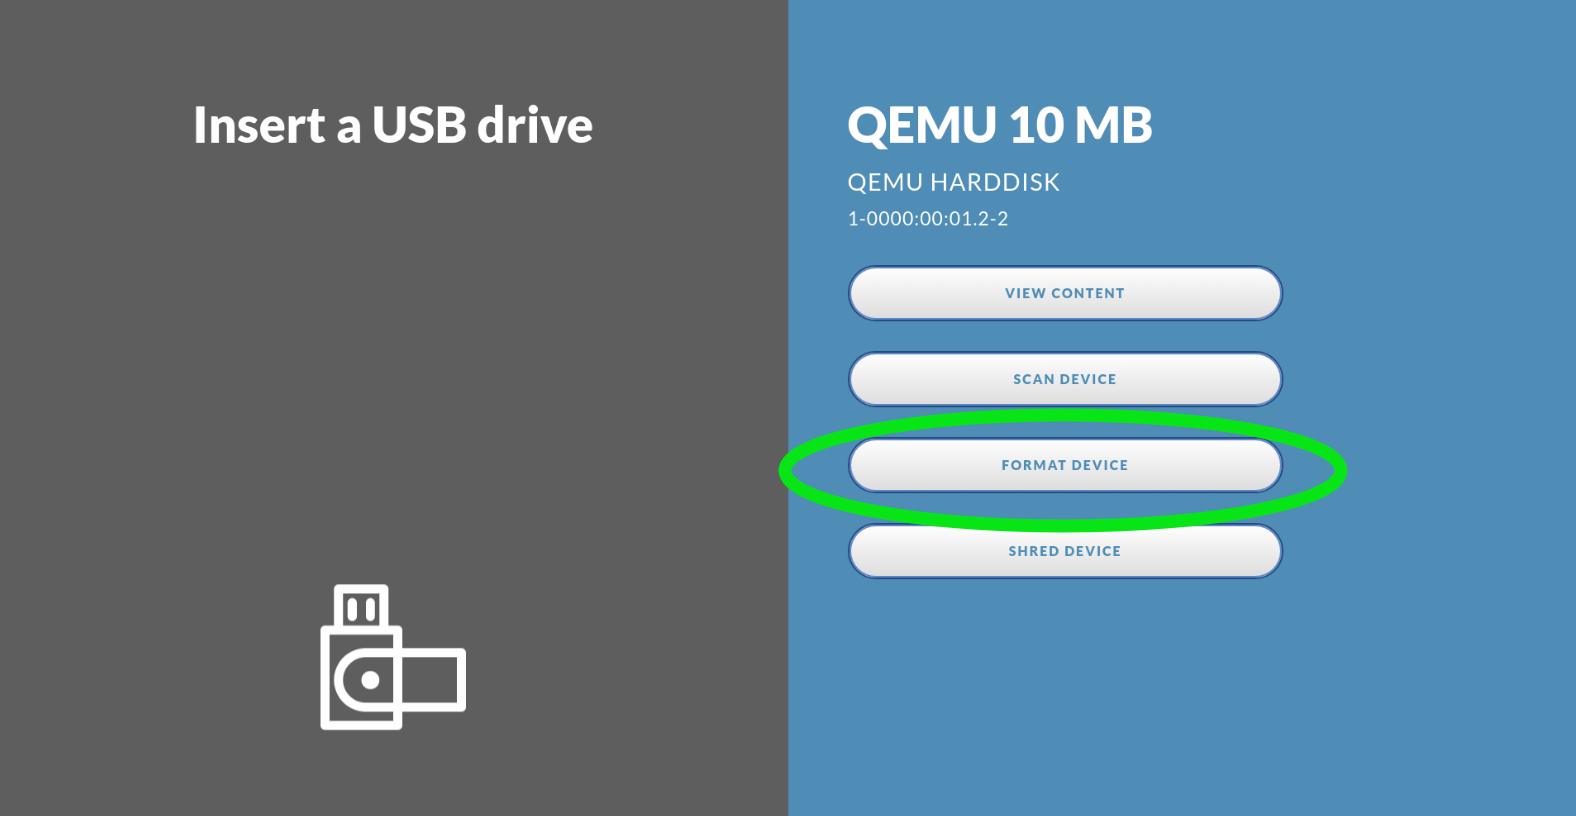 {#id .class height=300px}
Create a USB device filter block and allow list
In this workflow (Device Filters can be found in the menu under Settings -> Device Filters) we have a scenario where external USB devices are not allowed on the corporate network. Only a certain vendor and model is allowed and one is only allowed to bring files into the site, no exporting of files.
The implicit rule is to allow all drives which means it makes sense to start with a block all rule and then add allow list rules for what is allowed. Thus we want to:
- Start with one block all rule
- Then add one allow any as a source drive rule since the external drives can be of any brand
- Then add one allow only a certain model and vendor as the target drive rule
To group these rules we first need to create a rule set.
Create a set.

After naming the set, save it. Now we are ready to create rules for the set. Click the “Manage Rules” and then “Create Rule”.
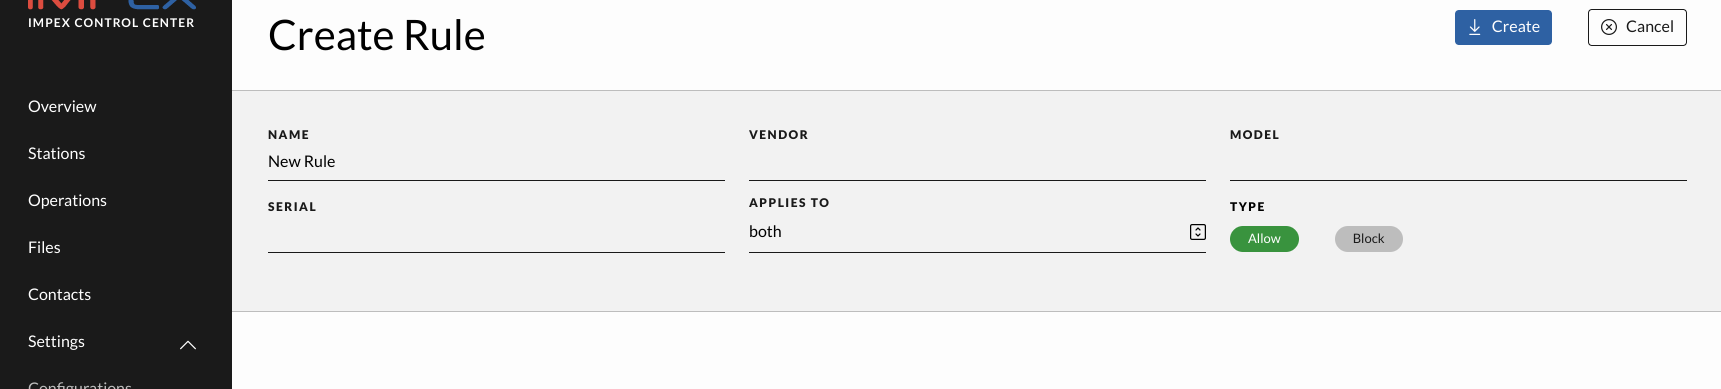
Click the create rule. Lots of fields to fill in and no room for errors, lets see what the model and vendor we want to allow is called by looking at an existing Operation done with one of the USB devices we want to allow.
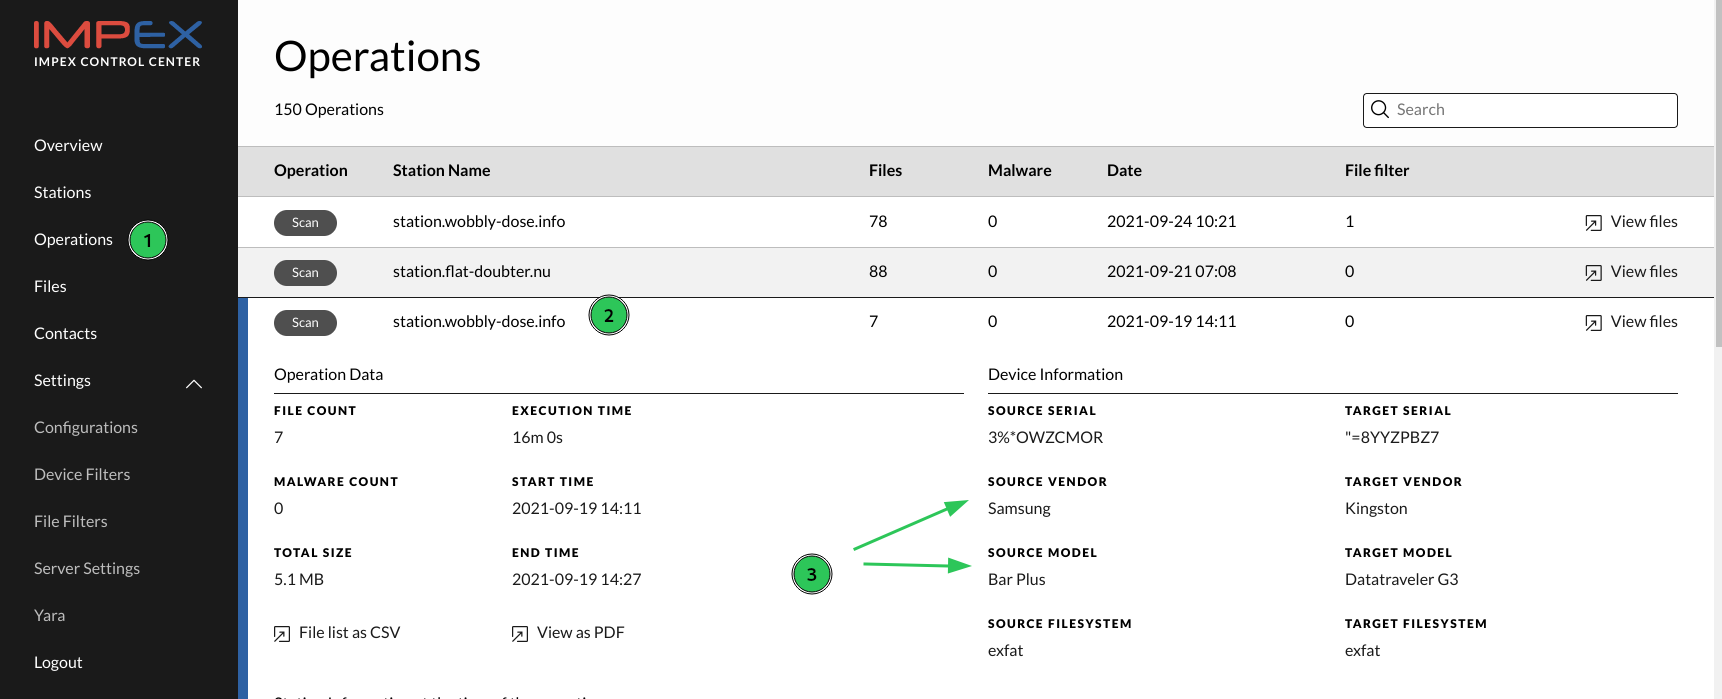
Go to an existing Operation and take note of the vendor and model, in this case Samsung and Bar Plus.
Now go back to the rules page by clicking “Device Filters” in the menu and then “Manage Rules. Then create the first block all rule.
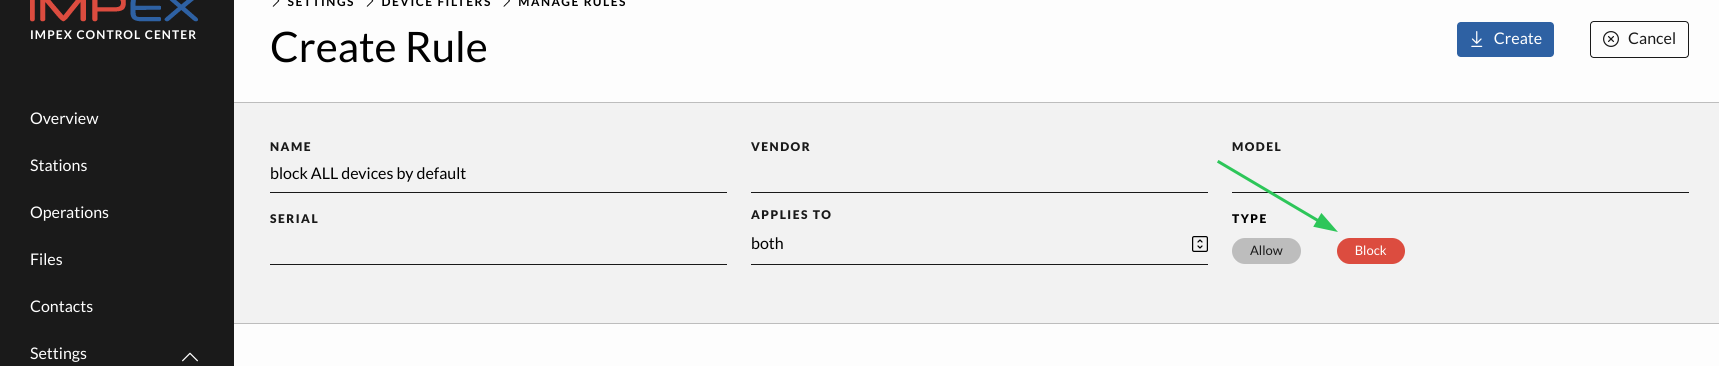
Then create the rule to allow all drives to be used as a source device.

Now create the rule for allowing only the company drive to be the destination, target, drive.
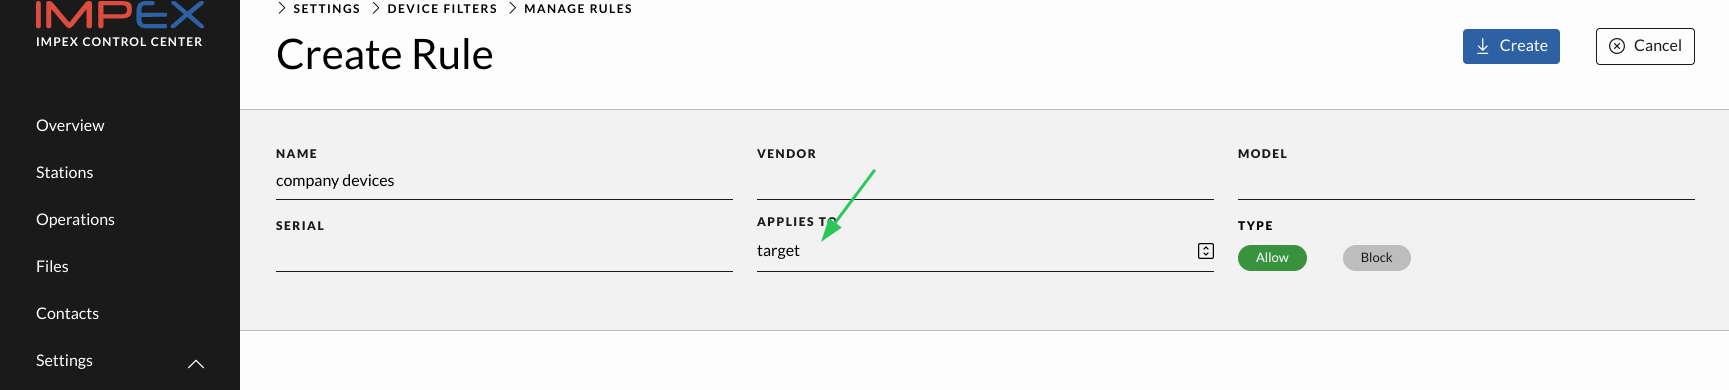
Fill in the model and vendor with the information that we took note of from the Operations page earlier. Now all rules have been created that we need for building our set.
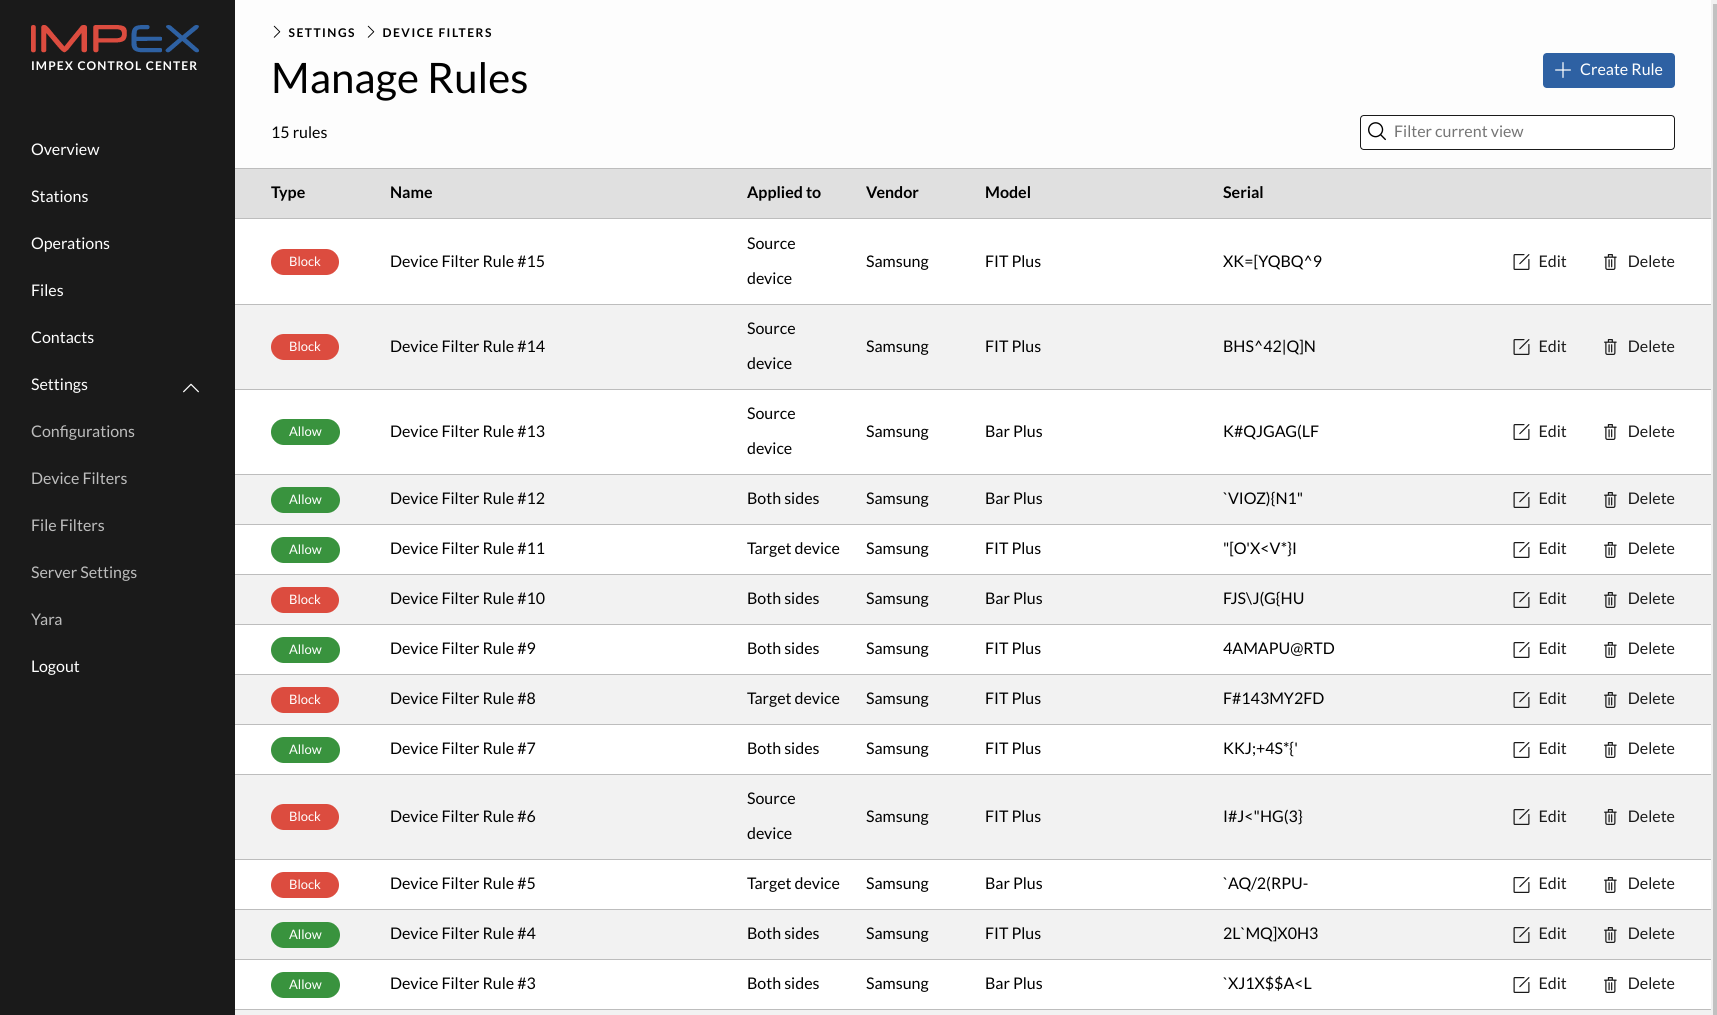
Go back to device filter sets and click “Edit” on the set to update. Click “Show rule(s)” to open the list of rules and click the one to add. After that rule is selected press “Add selected” to add it to the device set7.
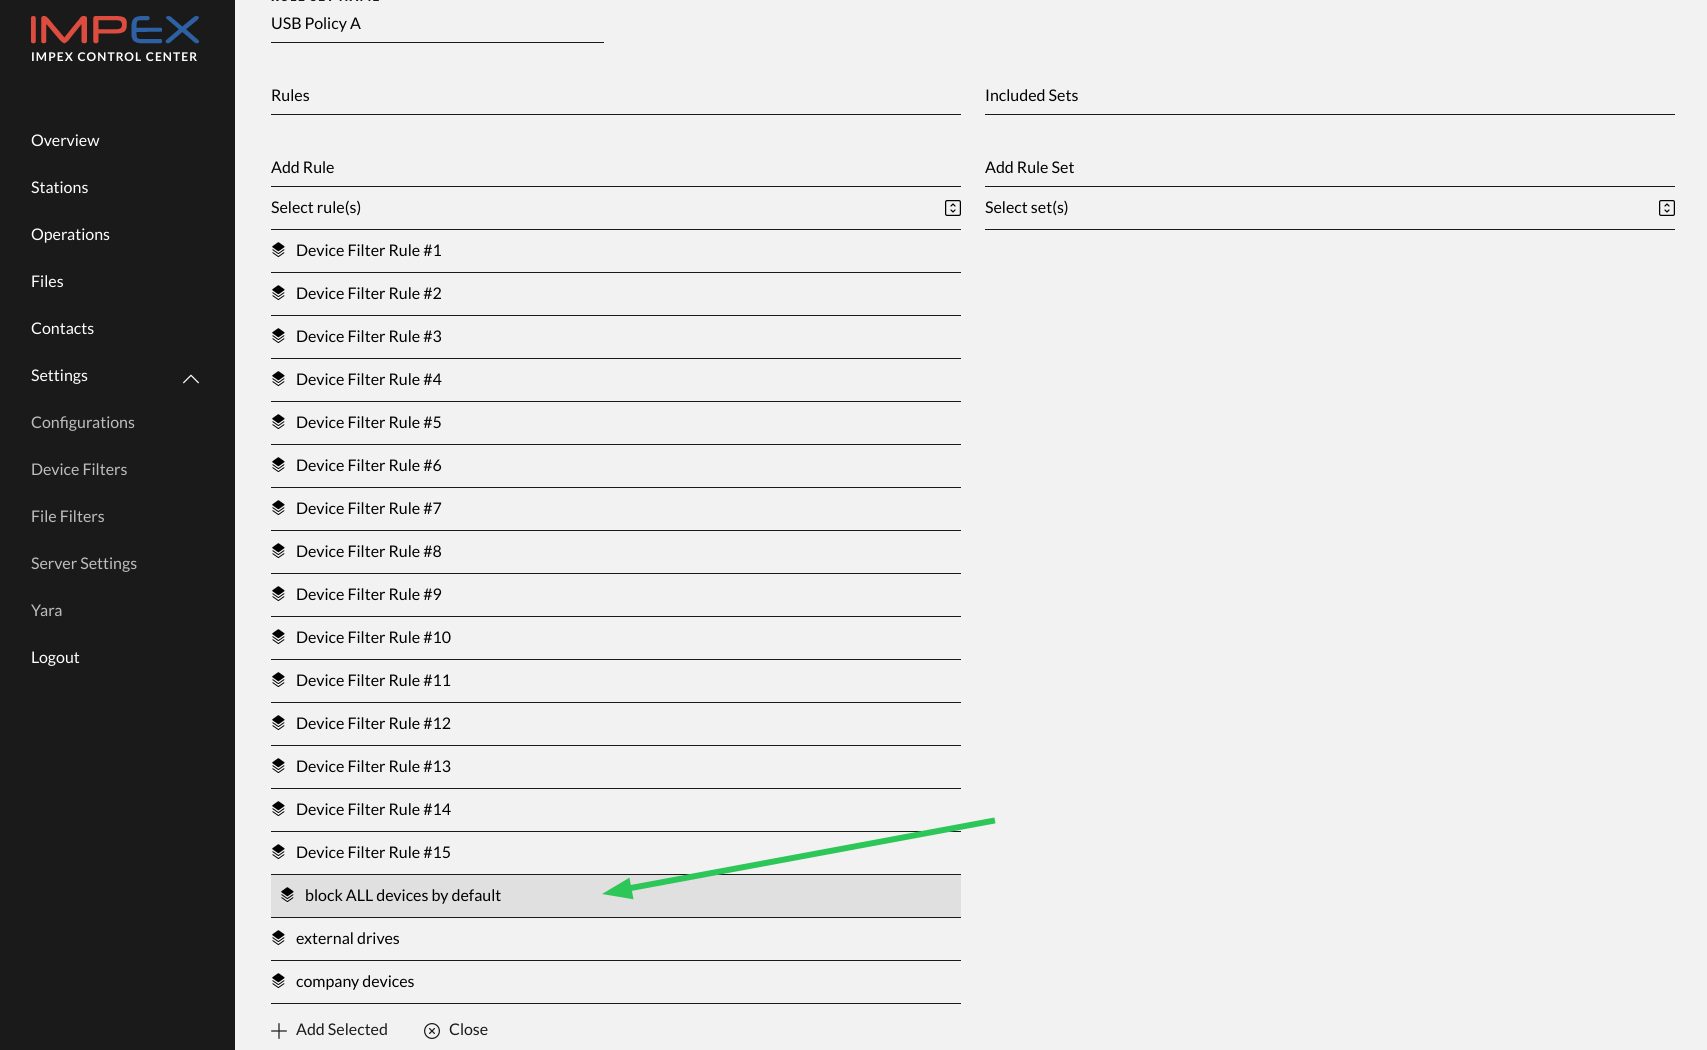
The final rule set then looks like following (do not forget to click “Close” to make sure it gets saved):
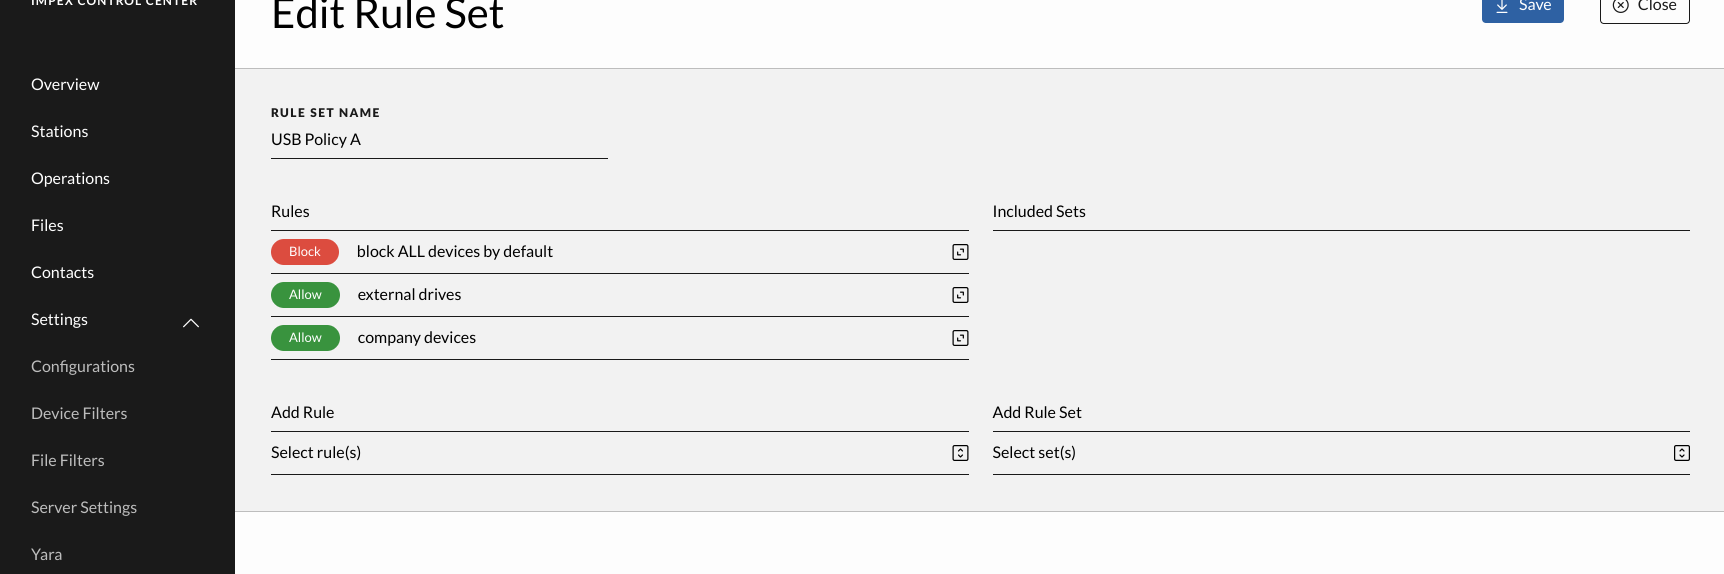
To activate this ruleset for a configuration go to the configurations view and click “Edit” on the configuration to update. Select the rule set in the “Device Filters” drop down.
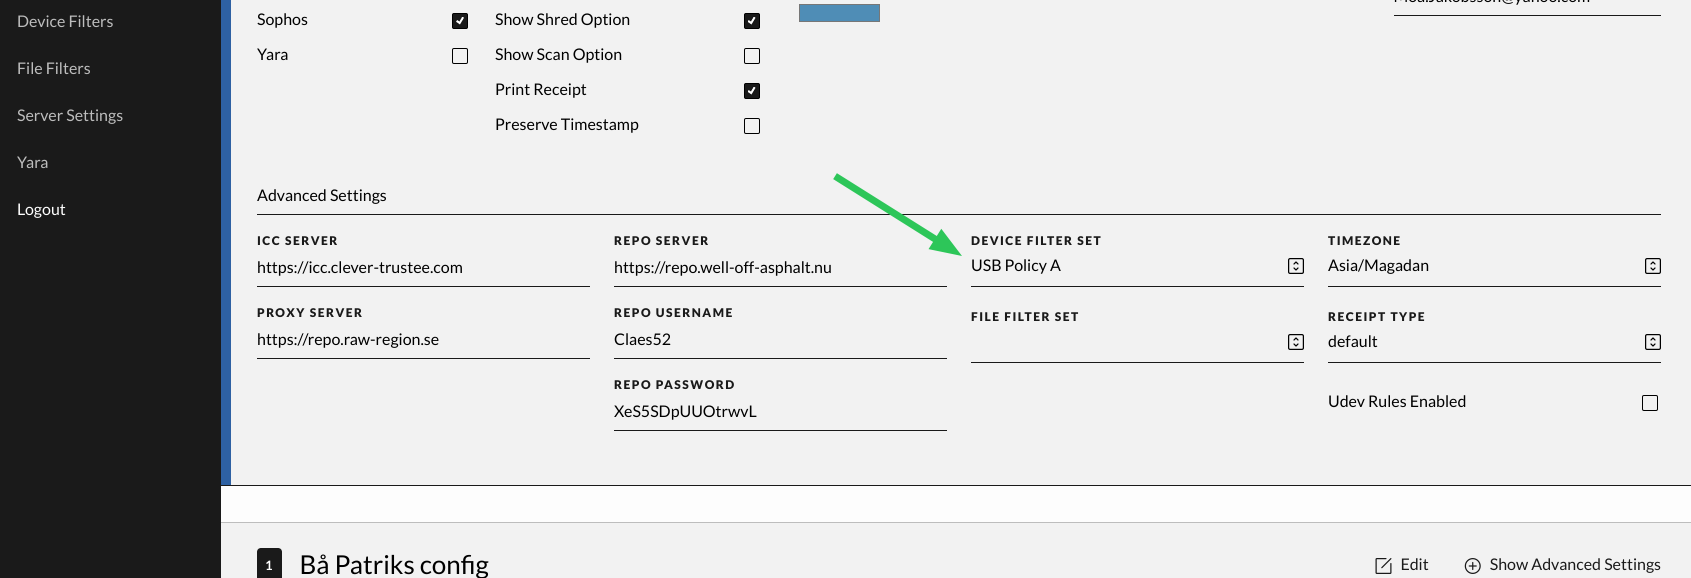
Click “Save Config” to enable it and wait for the next time the station fetches its config for it to be active out on the scanning stations.
When a user is trying to use another target drive than the allowed one the screen will go red with a message saying it got blocked by rule 11 since that is the default block all rule we started with in our example.
Configure Email on Malware Alerts
To get email alerts the ICC server must first be able to send email via the company email server.
Configuring the SMTP Server Settings
By default the SMTP settings used are 127.0.0.1 and port 25 which means the ICC server can only deliver email locally. To be able to send Malware Alerts and Reports to a company email address one needs to update these settings to point to a SMTP server that the ICC server can use to deliver the email alerts.
First off make sure the company firewalls are allowing the ICC server to connect to the mail server.
When that is done it is time to configure the ICC to use it, it is located under Settings -> Server Settings.
- Click Edit

- Click Save Settings (note that we have added an invalid test email)
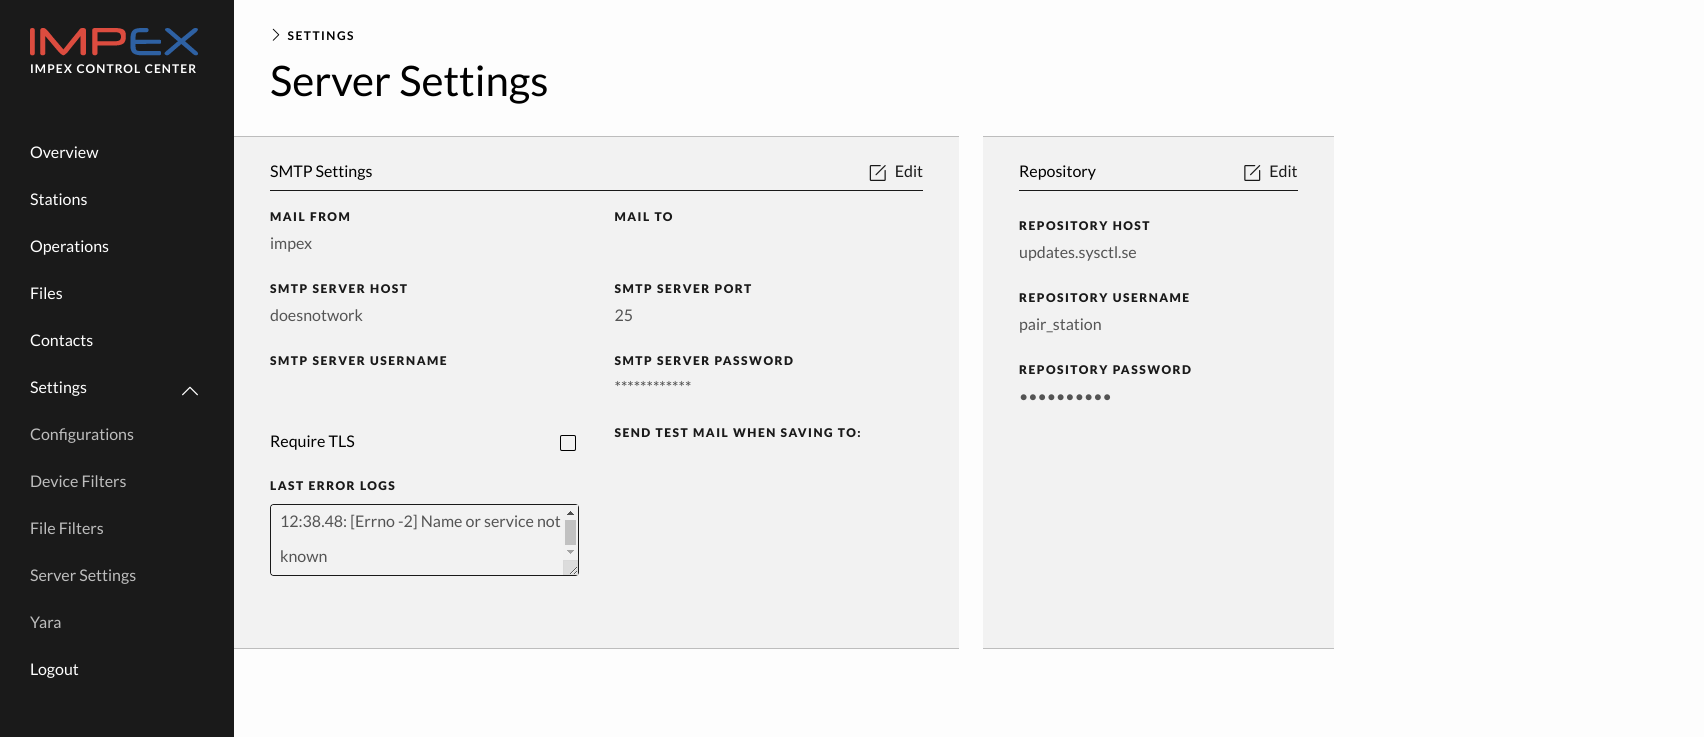
- We can see the error message in the “Last Error Logs” text area, in this case the email-server reported back that no such address exists
- Click Edit Settings and enter a correct test email address and click “Save Config”
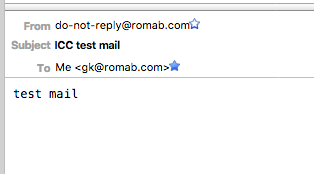
- This time we get a test email which means that all is fine with the setup
Configure Email Alerts
Now that the email server settings are correct, it is time to configure the malware alerts.
- Choose Configurations in the menu and click Edit Config on the configuration card belonging to the Station or Stations where Malware Alerts should be activated
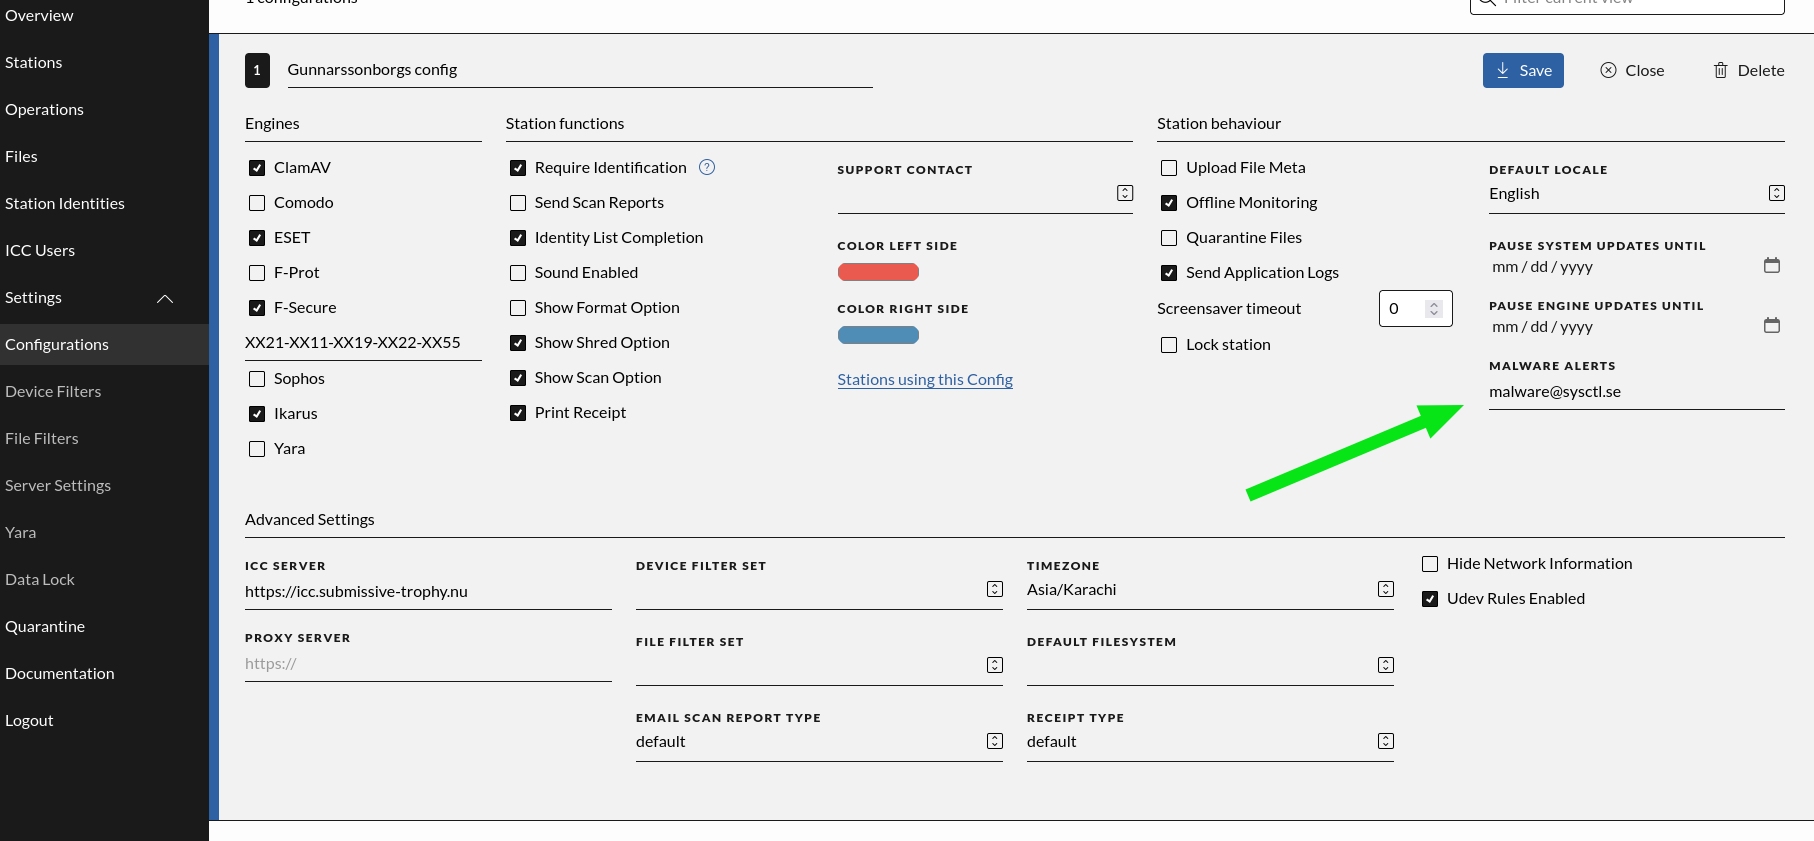
- Fill in a comma separated list of emails like in the image
- Save config
Troubleshooting
In case no emails are received even though a malware was found in a scan please go to the Server Settings menu and look at “Last Error Logs” for clues.
Note that the “Not Working” label will stay on the SMTP Settings Card until an email was successfully sent. This means even if an incorrect config was fixed it will say “Not working” until a test message is sent or a malware alert email was sent.
ICC API
ICC uses a REST-like JSON API which means everything one can do through the ICC GUI can also be done through the REST API.
There is no extensive documentation on the API and we reserve the right to adjust it over major releases. Also note that the REST endpoints do not go through any extensive testing. The general recommendation when scripting against the ICC is to use the Network tab in the Web Developer view in your favorite browser, do an operation manually, copy the sent JSON object and then go from there.
We will document use cases as we get customer requests for it. Below are examples of managing DataLock settings, first using curl and then a complete python script more suitable for integrating into ansible scripts and the like.
Creating DataLock flows
$ cat << EOF > flow.json
{
  "ip": "100.69.0.17",
  "description": "remote machine #1",
  "username": "remoteuser",
  "directory": "uploaddir"
}
EOF

$ curl -uadmin:pass -d@./flow.json https://icc/network_flows/ | jq
{
  "id": 25,
  "ip": "100.69.0.17",
  "username": "remoteuser",
  "description": "remote machine #1",
  "directory": "uploaddir",
  "errors": "",
  "host_key": "",
  "host_key_policy": 0
}
Uploading DataLock SSH keys
$ cat << EOF > key.json
{
  "public_key": "ecdsa-sha2-nistp256 AAAAE2VjZHNhLXNoYTItbmlzdHAyNTYAAAAIbmlzdHAyNTY
  AAABBBIEuXnWw9W6JmSTrM0F+7ig9Y3geeLtSz1i1USufphqOkVyQWZwNFu7O5ZEysWR/puGfo2uJ9W9CfhF
  b56LApMI=",
  "name": "user key #32",
  "flow_id": 25
}
EOF
$ curl -uadmin:pass -H "Content-Type: application/json" -d@key.json https://icc/ssh_keys/ | jq
{
  "id": 29,
  "created": "2023-11-22T13:56:04.473095Z",
  "public_key": "ecdsa-sha2-nistp256 AAAAE2VjZHNhLXNoYTItbmlzdHAyNTYAAAAIbmlzdHAyNTYAAA
   BBBIEuXnWw9W6JmSTrM0F+7ig9Y3geeLtSz1i1USufphqOkVyQWZwNFu7O5ZEysWR/puGfo2uJ9W9CfhFb
   56LApMI=",
  "fingerprint": "SHA256:dctaZd1ci04DoZSE9ok6q35cyqmgw+Hp2zOAPhFNaiQ",
  "name": "user key #32",
  "destination_flow": null,
  "identity": null
}
Example python script managing DataLock flows and SSH keys
Example run:
./icc_create_flow_add_keys.py admin xxxxxx 1.2.3.4 icc
[*] logged in
[*] creating new flow..
[*] created flow with id 17
[*] create a new ssh key..
[*] created ssh key, uploading key attached to flow 17
[*] ssh key uploaded succesfully with key id 18
[*] create 10 ssh keys with no flow attached initially..
[*] created 10 keys with no flow, now setting flow id on them..
[*] attached 10 keys to flow 17
Code:
#!/usr/bin/python3

import os
import sys
import json
import urllib3
import tempfile
import logging
import requests

# only ignore cert warnings if you know what you are doing
# urllib3.disable_warnings()

if len(sys.argv) < 5:
    print("./program username password proxy icc")
    sys.exit(1)

username = sys.argv[1]
password = sys.argv[2]
proxy = sys.argv[3]
icc = sys.argv[4]

if icc.startswith("http"):
    print("wrong format on icc, read the code.. ")
    sys.exit(1)

if proxy.startswith("http"):
    print("wrong format on proxy, read the code.. ")
    sys.exit(1)

proxy = f"http://{proxy}:3128"
os.environ["HTTPS_PROXY"] = proxy

icc = f"https://{icc}/"
logindata = {"username": f"{username}", "password": f"{password}"}

logging.basicConfig()

def ensureOk(resp):
    if resp.status_code != 200 and resp.status_code != 201:
        print("request failed, exiting. http status code and message is:")
        print(resp.content, resp.status_code)
        sys.exit(1)


def getcsrftoken(session):
    resp = session.get(icc)
    ensureOk(resp)
    content = resp.content.decode("utf-8")
    idx = content.find('csrfmiddlewaretoken" value="')
    idx += len('csrfmiddlewaretoken" value="')
    endidx = content[idx:].find('"')
    csrfmiddlewaretoken = content[idx : idx + endidx]
    return csrfmiddlewaretoken


def createSSHKey():
    path = tempfile.mkdtemp(dir="/tmp")
    os.system(f"ssh-keygen -q -t ecdsa -f {path}/foo -N ''")
    return open(f"{path}/foo.pub", "r").read()


try:
    session = requests.Session()
    # only ignore cert warnings if you know what you are doing
    # session.verify = False

    csrfmiddlewaretoken = getcsrftoken(session)

    logindata["csrfmiddlewaretoken"] = csrfmiddlewaretoken
    resp = session.post(icc + "login", headers={"Referer": icc}, data=logindata)
    ensureOk(resp)
    print("[*] logged in")
    cookies = session.cookies.items()
    icc_headers = {"Referer": icc, "X-Xsrf-Token": cookies[0][1]}

    print("[*] creating new flow..")
    flow = {
        "ip": "100.69.0.17",
        "description": "remote machine #1",
        "username": "remoteuser",
        "directory": "uploaddir",
    }
    resp = session.post(icc + "network_flows/", headers=icc_headers, data=flow)
    ensureOk(resp)
    tmp = json.loads(resp.content)
    flow_id = tmp["id"]
    print(f"[*] created flow with id {flow_id}")

    print("[*] create a new ssh key..")
    pubkey = createSSHKey()

    print(f"[*] created ssh key, uploading key attached to flow {flow_id}")

    # create ssh key json object
    key = {"destination_flow": flow_id, "name": "some key "}
    key["public_key"] = pubkey
    resp = session.post(icc + "ssh_keys/", headers=icc_headers, data=key)
    ensureOk(resp)
    tmp = json.loads(resp.content)
    key_id = tmp["id"]
    print(f"[*] ssh key uploaded succesfully with key id {key_id}")

    print("[*] create 10 ssh keys with no flow attached initially..")
    keys = []
    for i in range(0, 10):
        pubkey = createSSHKey()
        # create ssh key json object
        key = {"name": f"key {i}"}
        key["public_key"] = pubkey
        resp = session.post(icc + "ssh_keys/", headers=icc_headers, data=key)
        ensureOk(resp)
        tmp = json.loads(resp.content)
        keys.append(tmp["id"])

    print(f"[*] created 10 keys with no flow, now setting flow id on them..")
    for i in keys:
        resp = session.put(
            icc + f"ssh_keys/{i}",
            headers=icc_headers,
            data={"destination_flow": flow_id},
        )
        ensureOk(resp)

    print(f"[*] attached 10 keys to flow {flow_id}")

except Exception as ex:
    print("[x] unknown failure", str(ex))
Example python script uploading and enabling yara rules
Example run:
./yara.py admin xxxxxx <icc-ip> ./ny_regel.yar
[*] logged in
[*] uploading new yara rule..
[*] yara rule ./ny_regel.yar uploaded succesfully <Response [201]>
[*] now enabling it..
[*] enabled yara rule ./ny_regel.yar..
Code:
#!/usr/bin/python3

import os
import sys
import json
import urllib3
import tempfile
import logging
import requests

# only ignore cert warnings if you know what you are doing
# urllib3.disable_warnings()

if len(sys.argv) < 5:
    print("./program username password icc yara_rule.yar")
    sys.exit(1)

username = sys.argv[1]
password = sys.argv[2]
icc = sys.argv[3]
yara_rule = sys.argv[4]

if icc.startswith("http"):
    print("wrong format on icc, read the code.. ")
    sys.exit(1)

icc = f"https://{icc}/"
logindata = {"username": f"{username}", "password": f"{password}"}

logging.basicConfig()

def ensureOk(resp):
    if resp.status_code != 200 and resp.status_code != 201:
        print("request failed, exiting. http status code and message is:")
        print(resp.content, resp.status_code)
        sys.exit(1)


def getcsrftoken(session):
    resp = session.get(icc, verify=False)
    ensureOk(resp)
    content = resp.content.decode("utf-8")
    idx = content.find('csrfmiddlewaretoken" value="')
    idx += len('csrfmiddlewaretoken" value="')
    endidx = content[idx:].find('"')
    csrfmiddlewaretoken = content[idx : idx + endidx]
    return csrfmiddlewaretoken


try:
    session = requests.Session()
    # only ignore cert warnings if you know what you are doing
    # session.verify = False

    csrfmiddlewaretoken = getcsrftoken(session)

    logindata["csrfmiddlewaretoken"] = csrfmiddlewaretoken
    resp = session.post(icc + "login", headers={"Referer": icc}, data=logindata)
    ensureOk(resp)
    print("[*] logged in")
    cookies = session.cookies.items()
    icc_headers = {"Referer": icc, "X-Xsrf-Token": cookies[0][1]}

    print("[*] uploading new yara rule..")
    files = {'file': open(yara_rule,'rb')}

    resp = session.post(icc + "yara/", headers=icc_headers, files=files)
    ensureOk(resp)

    print(f"[*] yara rule {yara_rule} uploaded succesfully {resp}")

    print("[*] now enabling it..")
    data = { "enable" : f"custom/{yara_rule}" }

    resp = session.post(icc + "yara/", headers=icc_headers, json=data)
    ensureOk(resp)

    print(f"[*] enabled yara rule {yara_rule}..")

except Exception as ex:
    print("[x] unknown failure", str(ex))
-
CentOS 7.x or Fedora Linux 64-bit ↩
-
Files tagged as malicious but explicitly allowed by a file filter rule ↩
-
This can be turned off, see the Configuration chapter ↩
-
A rubber-duck is a USB device which changes its mode of operation and turn itself into a keyboard, a network device and so on ↩
-
GUI variant of SFTP tool for windows available here https://winscp.net ↩
-
To edit a station go to “View station” from the Station card ↩
-
It is important that only one rule is added at the time to make the order correct ↩